
:format(webp))
Table of Contents
Key takeaways
IPFighter provides a trusted proxy manager extension, while you can get reliable proxies with anyIP.
Adding the IPFighter Proxy Manager for your Chrome browser is free and only requires an active anyIP plan.
Choose the right proxy type for your needs – residential and mobile proxies typically offer a good balance between speed and security.
Some of the best practices include verifying your IP, DNS, and WebRTC leak protection before you start browsing or working.
IPFighter is an established proxy management tool and IP diagnostic platform. Their Chrome extension makes it easy to add, set up, and activate proxies by simply pasting in your proxy details.
You can protect your privacy much more easily, manage multiple online accounts, or scrape data without being blocked by using IPFighter. Combining a reliable proxy provider with a solid management tool is the way to go.
In this step-by-step guide, we'll show you exactly how to add the IPFighter Proxy Manager and use your anyIP proxies to power the proxy manager to protect your online operations.
How to Set Up anyIP Proxies in IPFighter
Adding anyIP proxies to your IPFighter Proxy Manager is an easy process. All you need is to have an active anyIP account with a live proxy plan and the Chrome extension. We'll walk you through 6 simple steps to get you on your way to using proxies with the IPFighter Proxy Manager.
Step 1: Generate your proxy credentials in anyIP
To start, you'll need to log in to your anyIP account, make sure you have an active plan, and create a proxy profile to obtain proxy credentials. Once you have that, simply navigate to the left side, click on Proxies, then choose the proxy profile you created, and you'll immediately see all the related details.
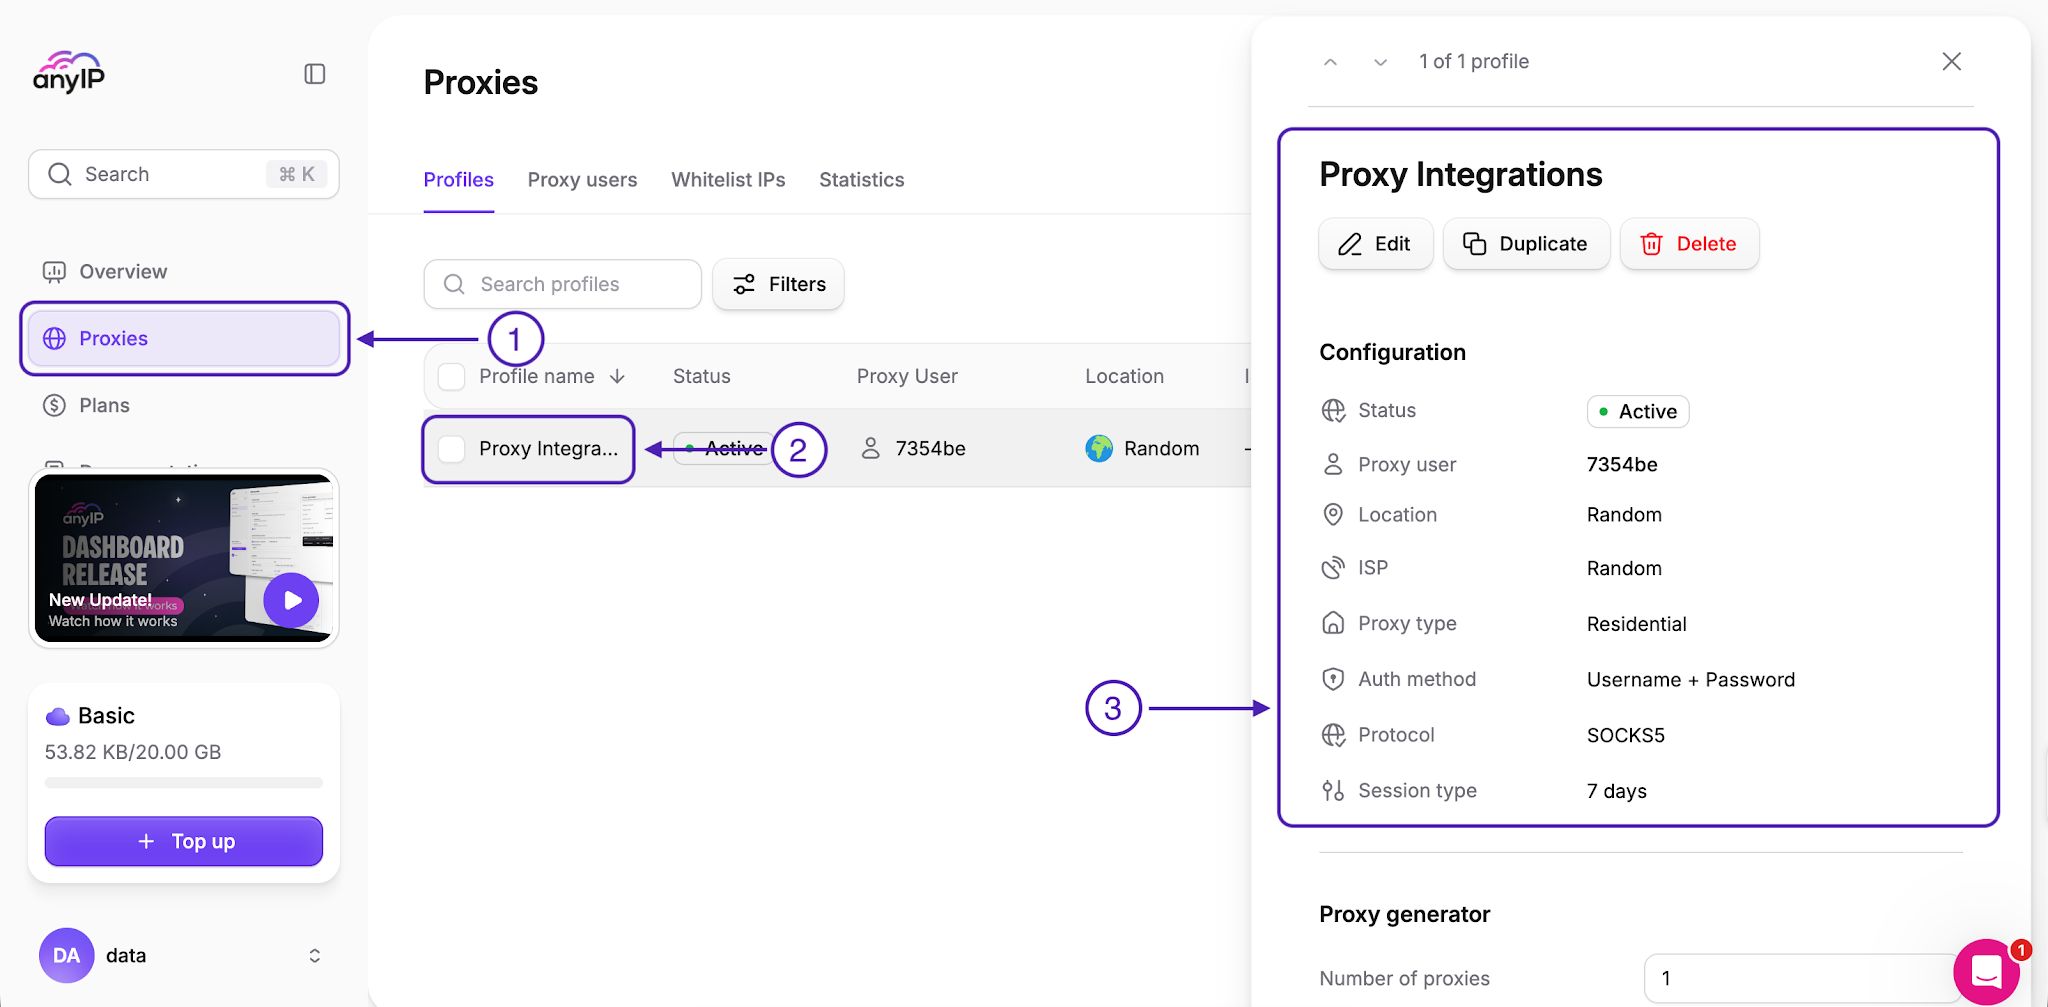
If you haven't created a profile yet – it only takes a few seconds. To do that, follow these steps:
Click on Profile and then Create Profile.
Choose your Proxy Type.
Select your Location or go with the default Random option.
Pick your Session Type, a.k.a. sticky or rotating.
Save your proxy profile, and you're done.
Step 2: Format your proxy credentials
Like most other proxy managers, IPFighter also accepts individual proxies and bulk uploads. However, to ensure the process goes smoothly, you'll need to format your proxy details correctly; the most commonly supported format is host:port:username:password.
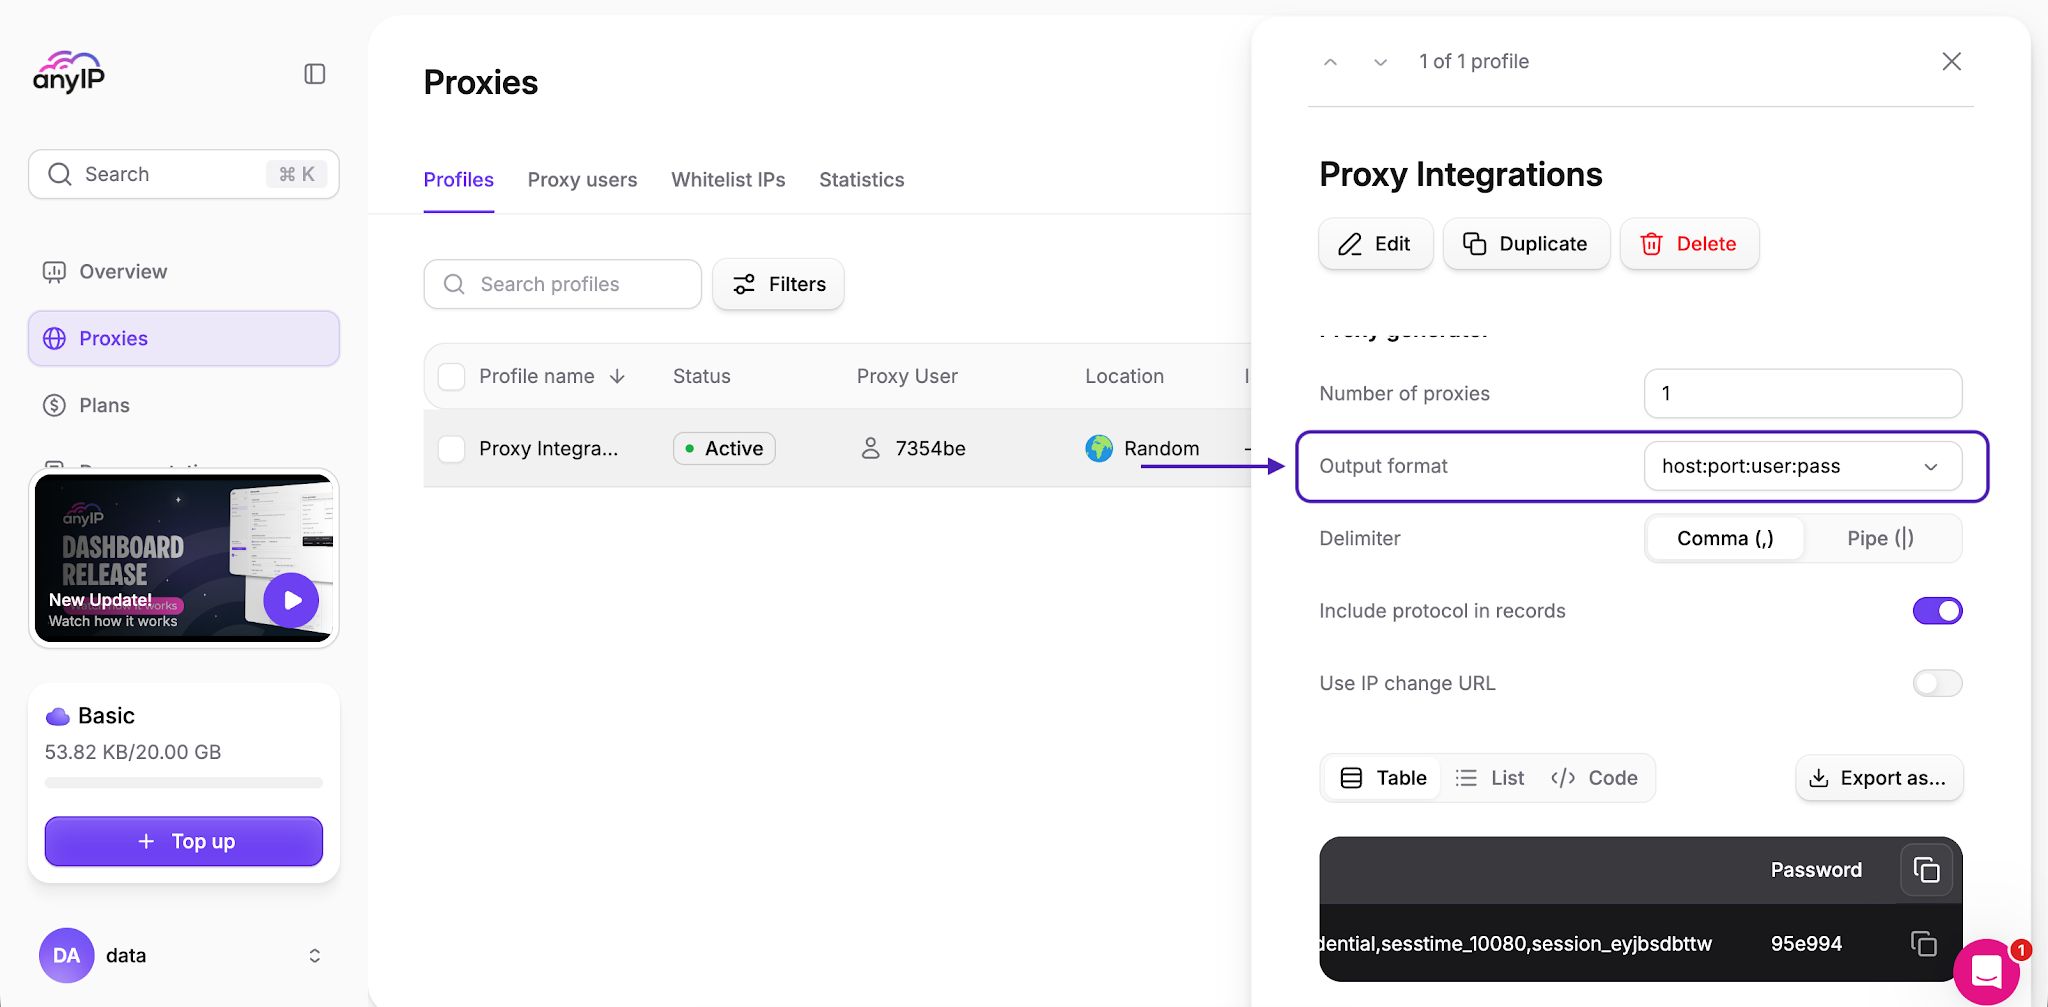
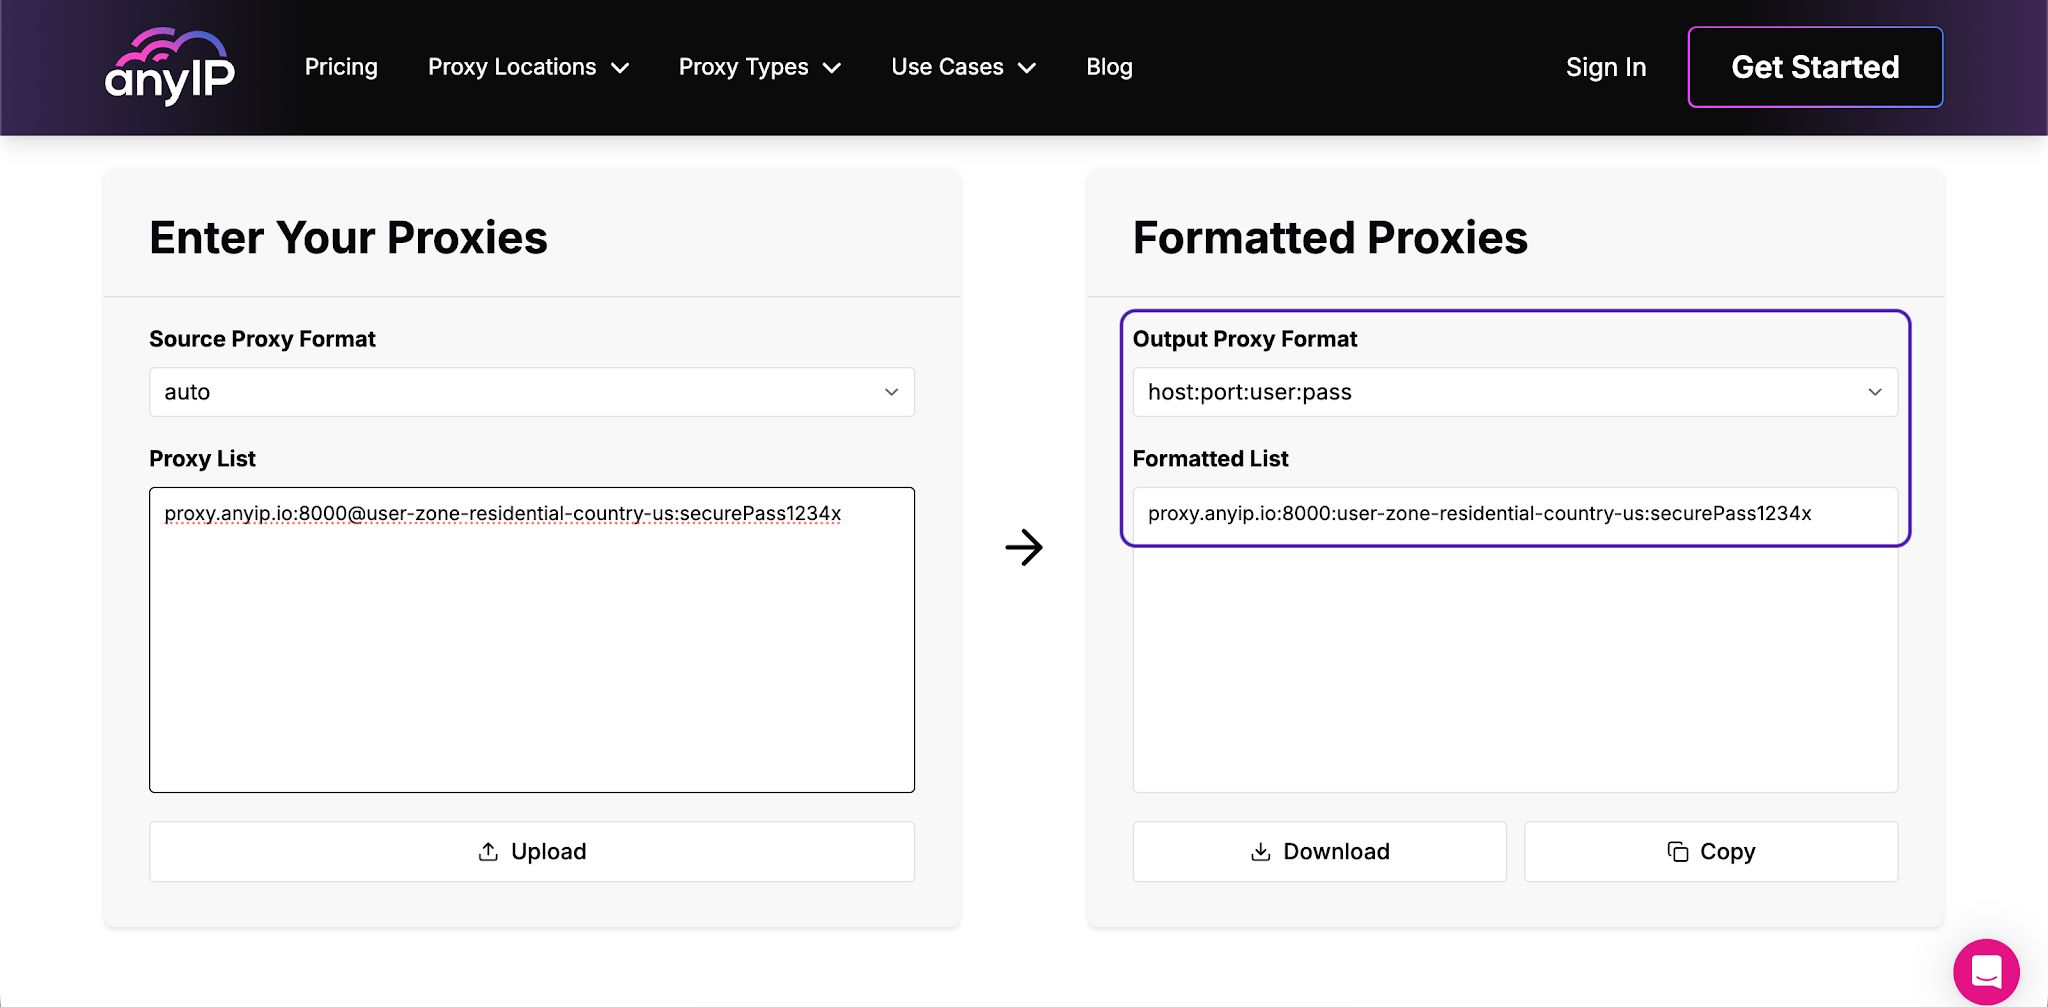
You can either choose the format by opening the Output format list, or use anyIP's Proxy Formatter tool, which instantly formats your proxy details. This is particularly useful for large sets of proxies.
For example, let's use these demo proxy credentials and format them using the host:port:username:password format. Just copy your proxy details into the formatter, and it will convert your information.
Host: proxy.anyip.io
Port: 8000
Username: user-zone-residential-country-us
Password: securePass1234x
Step 3: Install IPFighter proxy manager
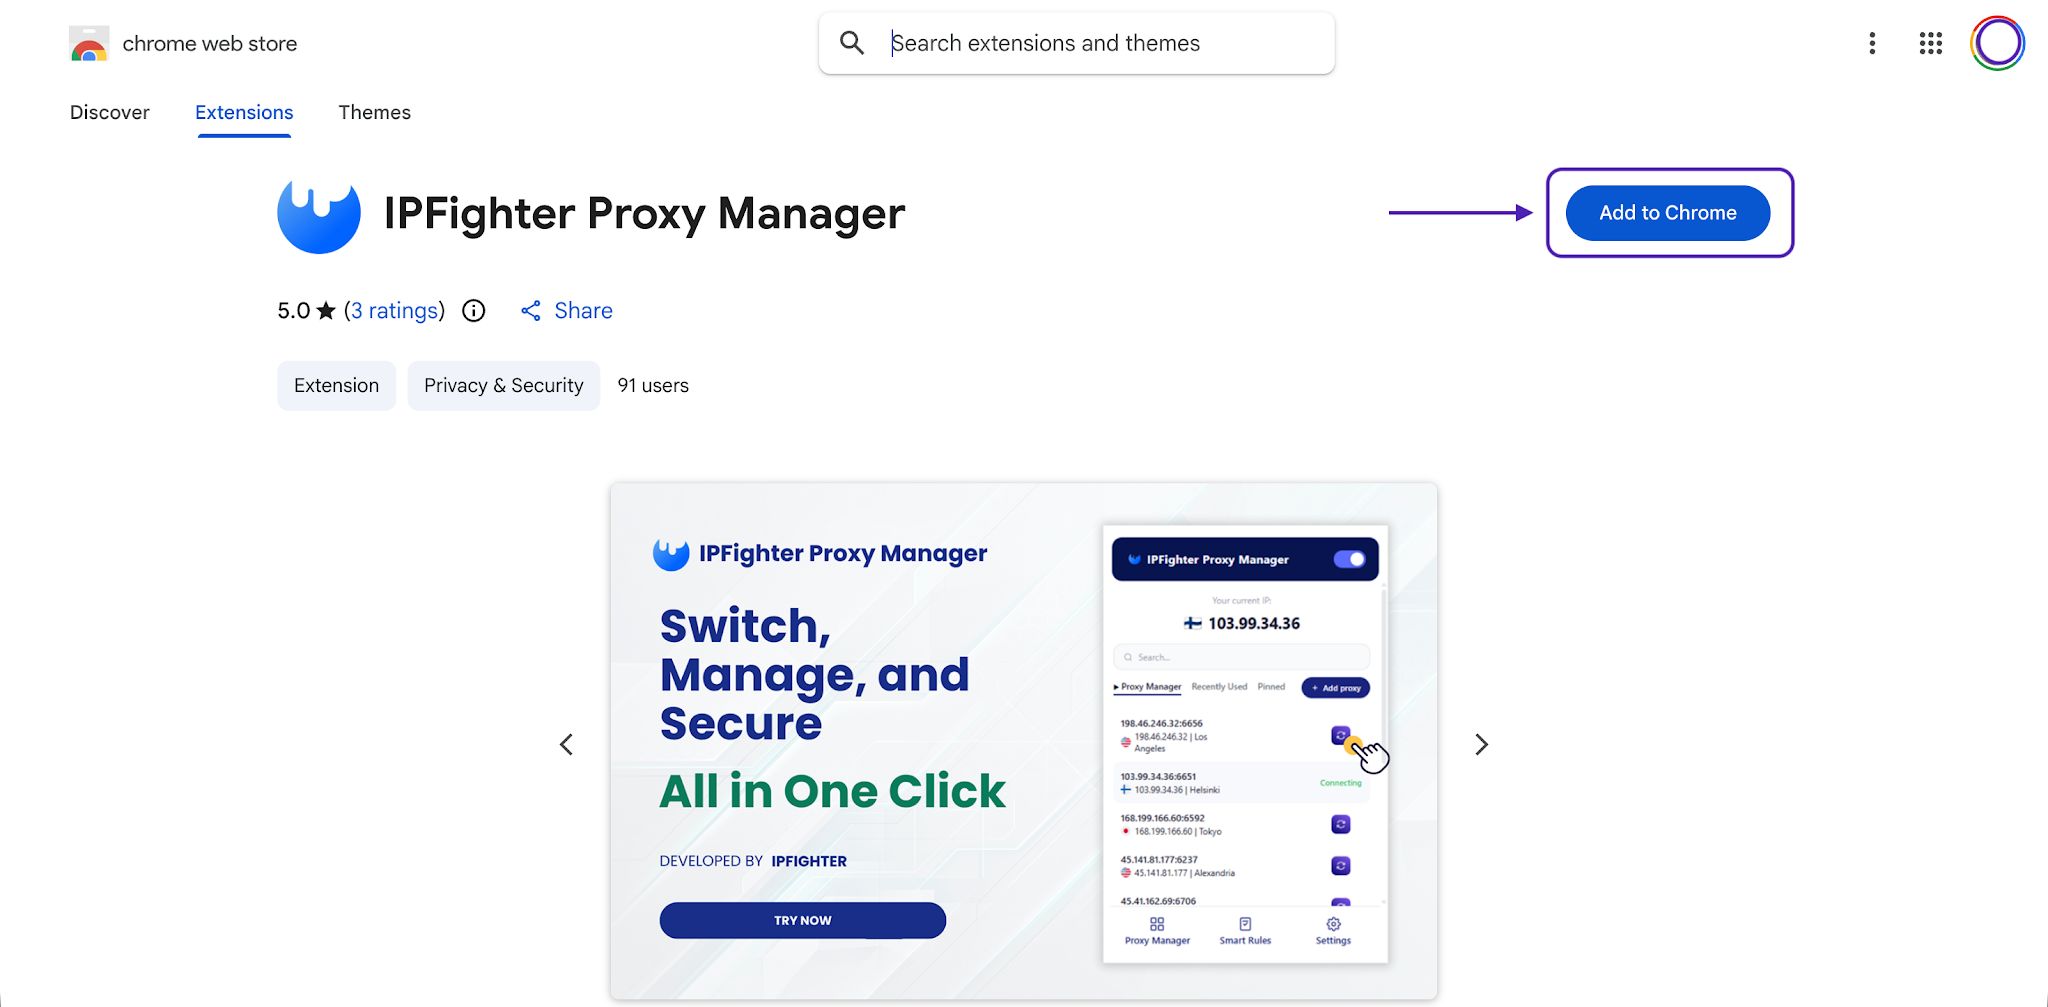
The next step is to get the IPFighter Proxy Manager from the Chrome Web Store. Once you open the extension page, click on Add to Chrome to confirm the installation.
Once the extension is added, go to the top-right corner and click the puzzle piece icon to open your extensions, then pin it so the IPFighter Proxy Manager is always visible in your toolbar.
Step 4: Add your anyIP proxy to IPFighter
Now, let’s add your anyIP proxy or proxies to the IPFighter Proxy Manager. Start by opening the extension, which will immediately show you your IP address and location. Click on Add Proxy, and you'll see an extended window where you can enter your proxy details.
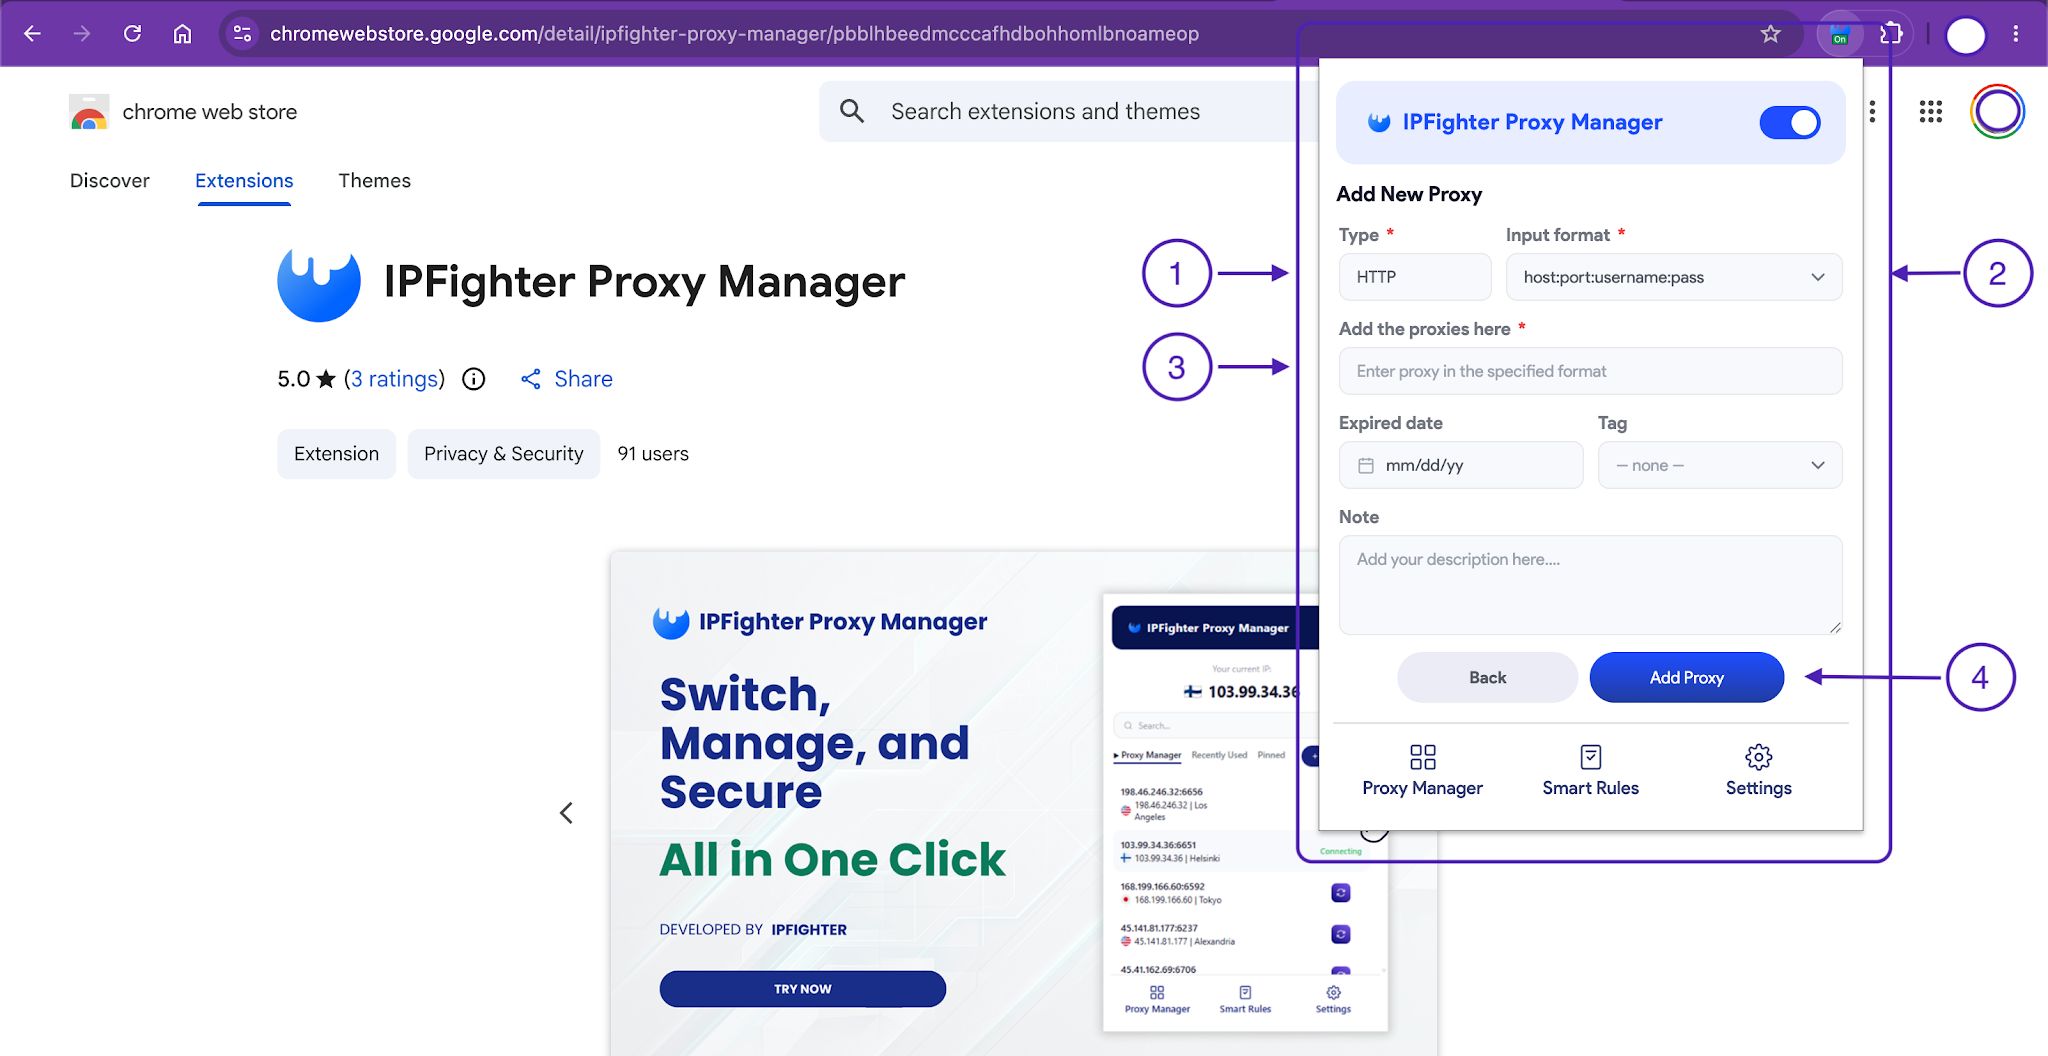
Click on Add Proxy.
Give your proxy a recognizable Name to make identification easier, especially if you'll add new proxies later on.
Select your protocol type – HTTP, HTTPS, or SOCKS5.
Copy your proxy details and paste the host, port, username, and password into the Input Format field.
Click Add Proxy.
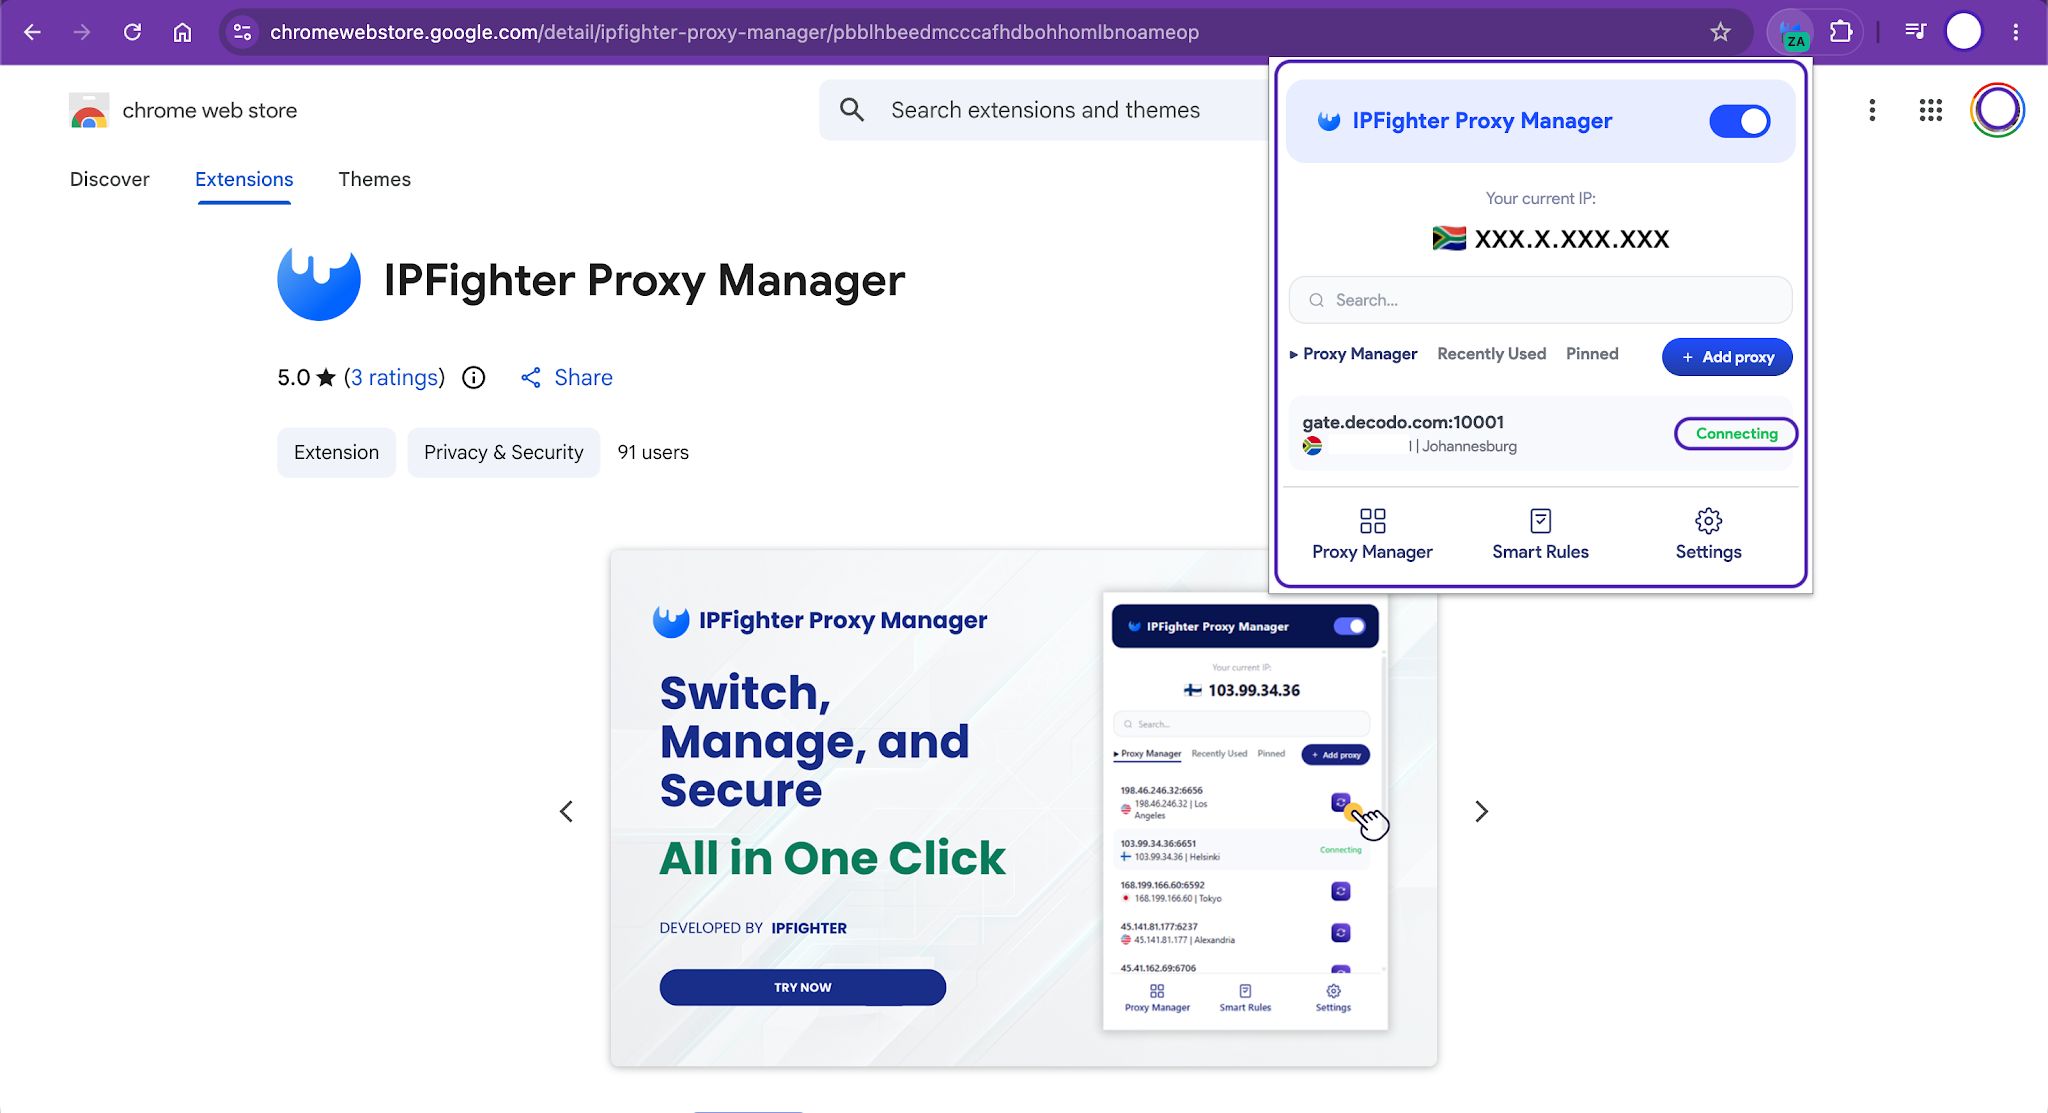
Step 5: Turn on the proxy
Once you add your proxy details, make sure to check your proxy status to confirm it's active. Typically, the newly added proxy becomes active immediately, but if not, just toggle the enable button next to the proxy.
Step 6: Confirm the IP changed
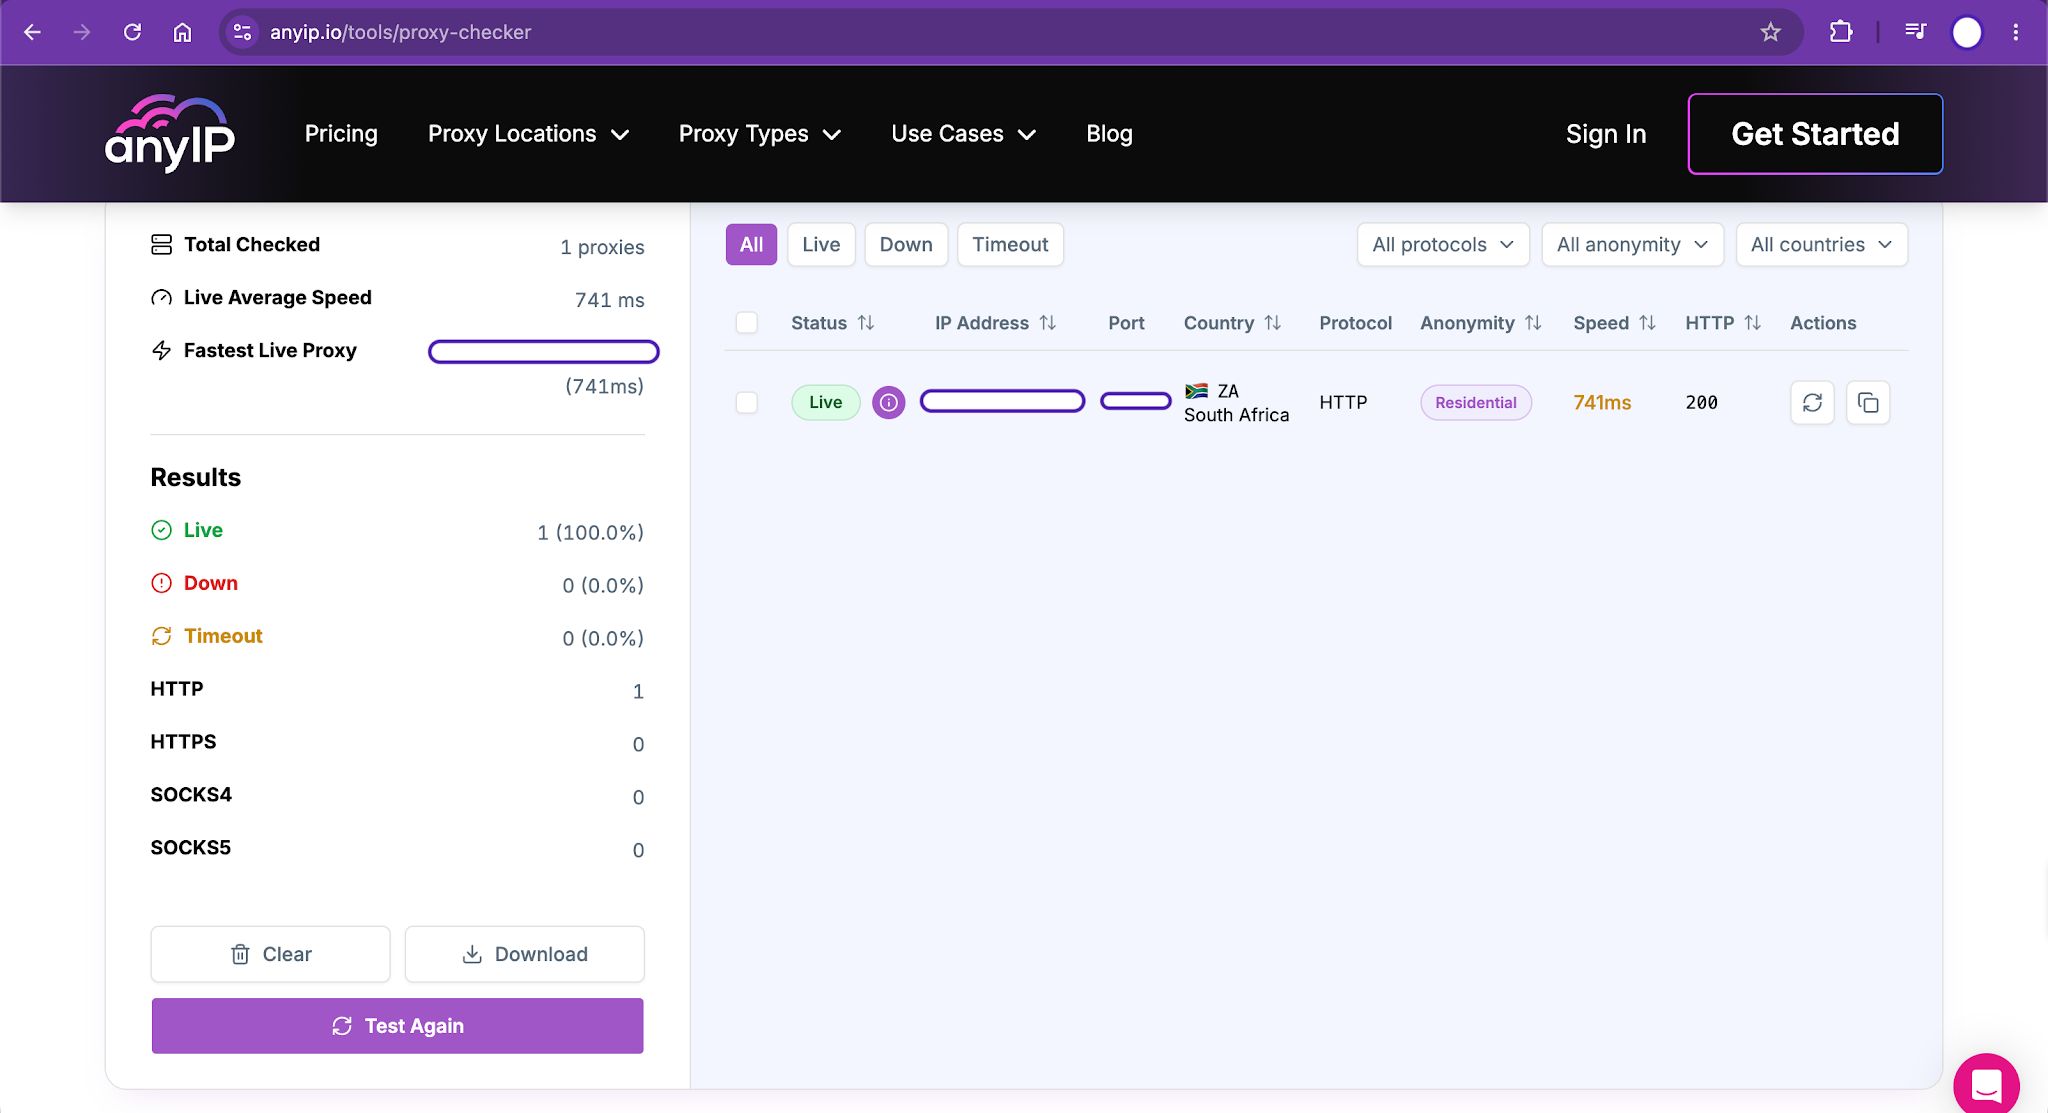
One thing to keep in mind is that it's always better to validate whether your IP address actually changed. You can quickly do that by visiting a public IP verification site like IPFighter or anyIP's Proxy Checker.
If you're opening IPFighter's website, it should show your IP address and browser fingerprint information the second you open the webpage. However, if you use anyIP's checker and paste in your proxy details, it will return a visible IP address, location, and proxy details.
A browser fingerprint is a unique identifier, or digital ID, that all devices have. The ID includes information about your web browser configurations, hardware settings, and system details to identify devices without relying on cookies.
Recommended Proxy Settings for IPFighter
IPFighter is a popular proxy manager tool, but there are a few pointers to keep in mind to make sure your IPFighter and anyIP setup is working well.
Residential vs mobile proxies
Residential and mobile proxies are some of the most popular proxy types used for many tasks online. Residential proxies use ISP-issued IPs from real devices and are great for general web scraping, high online security, and managing social media accounts.
Mobile proxies are sourced from cellular networks (3G/4G/5G), and because mobile tower IPs are shared by thousands of users, websites tend to be careful with blocking these IPs. That's why mobile proxies are mostly used for sensitive tasks.
Rotating vs sticky sessions
Rotating sessions rely on constantly changing IP addresses, which typically also have predetermined frequencies dictating how often IPs change. Key use cases include large-scale data scraping. In contrast, sticky sessions keep the same IP address for a set period and are common for sessions that require a single login.
Country and location targeting
Always match your proxy's location to the target website or the region of the account you are managing. So, if you're managing a UK PayPal account, you should use a UK proxy. Using a different location to access that account may send alerts and result in flags or blocks.
Protocol recommendation
While anyIP supports multiple protocols, we recommend HTTP for this specific IPFighter Chrome extension setup. It integrates seamlessly with browser-level extensions and handles authentication smoothly.
How to Check If Your IPFighter Proxy Is Working Safely
Now, connecting to anyIP proxies is one thing – but it's a different thing to confirm whether IPFighter is using your proxies safely. Particularly, if you're working with sensitive tasks, here's a quick checklist to go through before you start working:
Confirm the proxy is active and actually uses the proxy IP address.
Verify whether your IP location matches your target website's location.
Match your DNS servers to your proxy's country.
Check whether IPFighter's leak protection is active to prevent WebRTC from accessing your real device IP.
Make sure that your proxy timezone and language match.
While not always necessary, it's a good practice to check your IP reputation. You can easily confirm your IP score by checking proxy detection sites.
An IP score measures the credibility of IP addresses on a scale of 1 to 100 to detect associations with malicious activity, spam, or fraud.
Common IPFighter Proxy Errors and Fixes
Issues happen, but the important thing is to look for the cause. To make it easier, we've listed some of the most common causes and how to fix them.
Proxy does not connect
The most common cause for this problem is either incorrect or invalid proxy credentials. This could be a misplaced character, an empty space, or an inactive proxy. The best way to fix this issue is to always copy your proxy details and make sure proxies are active.
IP address does not change
Make sure you actually activated your proxy profile in IPFighter. If the proxy manager shows the proxy is connected, try closing your open tabs, opening a new tab, and checking the IPFighter Proxy Manager again.
Another cause could be a conflicting proxy service or an active VPN service. If that's the case, turn off these services.
Authentication popup keeps appearing
This happens when the proxy server rejects the browser's authentication. To combat this, re-enter your proxy username and password and check the status of your proxy to make sure you're not using an expired sticky session.
IPFighter says “proxy detected”
Security databases and detection systems are being updated constantly. So, if a target website flags your IP address, the best thing to do is to go back to your anyIP account and generate a new proxy profile or switch your location/session type, and try again.
WebRTC or DNS leak detected
This requires some additional configuration in the IPFighter Proxy Manager extension. Look for Block WebRTC and DNS Leak Protection options and ensure they're enabled. Also, keep an eye out for conflicting privacy extensions by going over your active Chrome extensions.
Target website still blocks the proxy
Some sites have incredibly strict security. If you're using datacenter proxies, you might see IP flags more frequently. If your residential proxies get blocked, try switching to a mobile proxy. Alternatively, use sticky sessions to maintain a stable identity, ensure your proxy location matches the site's region, and slow down your browsing speed so you don't look like a bot.
Get a proxy now with anyIP
Proxy manager extensions are amazing tools – but their success depends on the proxies you use. anyIP offers affordable and high-speed proxies with over 100M residential IPs from verified devices around the world. Check anyIP's pricing and get your proxies today, plug them into your IPFighter Proxy Manager extension, and secure your internet connection.