

Table of Contents
Key takeaways
BitBrowser supports HTTP, HTTPS, SOCKS5, and SSH, and anyIP residential proxies and mobile proxies work over HTTP, HTTPS, or SOCKS5 on the same port.
You can attach a proxy to a profile through custom manual entry, API extraction, or a saved proxy management list.
The built-in proxy detection check confirms whether your proxy connection successfully passes traffic before you launch the browser window.
If you handle large proxy lists, you can paste them into Batch Add or create profiles with proxies attached from BitBrowser’s Excel template.
BitBrowser sets the timezone, language, and geolocation to match the proxy by default, so you only need to check them against the IP location.
BitBrowser is an anti-detect browser that isolates each account in its own browser profile, with a separate fingerprint and proxy. This BitBrowser proxy integration guide picks up after you download BitBrowser and shows how to integrate proxies from anyIP into those profiles, check the connection, and add proxies in bulk.
How To Configure My Proxy On BitBrowser
Step 1: Get Your anyIP Proxy Credentials
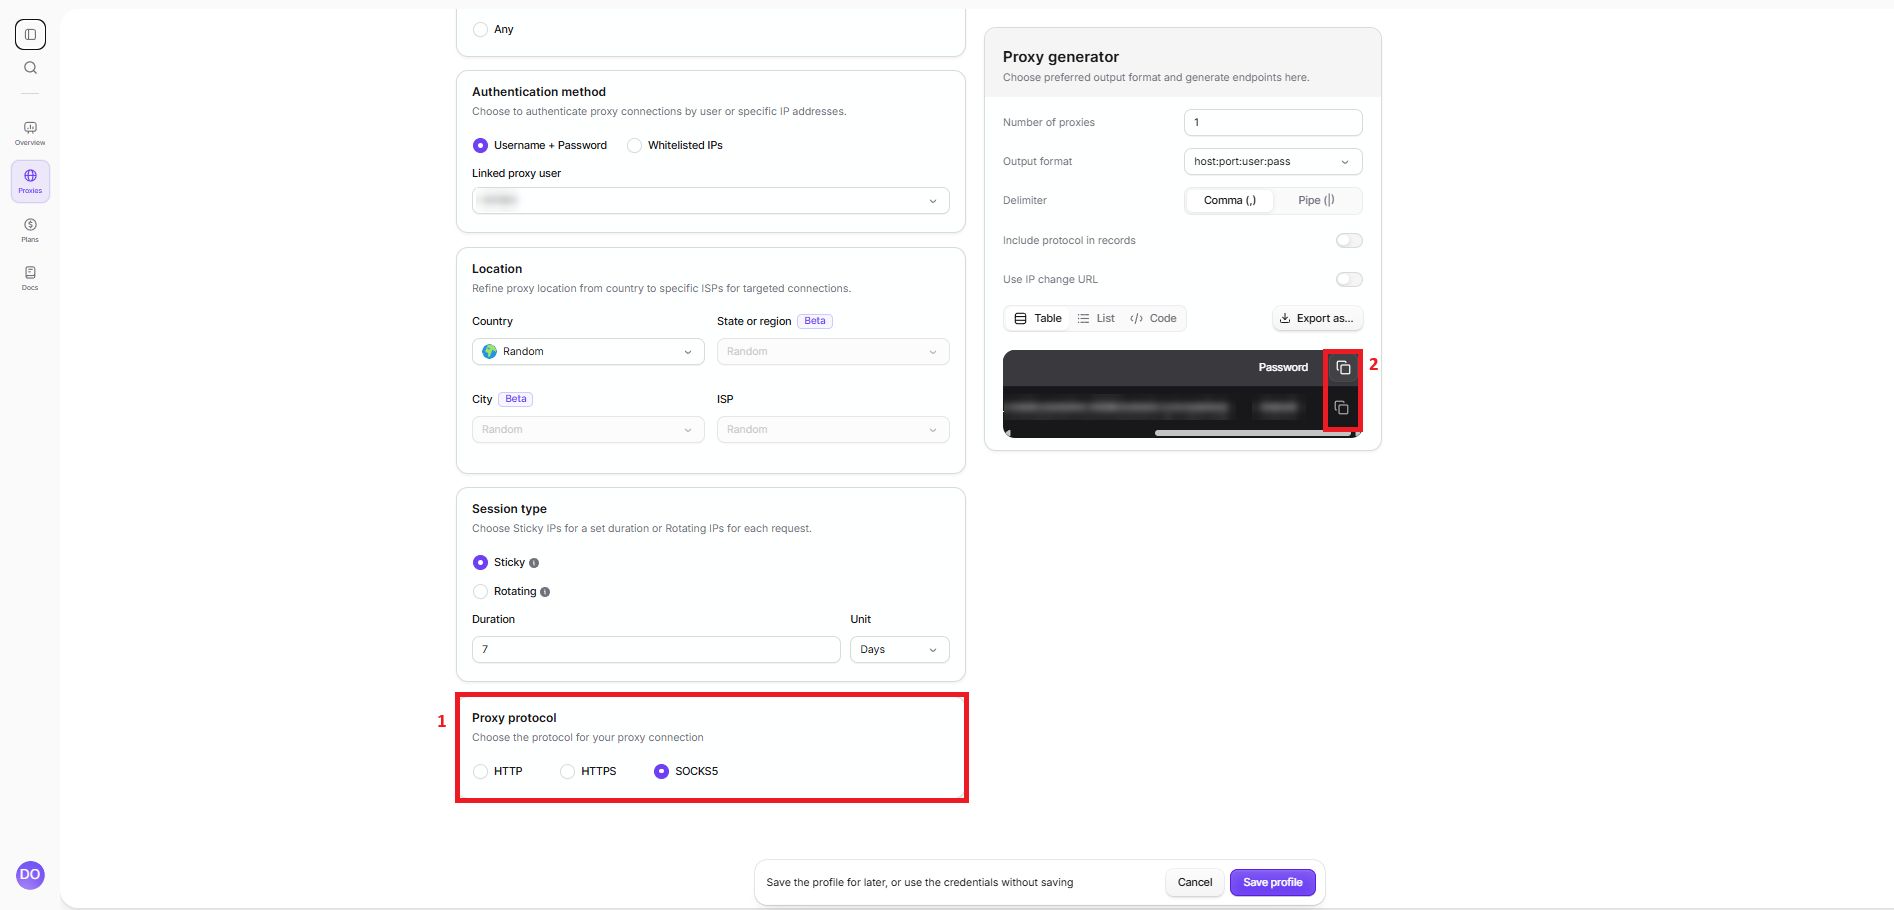
Before configuring your BitBrowser account, log into the anyIP dashboard, open the Proxies page, and click + Add Profile. Pick residential or mobile, the country, and the protocol, turn on a sticky session, click Save profile, and copy the host, port, username, and password.
Any of anyIP’s three protocols will work here, since HTTP, HTTPS and SOCKS5 all run on the same port. For an anti-detect browser, go with SOCKS5. When you copy the username, take all of it: the flags after user_XXXX are where your country and session settings live.
Step 2: Open BitBrowser and Create a Profile
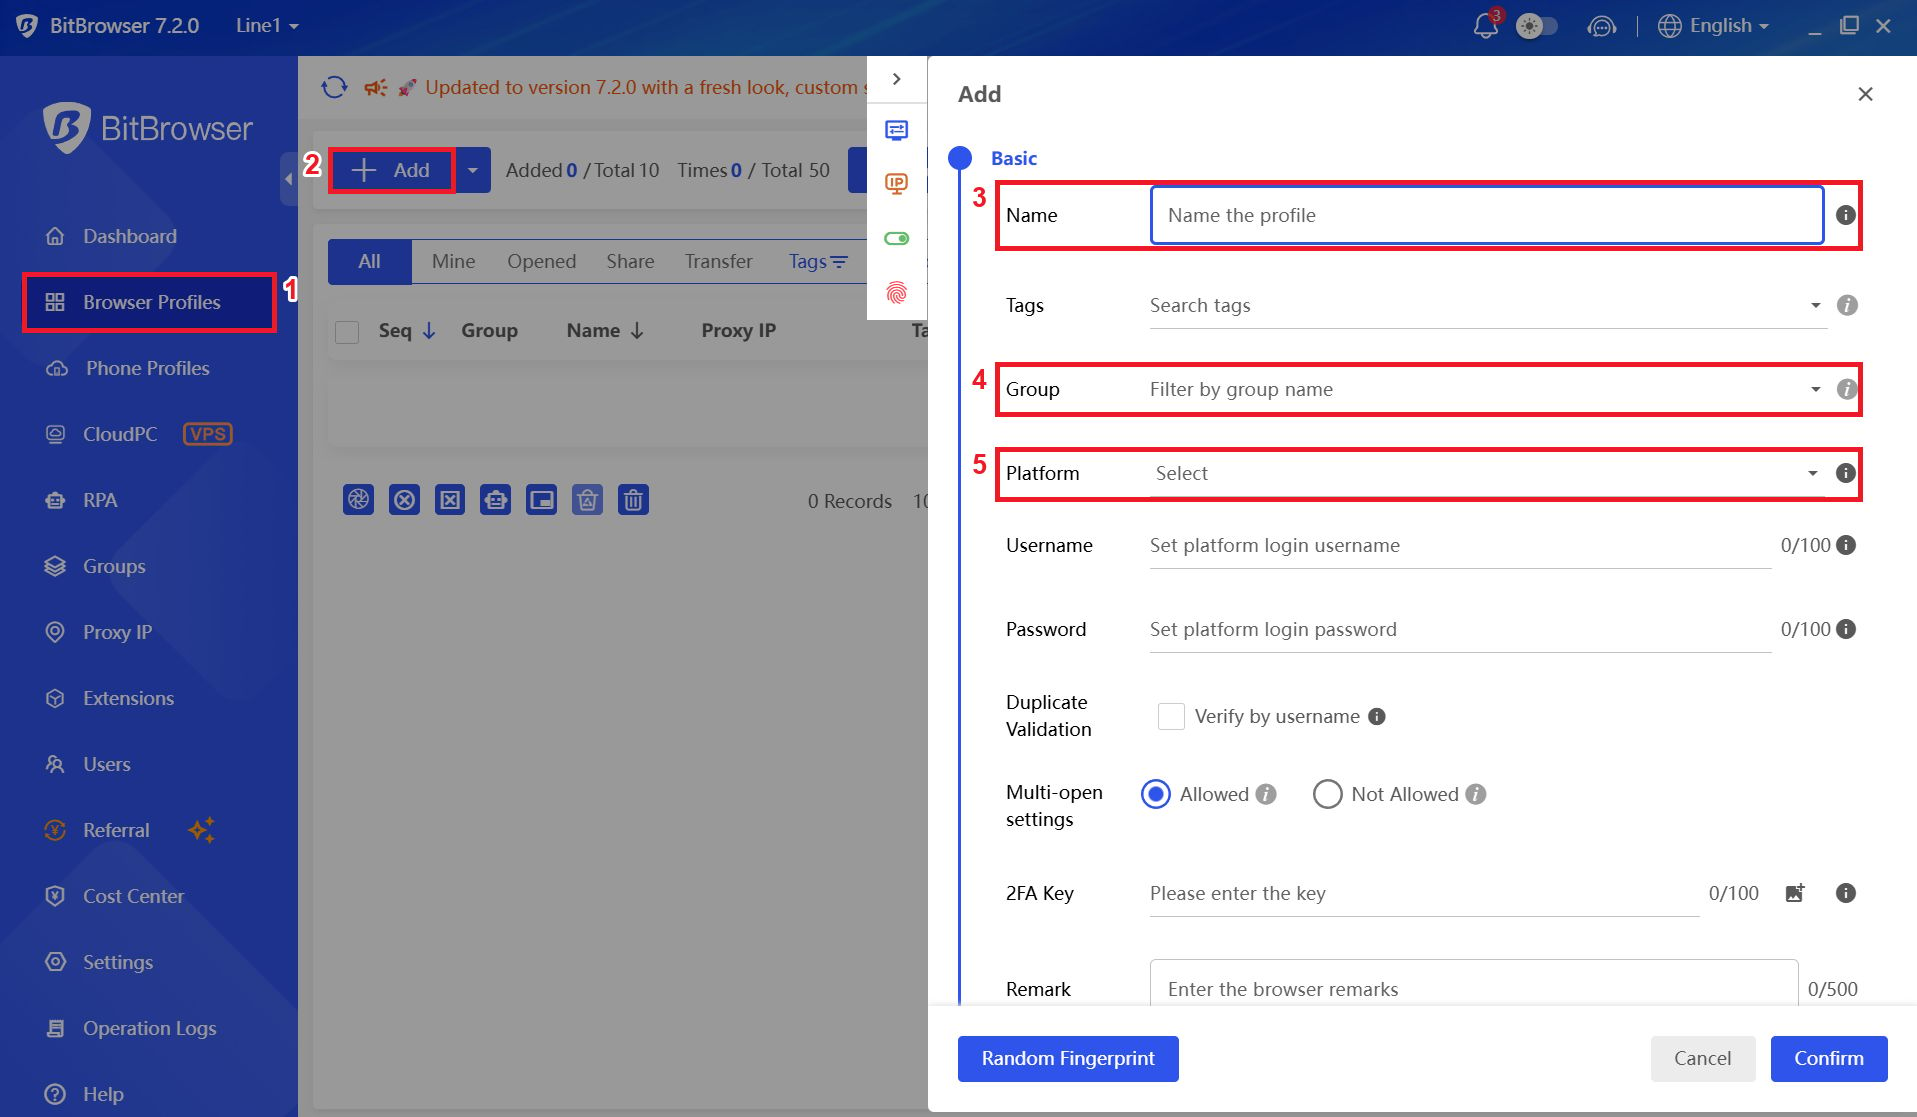
After you download BitBrowser and launch the desktop client, open Browser Profiles in the left sidebar, and click Add to open the form for a new browser profile. Fill out the basic fields: the profile name, the group, and the platform, which is the website the profile opens at launch.
Leave the other fields empty for now; the operating system sits further down the form, with the fingerprint values. Every BitBrowser profile runs independently, so the proxy you set in the proxy configuration section next applies to this profile only.
Step 3: Enter Your anyIP Proxy Details
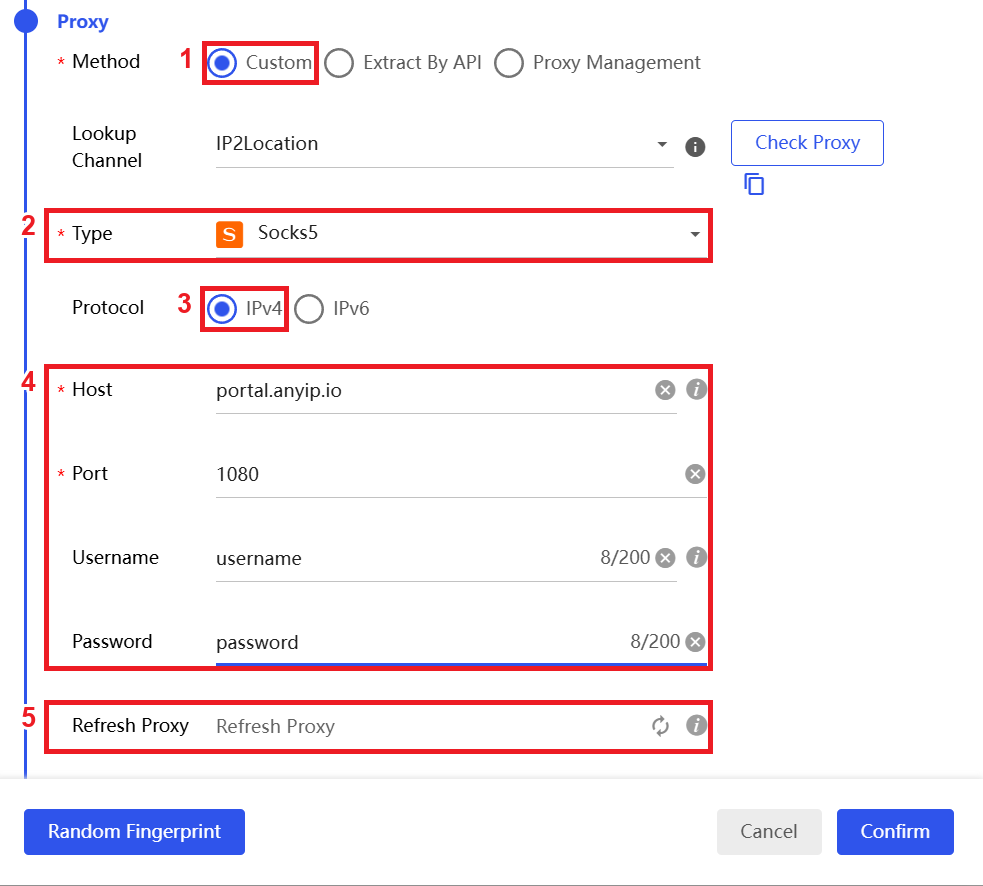
Use Custom, the single-setup option, to enter your anyIP details. BitBrowser’s other two ways to assign an IP are Extract By API, for providers that issue IPs through an extraction link, and Proxy Management, for a saved list you plan to reuse.
If you want to take the Custom path, the form presents the fields in a specific sequence: the proxy method, the lookup channel, the proxy type, and the protocol (IPv4 or IPv6) before you paste the host, port number, username, and password.
Select Custom, set the type to SOCKS5 (HTTP works too), and leave the protocol on IPv4. Then enter portal.anyip.io as the host and 1080 as the port, or 443 if your network blocks 1080. The username is the full one from your anyIP profile, and the password is your proxy password.
To get a new IP without editing the username, turn on Use IP change URL in your anyIP profile, copy the URL it shows, and paste it into the Refresh Proxy field in BitBrowser’s proxy settings. The refresh icon in the profile list then switches that profile to a new IP with the same country and proxy type.
Step 4: Run the Proxy Detection Check
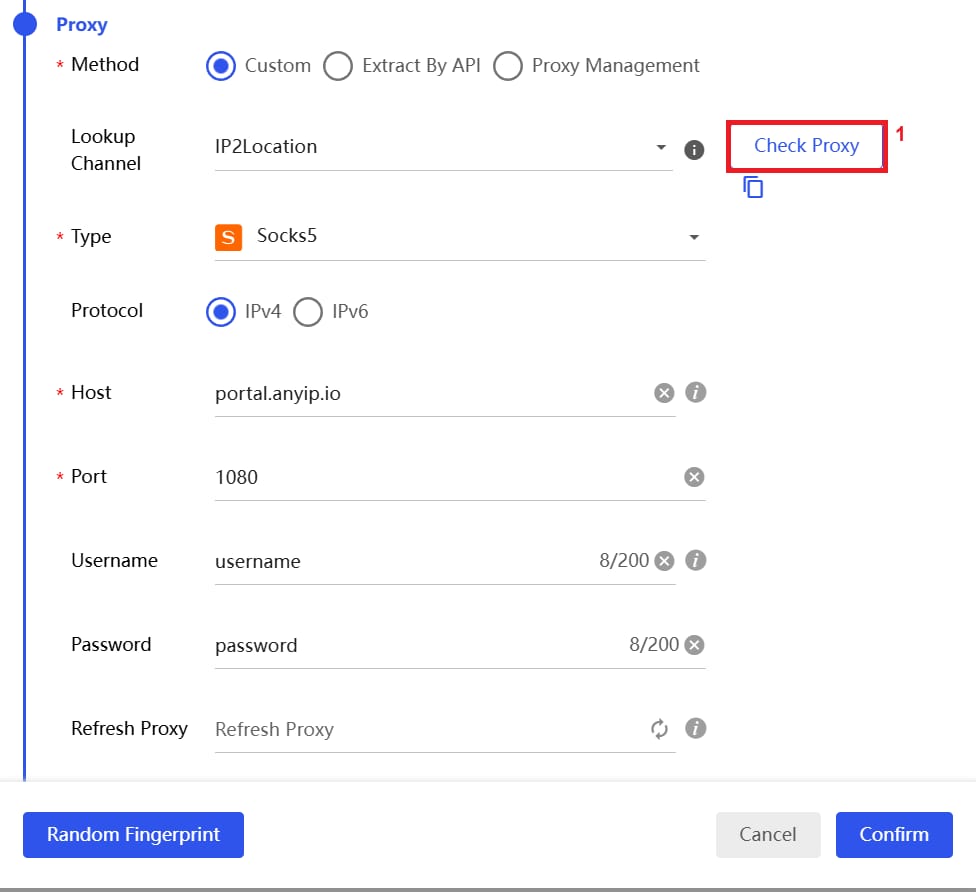
Click Check Proxy (top right of the proxy section) before you save anything. A working proxy comes back with its IP and internet service provider, plus the location and latency.
A failed check is usually something small. Look for a typo in the credentials, a username that lost its flags, or details in the wrong fields. If those are fine, the proxy user may be disabled, or the plan may be expired or out of traffic. On IP whitelisting, make sure you’re using your assigned port and that your current IP is saved in the dashboard.
Step 5: Check the Fingerprint Settings
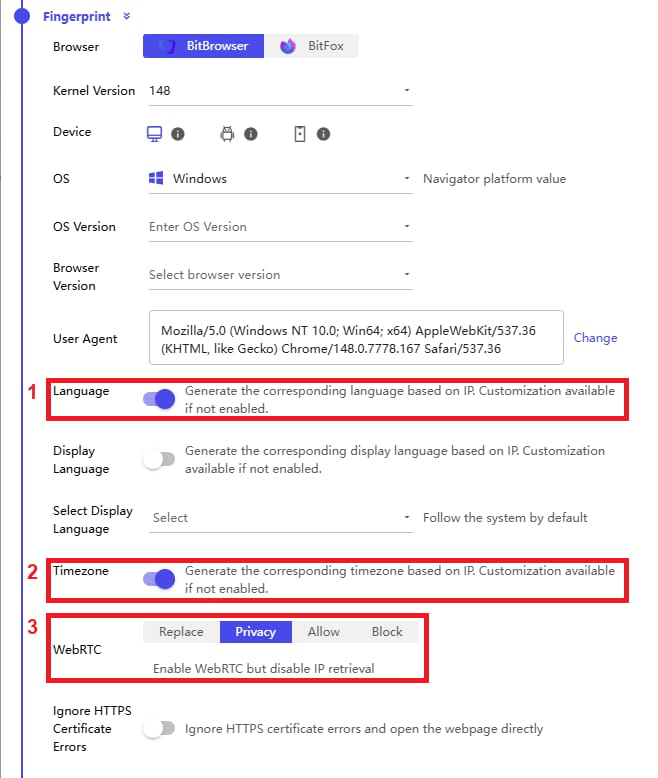
BitBrowser builds the IP-based parts of the digital fingerprint from the proxy in use, so you’re checking what it generated, not building one by hand.
Look at the values that must follow the IP, such as the timezone, the language, and the geolocation, and confirm that each one matches the location the detection check reported in step 4. Keep WebRTC on Replace or Privacy, so it doesn’t expose your real IP address.
Leave the user agent, canvas, WebGL, audio, fonts, and resolution on their default values, because changing them by hand often makes the fingerprint less consistent than the values BitBrowser generated.
Step 6: Launch the Profile and Verify
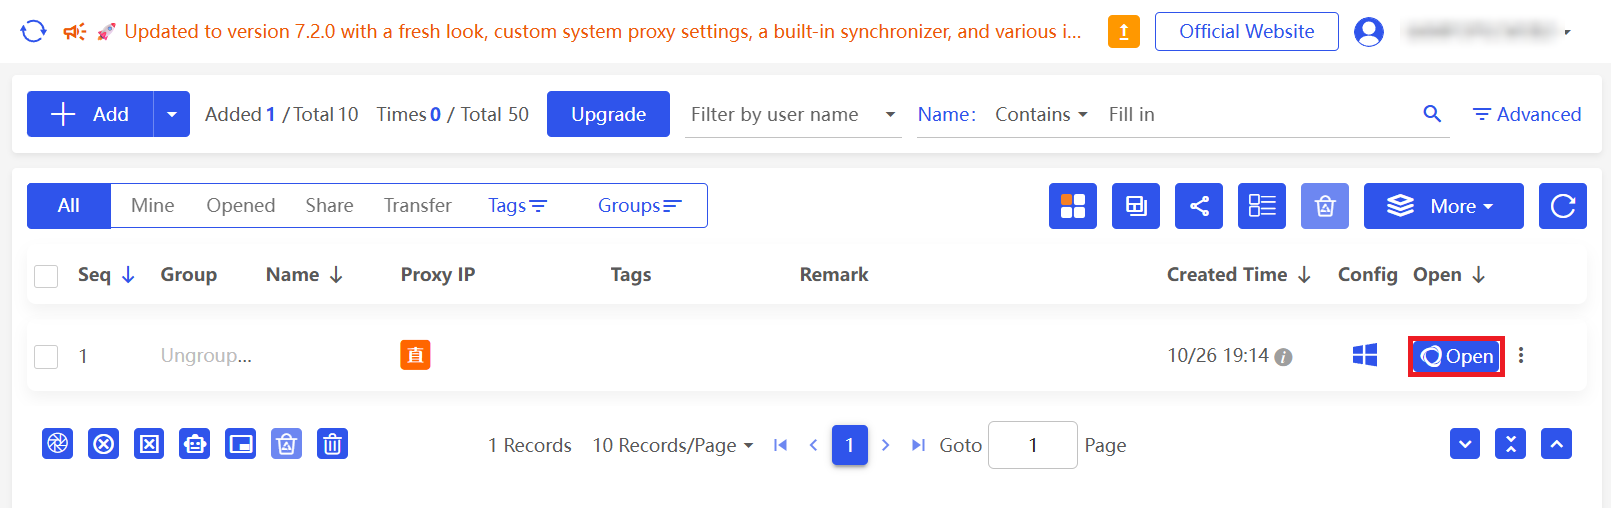
Click Confirm to save, then Open to launch the profile in a new window, and load an IP-check site like WhatIsMyIPAddress. You want to see the proxy IP and the location from step 4 there, not your real IP address. An IP that changes on every refresh means the username is missing its session ID.
How To Add Multiple Proxies in BitBrowser
If you manage multiple accounts within each platform’s terms, you can load proxies in bulk two ways, and which one fits depends on the shape of your proxy data.
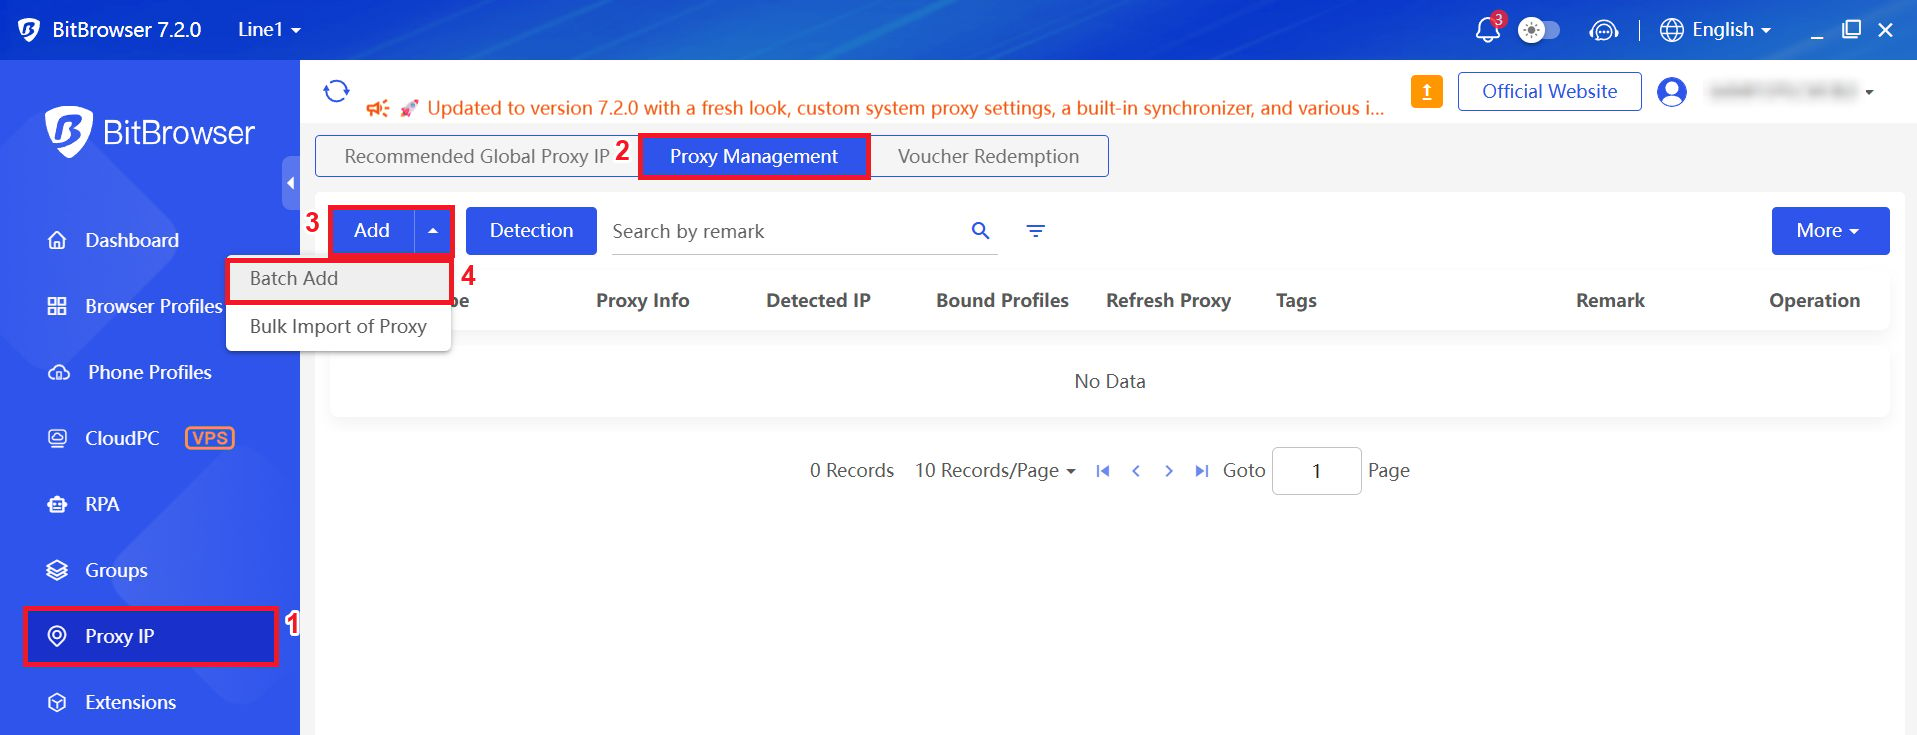
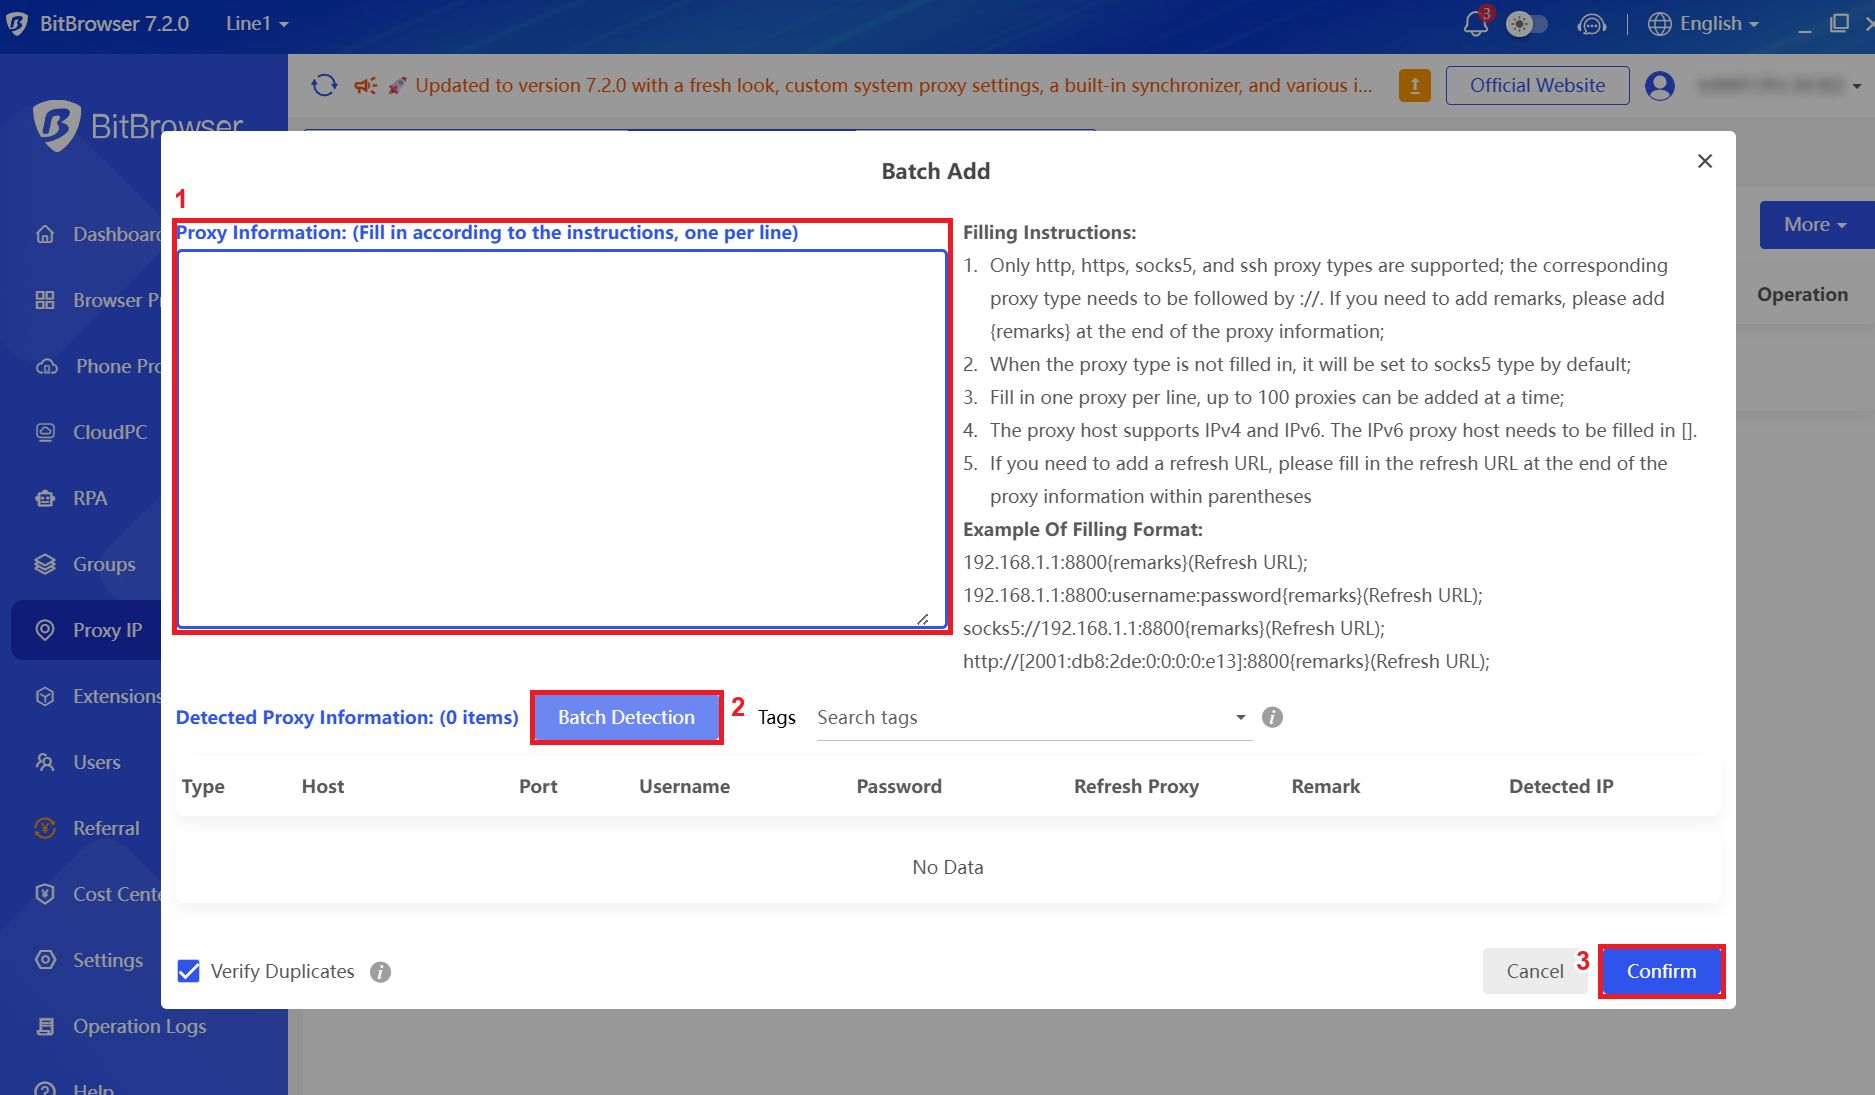
For a saved list you can reuse, go to Proxy IP, then Proxy Management, and select Batch Add from the Add menu, then paste your proxies in. If you’d rather create the profiles and their proxies in one go, the Browser Profiles page has Batch Import, which works from a downloadable Excel template.
The template takes the proxy type as http, https, socks5, or ssh (anyIP works with the first three) and the proxy details as Host:Port:Username:Password. Batch Add takes the same lines, one per line, and treats a line without a type prefix as SOCKS5. An IP change URL goes at the end of a line, in parentheses.
anyIP’s Proxy List Generator outputs lines in this format, each with its own session ID, so you can paste them straight in:
portal.anyip.io:1080:user_XXXX,type_residential,country_US,session_profile01:PASSWORD
portal.anyip.io:1080:user_XXXX,type_residential,country_US,session_profile02:PASSWORD
Run a batch detection on the saved list before you assign any of it, so you’re only configuring proxies that passed the check. Then bind each saved proxy to a browser profile from the list, or pick it from your saved proxies when you create the profile.
Conclusion
In practice it’s one rule: every BitBrowser profile uses the same anyIP host, port and password, and only the session ID in the username changes, which gives each profile its own sticky IP. Check the proxy before you launch, and switch to Batch Add or Batch Import once you’re setting up profiles by the dozen.
Frequently Asked Questions
Which proxy type works best in BitBrowser?
Residential proxies are the best default for most browser profiles. They come from home connections, so their IP reputation is stronger than a datacenter range’s, and they handle web scraping and other data collection well. On platforms that look harder at IP quality, switch to mobile proxies.
Do I need a separate proxy for each BitBrowser profile?
Yes, each browser profile should use a specific IP address. With anyIP, you don’t need separate credentials for that: add a different session ID to the username for each profile, such as session_profile01 and session_profile02, and each profile keeps its own sticky IP for up to 7 days.
Why is my proxy failing the BitBrowser proxy detection test?
The proxy check usually fails because of mistyped credentials, a username without its flags, the wrong port, a disabled proxy user, or an expired plan or exhausted traffic allowance. anyIP uses port 1080 or 443 with a username and password, and a port from 2000 to 2999 with IP whitelisting.
Does BitBrowser support SOCKS5?
Yes. BitBrowser supports HTTP, HTTPS, SOCKS5, and SSH, and you pick one in the Type field of the proxy section. anyIP accepts SOCKS5 as well as HTTP and HTTPS on the same port, 1080, and SOCKS5 is its preferred option for anti-detect browsers.
Can I import a list of proxies into BitBrowser?
Yes, you can bulk import them. Paste up to 100 proxies at a time, one per line, into Batch Add under Proxy IP, or create profiles with proxies attached through Batch Import and BitBrowser’s Excel template. anyIP’s Proxy List Generator builds the list for you, with a different session ID on each line.
Should I change the time zone to match my proxy?
Usually not. By default, BitBrowser generates the time zone, language, and geolocation from the proxy’s IP address, and WebRTC doesn’t expose your real IP address. Check these values once against the detection result, and change them by hand only if they don’t match.
Can I use one proxy across several profiles?
Yes, you can bind one saved proxy to several profiles in BitBrowser. The catch is that they’ll share an IP, so they’re no longer fully separate. With anyIP, keep the same credentials and give each username its own session ID, and every profile gets its own IP.