
Ghost Browser Proxy Integration: Ultimate Guide
Table of Contents
Table of Contents
Key takeaways
Ghost Browser boosts productivity and supports simultaneous multiple account management.
The Ghost Proxy Control extension manages proxies for tabs, workspaces, or identities.
Proxies can be added individually or in bulk, offering organization with custom tags.
WebRTC issues in Ghost Browser can be fixed by disabling WebRTC in privacy settings.
Ghost Browser enhances efficiency for web professionals with proxy and privacy features.
Ghost Browser is a productivity powerhouse, but to unlock its full potential for anonymized browsing and bypassing restrictions, you will need to tackle the proxy setup.
Those advanced settings can be challenging, but fear not! This guide will be your roadmap to configuring and using proxies seamlessly within Ghost Browser.
As proxy experts, we are always eager to extend and share our knowledge. You can trust that every guide we provide is made to help you acquire new technical skills.
In the following article, in less than 10 minutes, you will learn to configure a proxy on a new browser.
Exciting, right?
What is Ghost Browser?
Here is a small review for those who don’t know Ghost Browser.
First of all, it not an anty detect browser. It’s a web browser based on Chromium. It aims to boost your efficiency and privacy. Here's a quick rundown of the main features:
Focus on Web Professionals: They can manage many accounts on their favorite websites simultaneously in one window.
Organized Workspace: Keep tasks, bookmarks, downloads, and history neatly arranged in a handy sidebar.
Privacy-Centric: No activity tracking and open-source development for better security.
Built on Chromium: Familiar base for a smooth transition from your current browser and the option to install your favorite Chrome extension.
Without further ado, let's jump right into the guide!
What do you need?
In addition to installing Ghost Browser on your computer, you’ll need to have your proxy credentials ready to use to follow this guide.
💡 You don’t have any proxy credentials?
Create your account in less than 5 min on anyIP.io to enjoy a high-quality proxy.
Our 24/7 support team will be available to answer all your questions and help you configure your proxy.
How to configure a proxy on Ghost Browser
Ghost Browser is based on Chromium. You may be tempted to use a popular Chrome extension to connect your proxies. While this solution will work, you’ll not embrace the full power of Ghost Browser.
Let me present you “Ghost Proxy Control.” It's a dedicated extension for Ghost Browser. It lets you manage your proxies and assign them to your tab, workspace, or identity (depending on your subscribed plan).
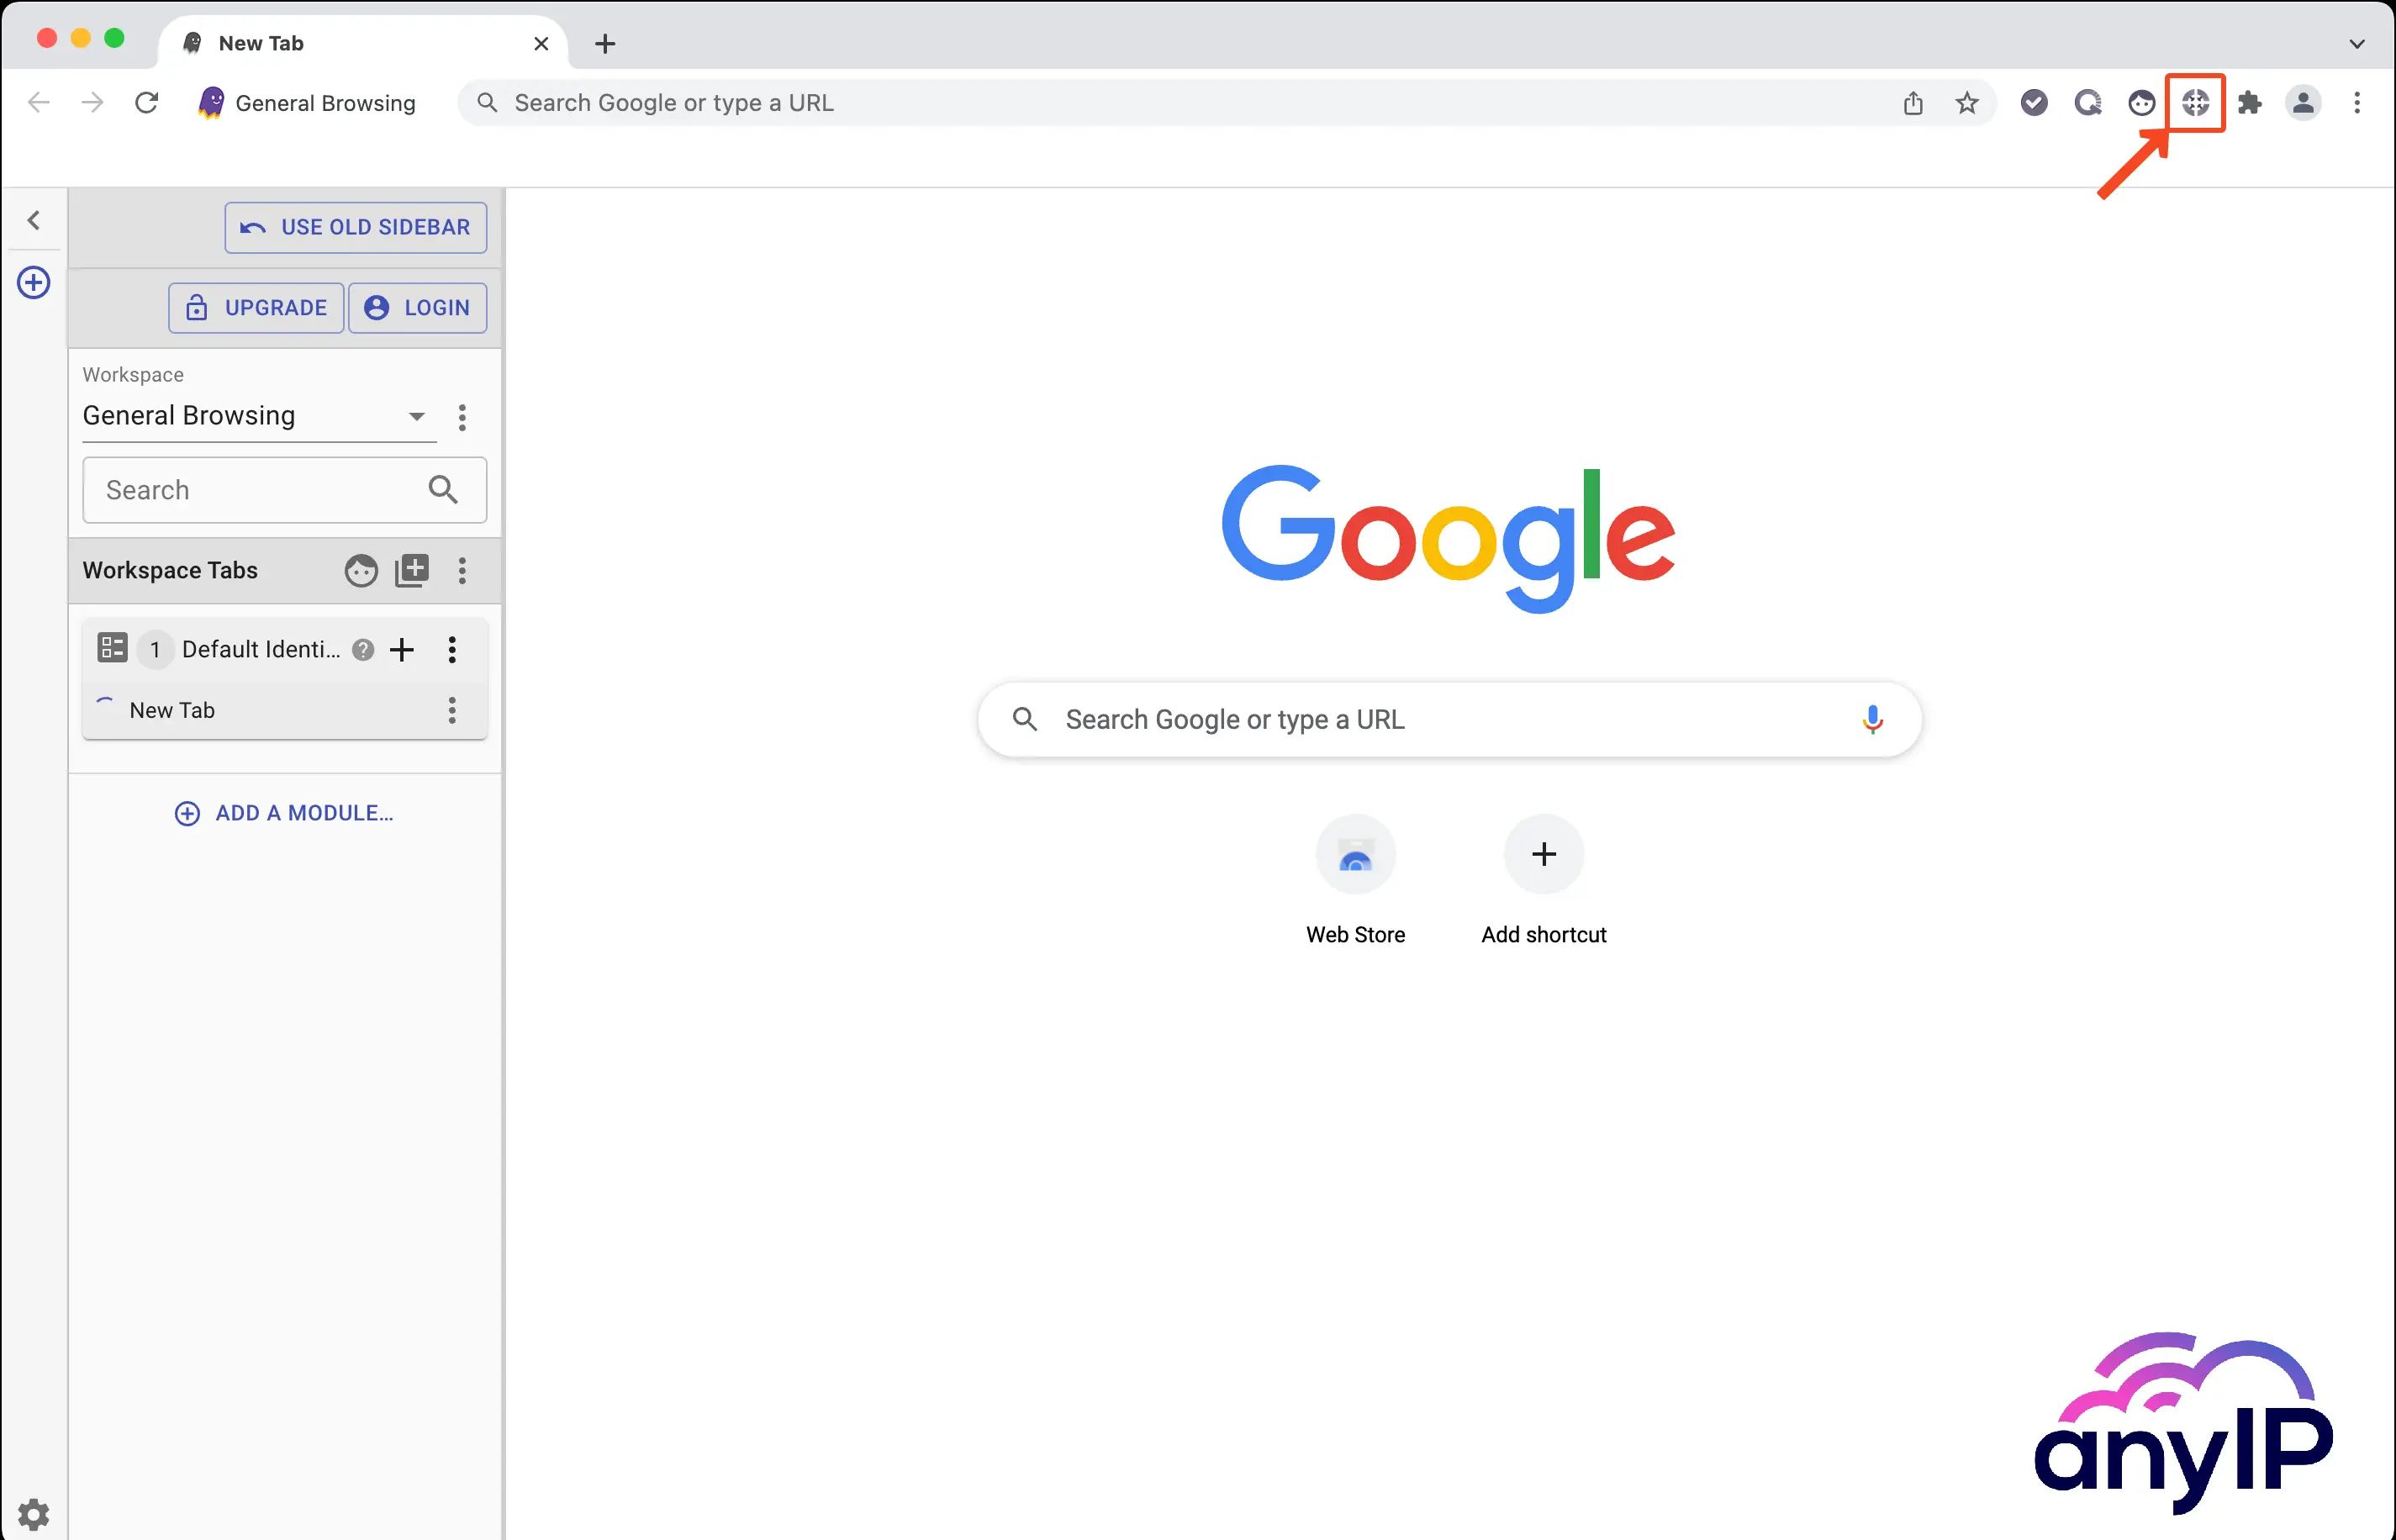
Opening the Ghost Proxy Control extension
Ghost Browser allows you to configure HTTP, HTTPS, and SOCKS5 proxies.
To open the Ghost Proxy Control extension, you can click on this icon:
Then click on ”Add/Edit Proxies.”
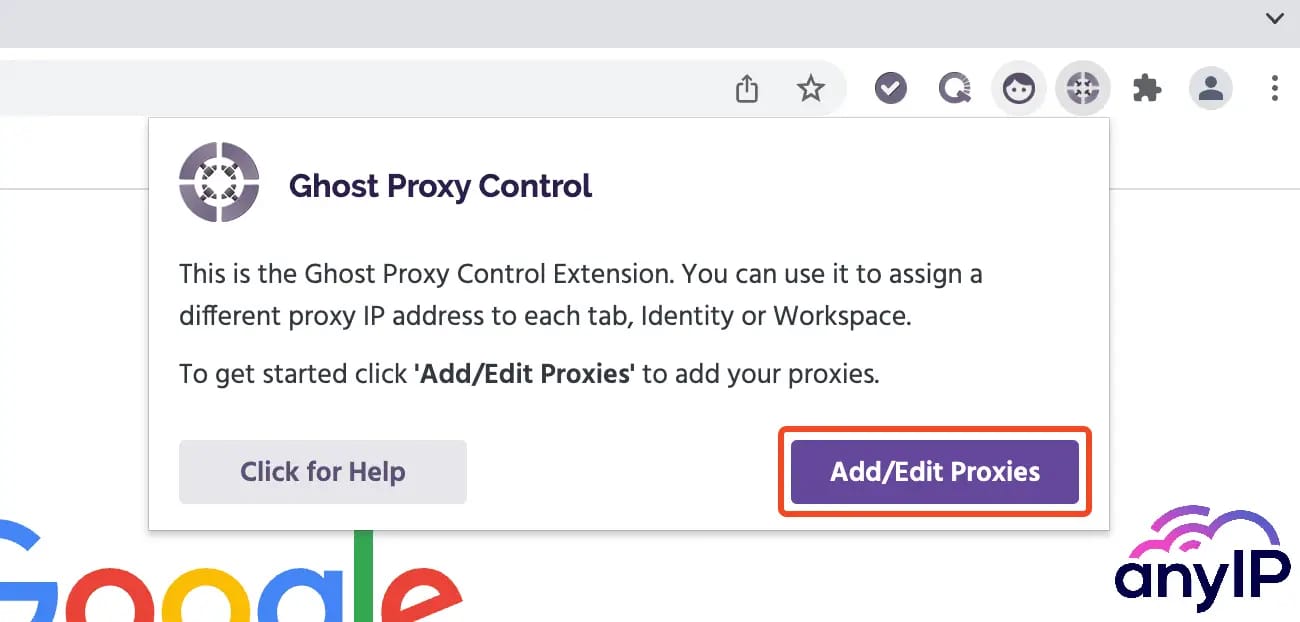
The Ghost Proxy Control settings page will open.
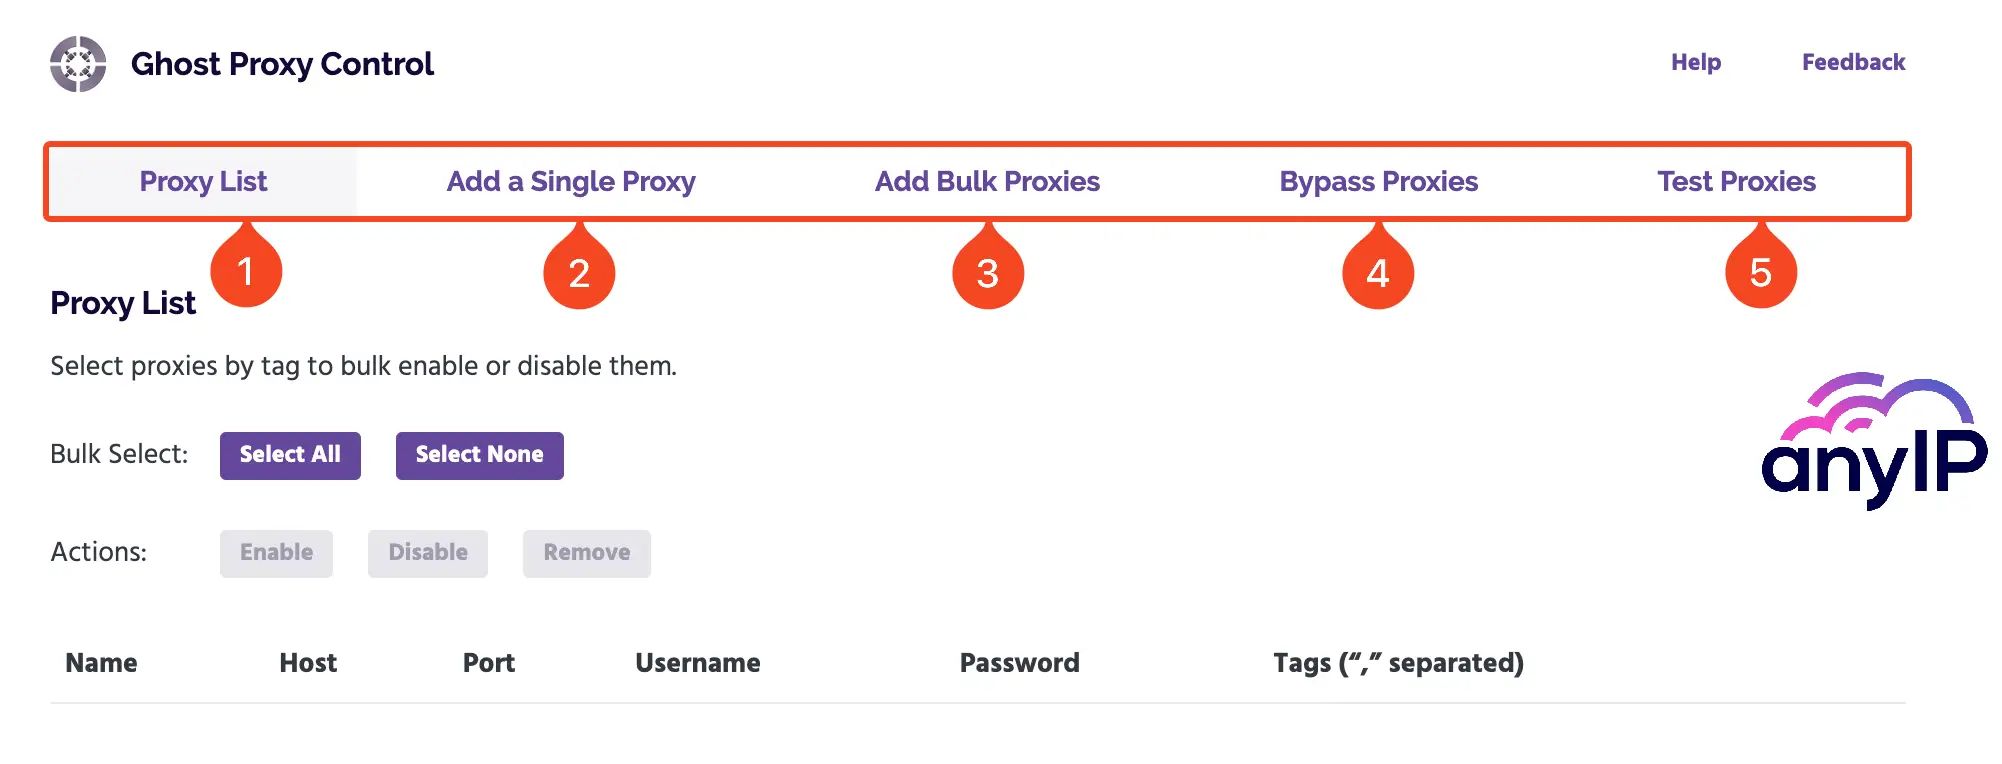
From here you can add, disable, remove, and test your proxies. Using the menu, you have access to:
Your proxy list: empty at first, but once you start adding new proxies, you will see them here
Add a single proxy: you've got access to the form that allows you to save one proxy
Add bulk proxies: from here you can export a CSV file and add bulk proxies
Bypass proxies: this is where you can save website that will bypass the proxies
Test proxies: no brainer, from here you can test your proxies
How to add a single proxy
Now let’s add a single residential proxy, open the form by clicking on “Add a Single Proxy.”
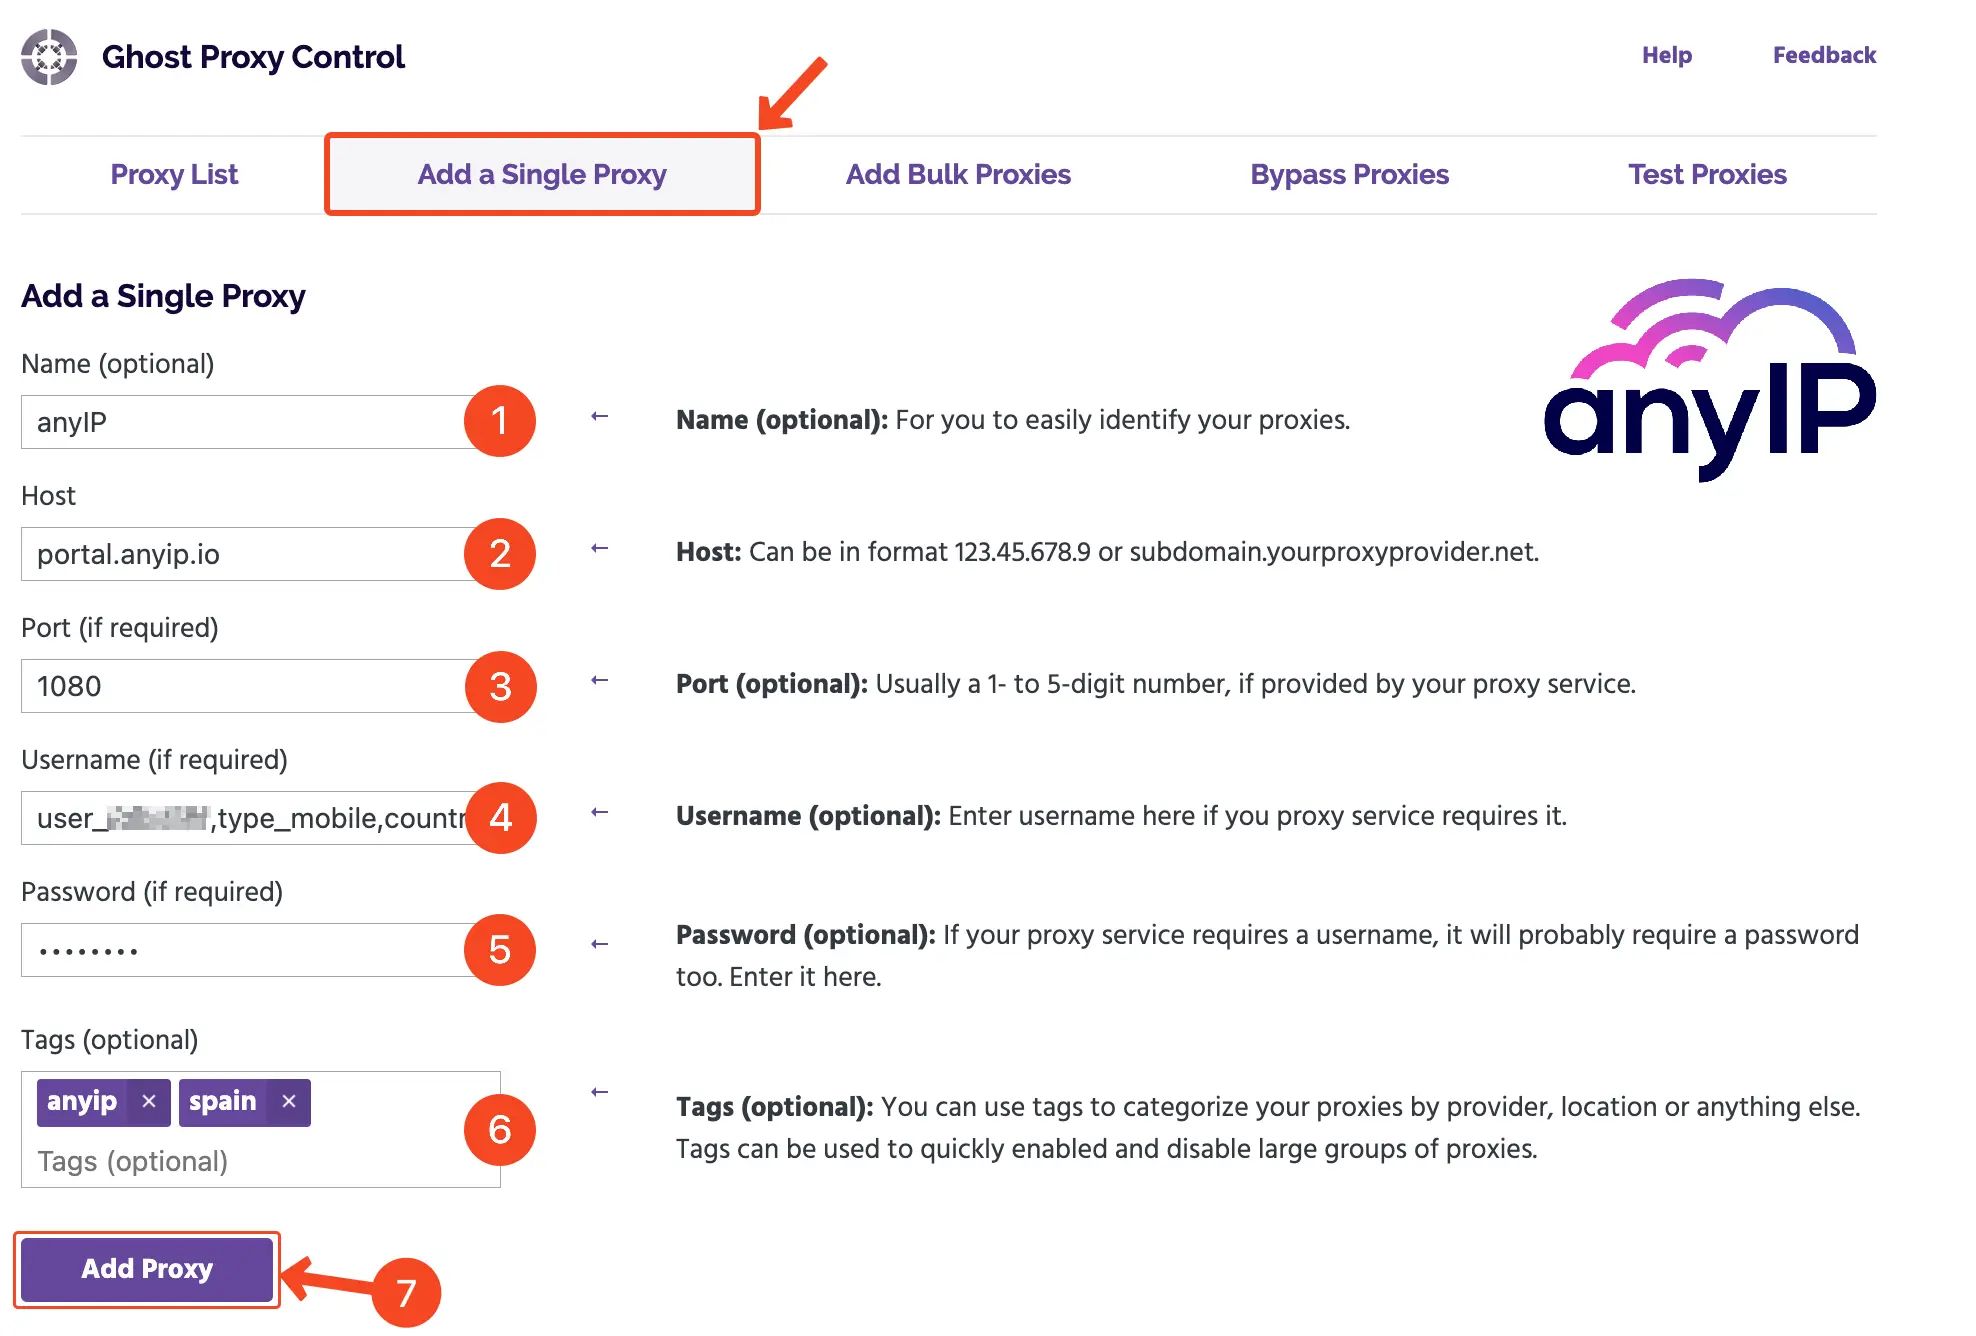
You can enter the required information about your proxy:
A name to easily identify your proxy;
The proxy Host (which could be an IP or a domain name), at anyIP.io it’s always portal.anyip.io
💡 if you want to use a socks5 proxy you need to specify “socks5://” in front of the host
The proxy port, here 1080
Your proxy username
Your proxy password
You can use custom tags to organize your proxies
Once you’ve double-checked the information, you can confirm by clicking on “Add Proxy”
Your new proxy will be visible on the Proxy List bellow or by clicking on “Proxy List.”

How to add proxies in bulk
Now, if you need to add multiple proxies, you can create a CSV file. It will contain all your proxy info.
Open the update form by clicking on “Add Bulk Proxies.”
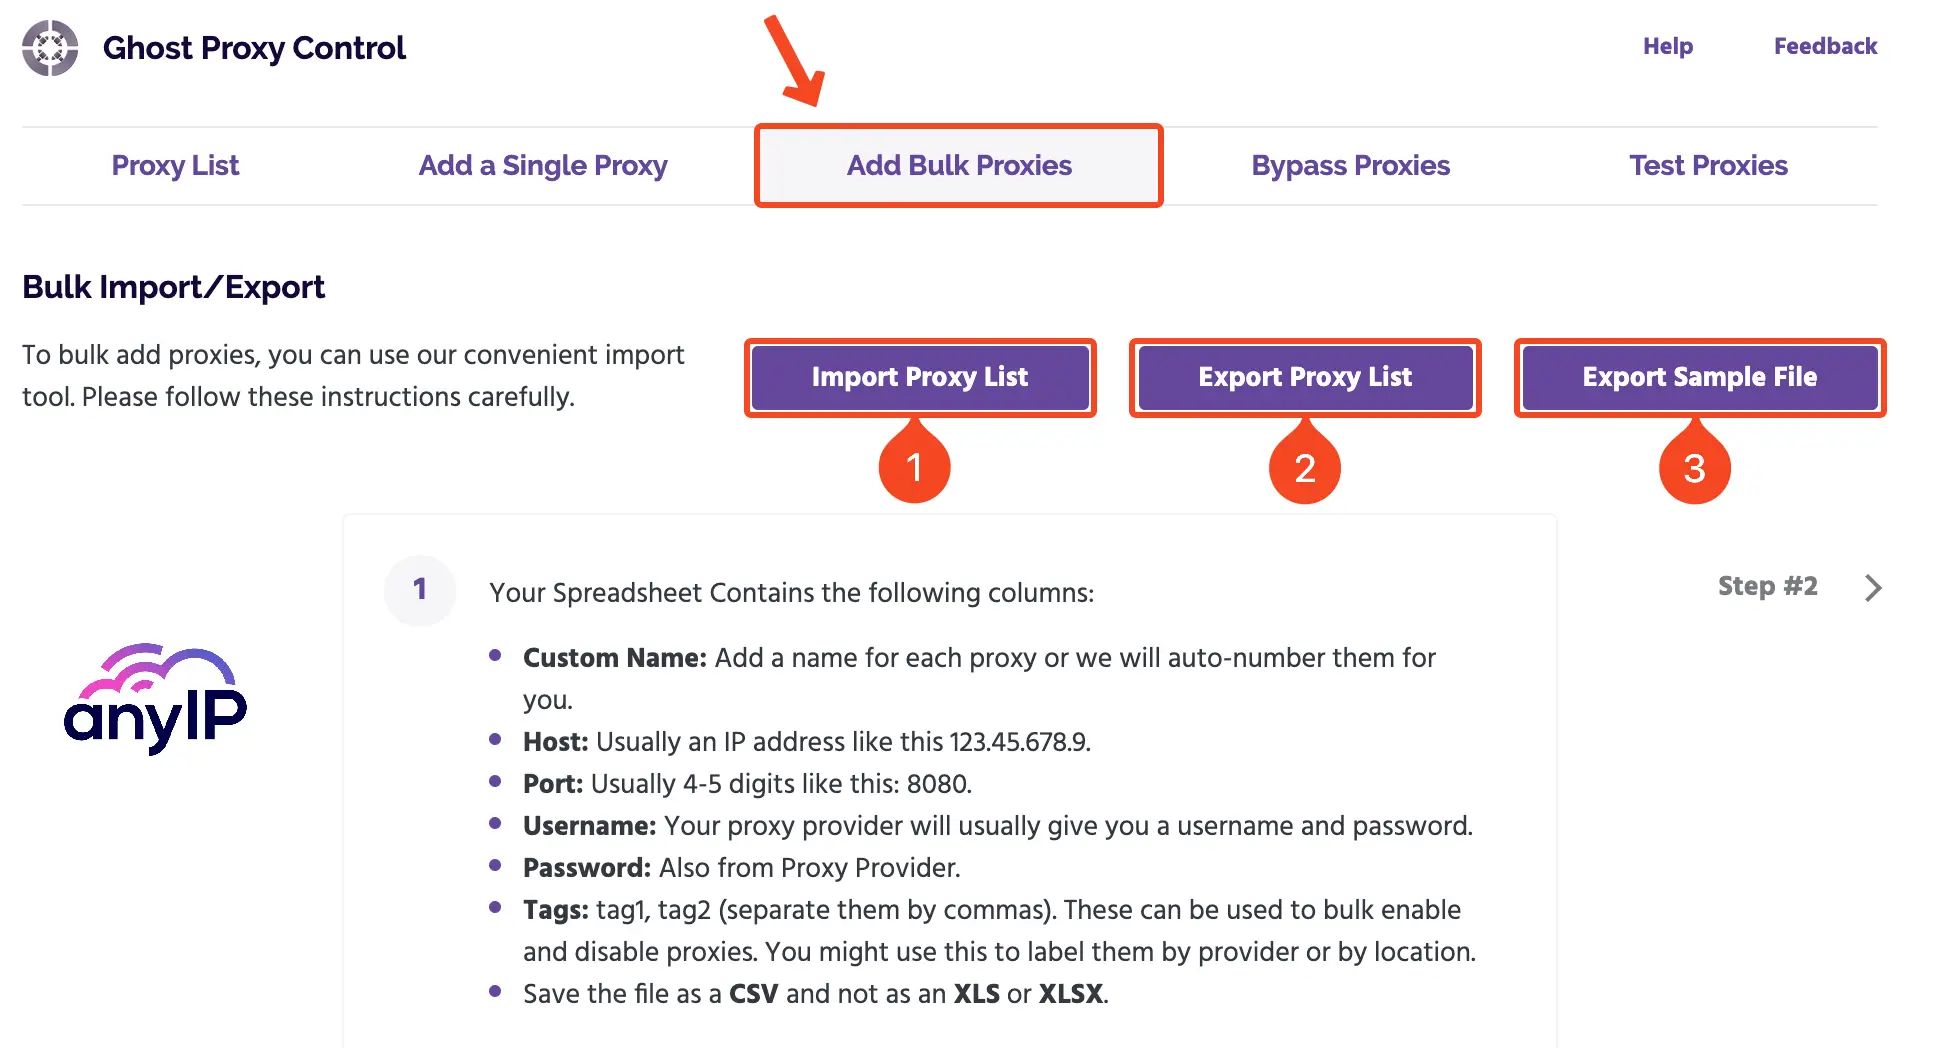
You’ll find three button here:
“Import Proxy List”: if your CSV file is all set you can click here to upload it.
“Export Proxy List”: It will save your existing proxy list to a CSV file. This is perfect if you want a backup of your proxies.
“Export Sample File”: To make it easy, you can download a template file, you simply have to add your proxies to it. One proxy by line and you’ll be able to upload it directly.
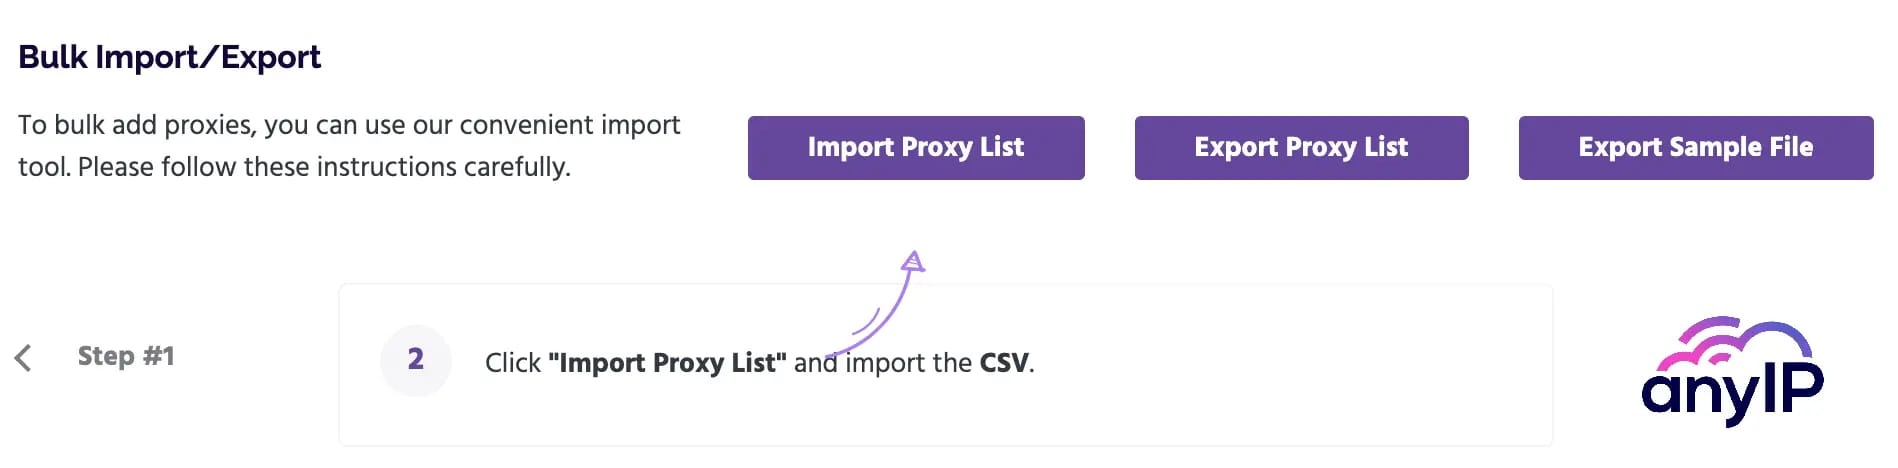
If you click on “Step #2” Ghost browser will invite you to import your CSV file.
💡 Here is the file I uploaded to add my proxies

It’s required to leave the “Custom Name” column. You leave it blank, Ghost Browser will automatically number each unnamed proxies.
Once you save all the proxies into a CSV files. We will add them. After the importation, they should be visible on the Proxy List below or by clicking on “Proxy List.”

How to bypass proxies
Now your proxies are saved and configured. You have the option to specify if you want to bypass them for some websites or only for requests.
You can do that by clicking on “Bypass Proxies.”
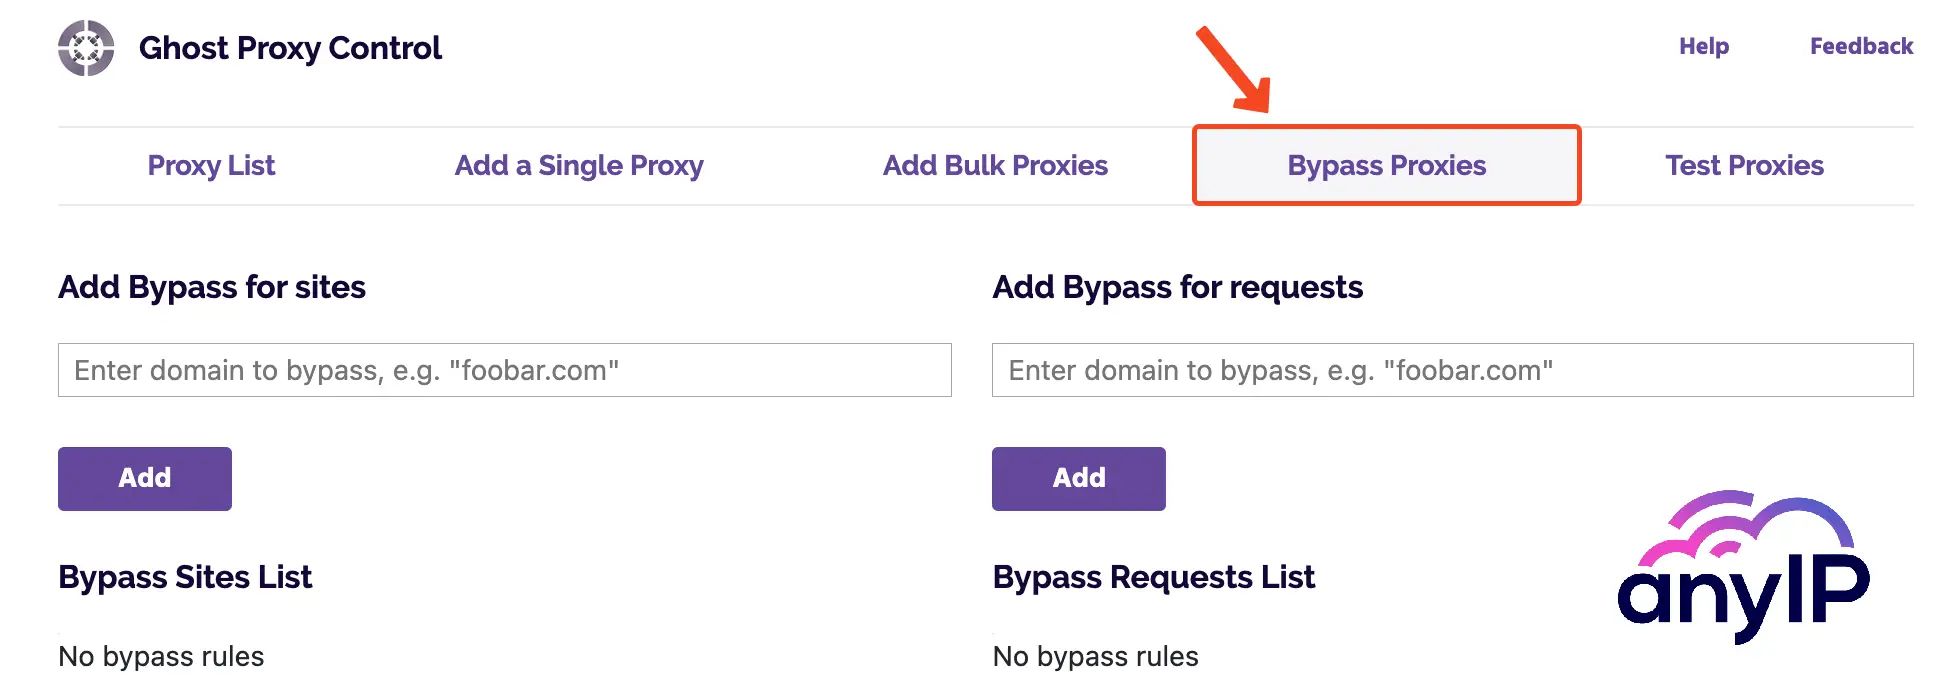
You can simply add the domain that can bypass the proxies. Valid by clicking on “Add” and the rule will be saved.
How to test your proxies
Head up to the “Test Proxies” tab to test your proxies.
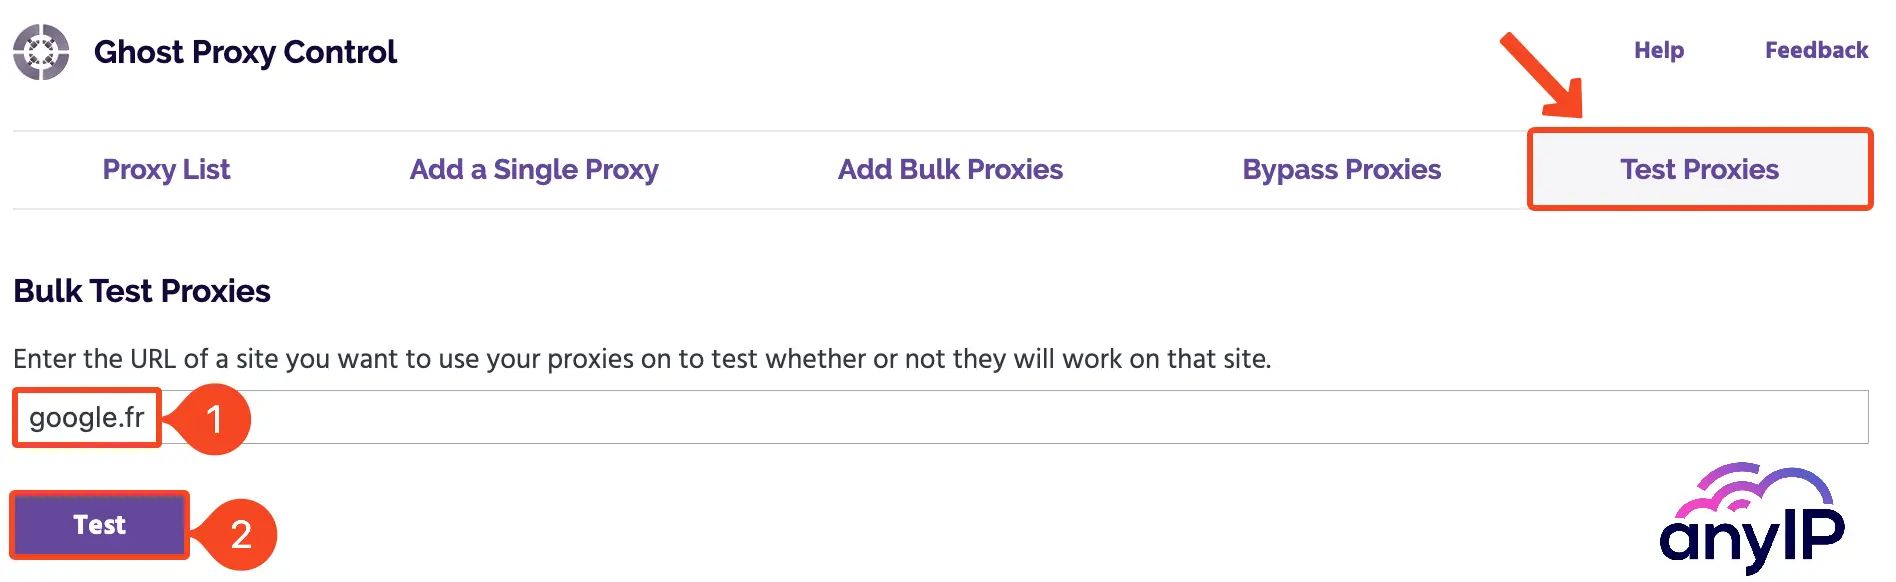
it’s really easy to test your proxies on Ghost Browser:
enter an URL your want to test your proxies with
Hit the “Test” button and wait for the results
Congratulations all your proxies are working fine!
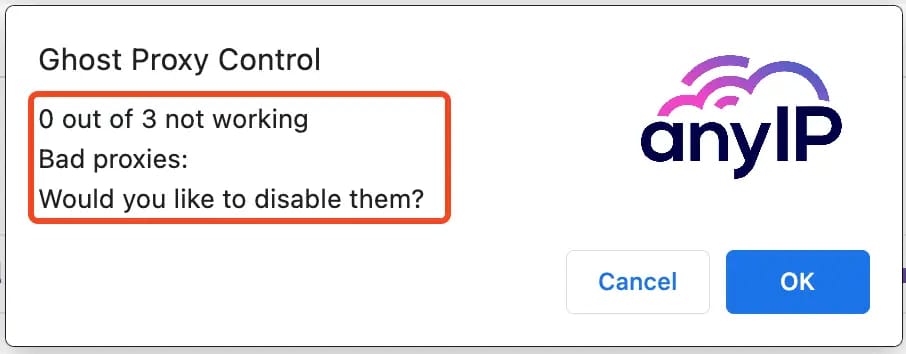
If you’re like me you’ll find this part a little bit disturbing. But here is how to read the result:
0 out of 3 not working: meaning that all my proxies are working great
Bad proxies: here I don’t have a bad proxy hence why there is nothing displayed
Finally if you have one or many “bad proxies”, you can disable them
💡 You can see on this GIF that the test is fast and straightforward
You now know how to add your proxies to Ghost Browser. You can close the settings tab and jump to the next section. We’ll see how to use them.
How to use a proxy on Ghost Browser
Like I told you earlier, Ghost browser is a aiming to enhance your productivity.
To accomplish this, it lets you split your activities by workspace and identity. We will not explain how to use those feature here but you can have a look here.
Now that you have one or more proxies set up, the Ghost Proxy Control extension will have more options:
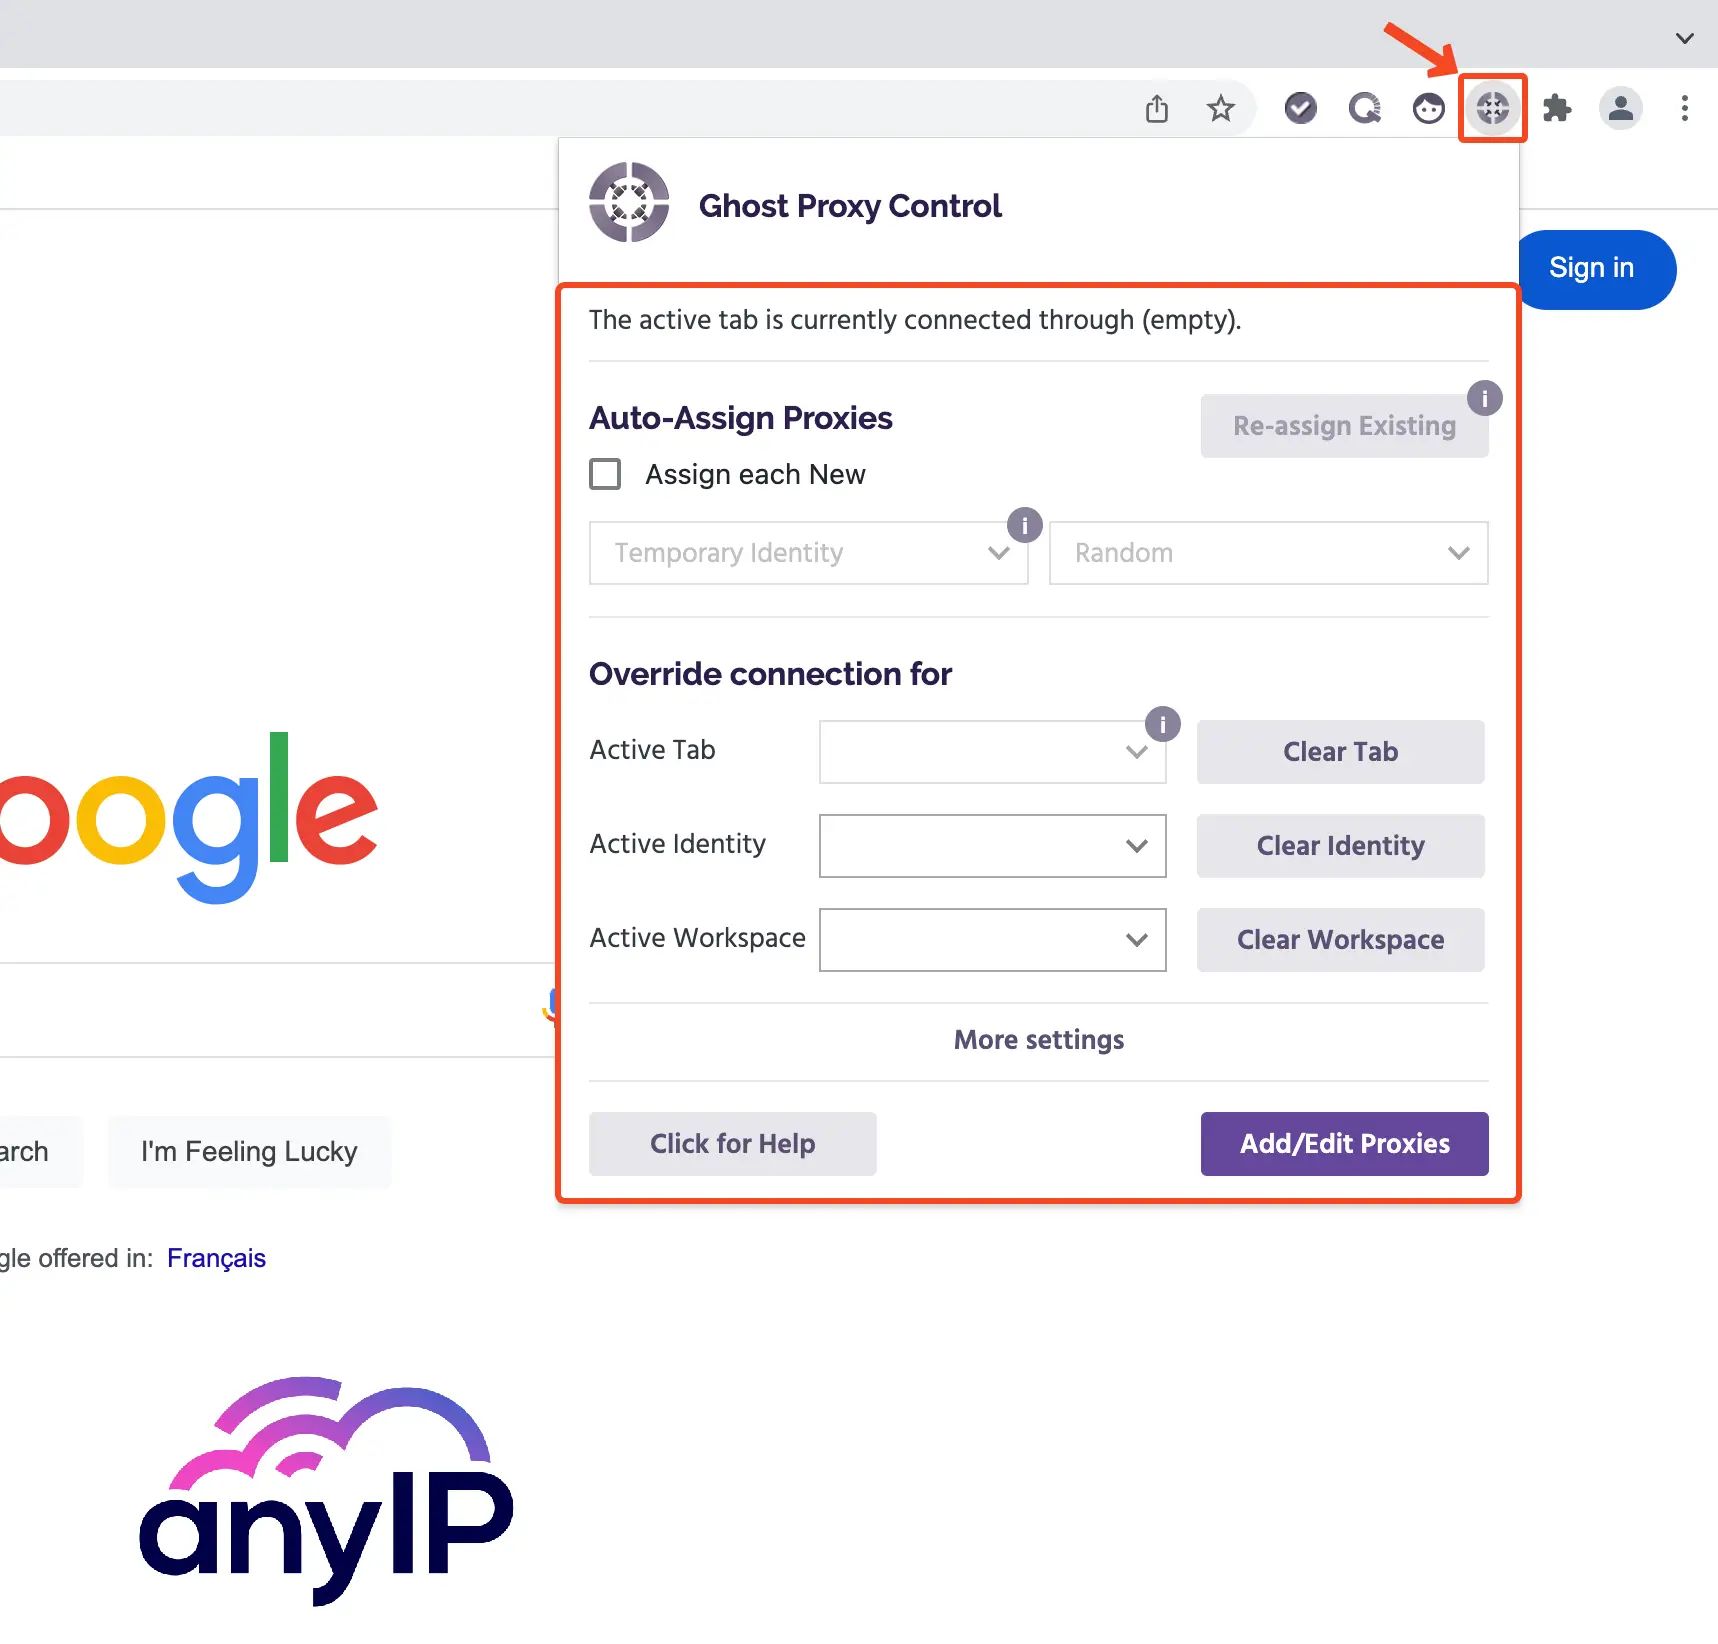
💡 If you’re using the freemium version you will have couple limitations noted by this icon:
To be honest you with, during our tests, we were not really impacted by this limitation. But, you should know that with the free version you can't add a proxy to the active tab. Also, the auto-assign proxies feature is limited to the temporary identity.
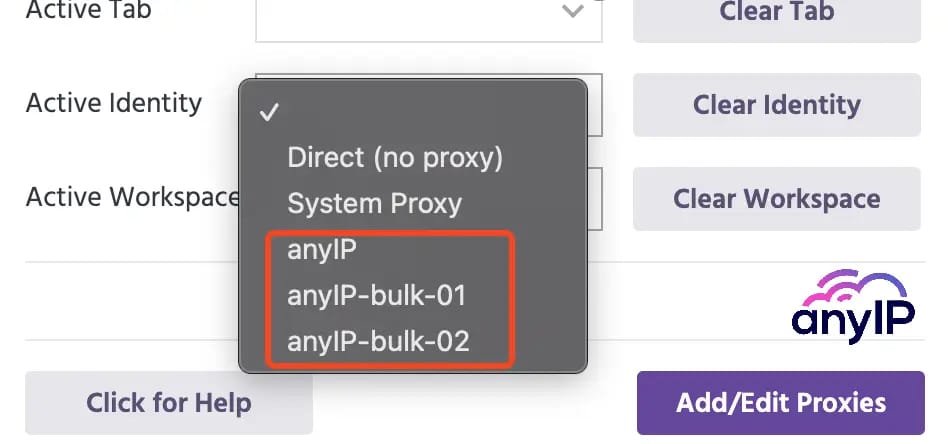
To override a connection with your proxies, you simply choose the proxies you want. They will be associated with your identity/workspace (or tab if you use a paid version).
Each time you change the settings, ghost browser will ask you if you want to reload the current tab to use the new configuration.
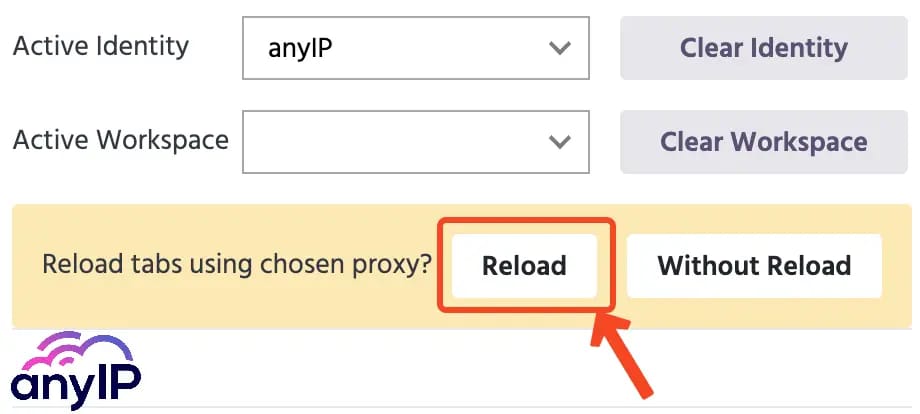
Simply click on “Reload” to refresh the page.
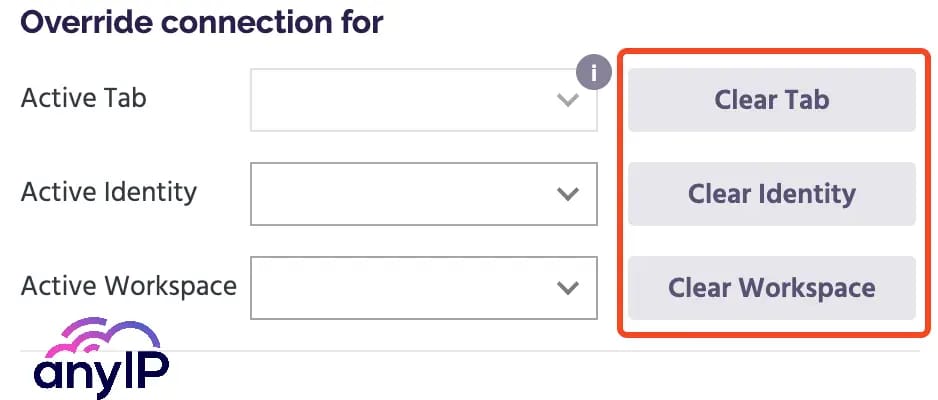
To reset the setting, use the “Clear” button:
Please have a look at this small GIF showing how easy it is to switch proxies! I can switch from Canada to US or France (among my examples) so quickly and without any issue that even a child could use it!
You said RTC Leak?
WebRTC, which stand for Web Real-Time Communication, is a free, open-source technology. It enables real-time communication and data sharing. It allows users to share files and screens without additional software or plugins but also to easily make audio and video calls directly from the browser.
You got it right, WebRTC is awesome, but, it has flaws.
The main issue is that it can reveal a user's real IP address. This can happen even when using a VPN or proxy and Ghost Browser being a chromium-based web browser, it has the same issue that Google Chrome has.
(By the way, if you struggling to fix the leak on chrome, have a look at our article WebRTC section here)
While you need an extension to fix it on Chrome, Ghost Browser has a simple settings to easily fix the leak.
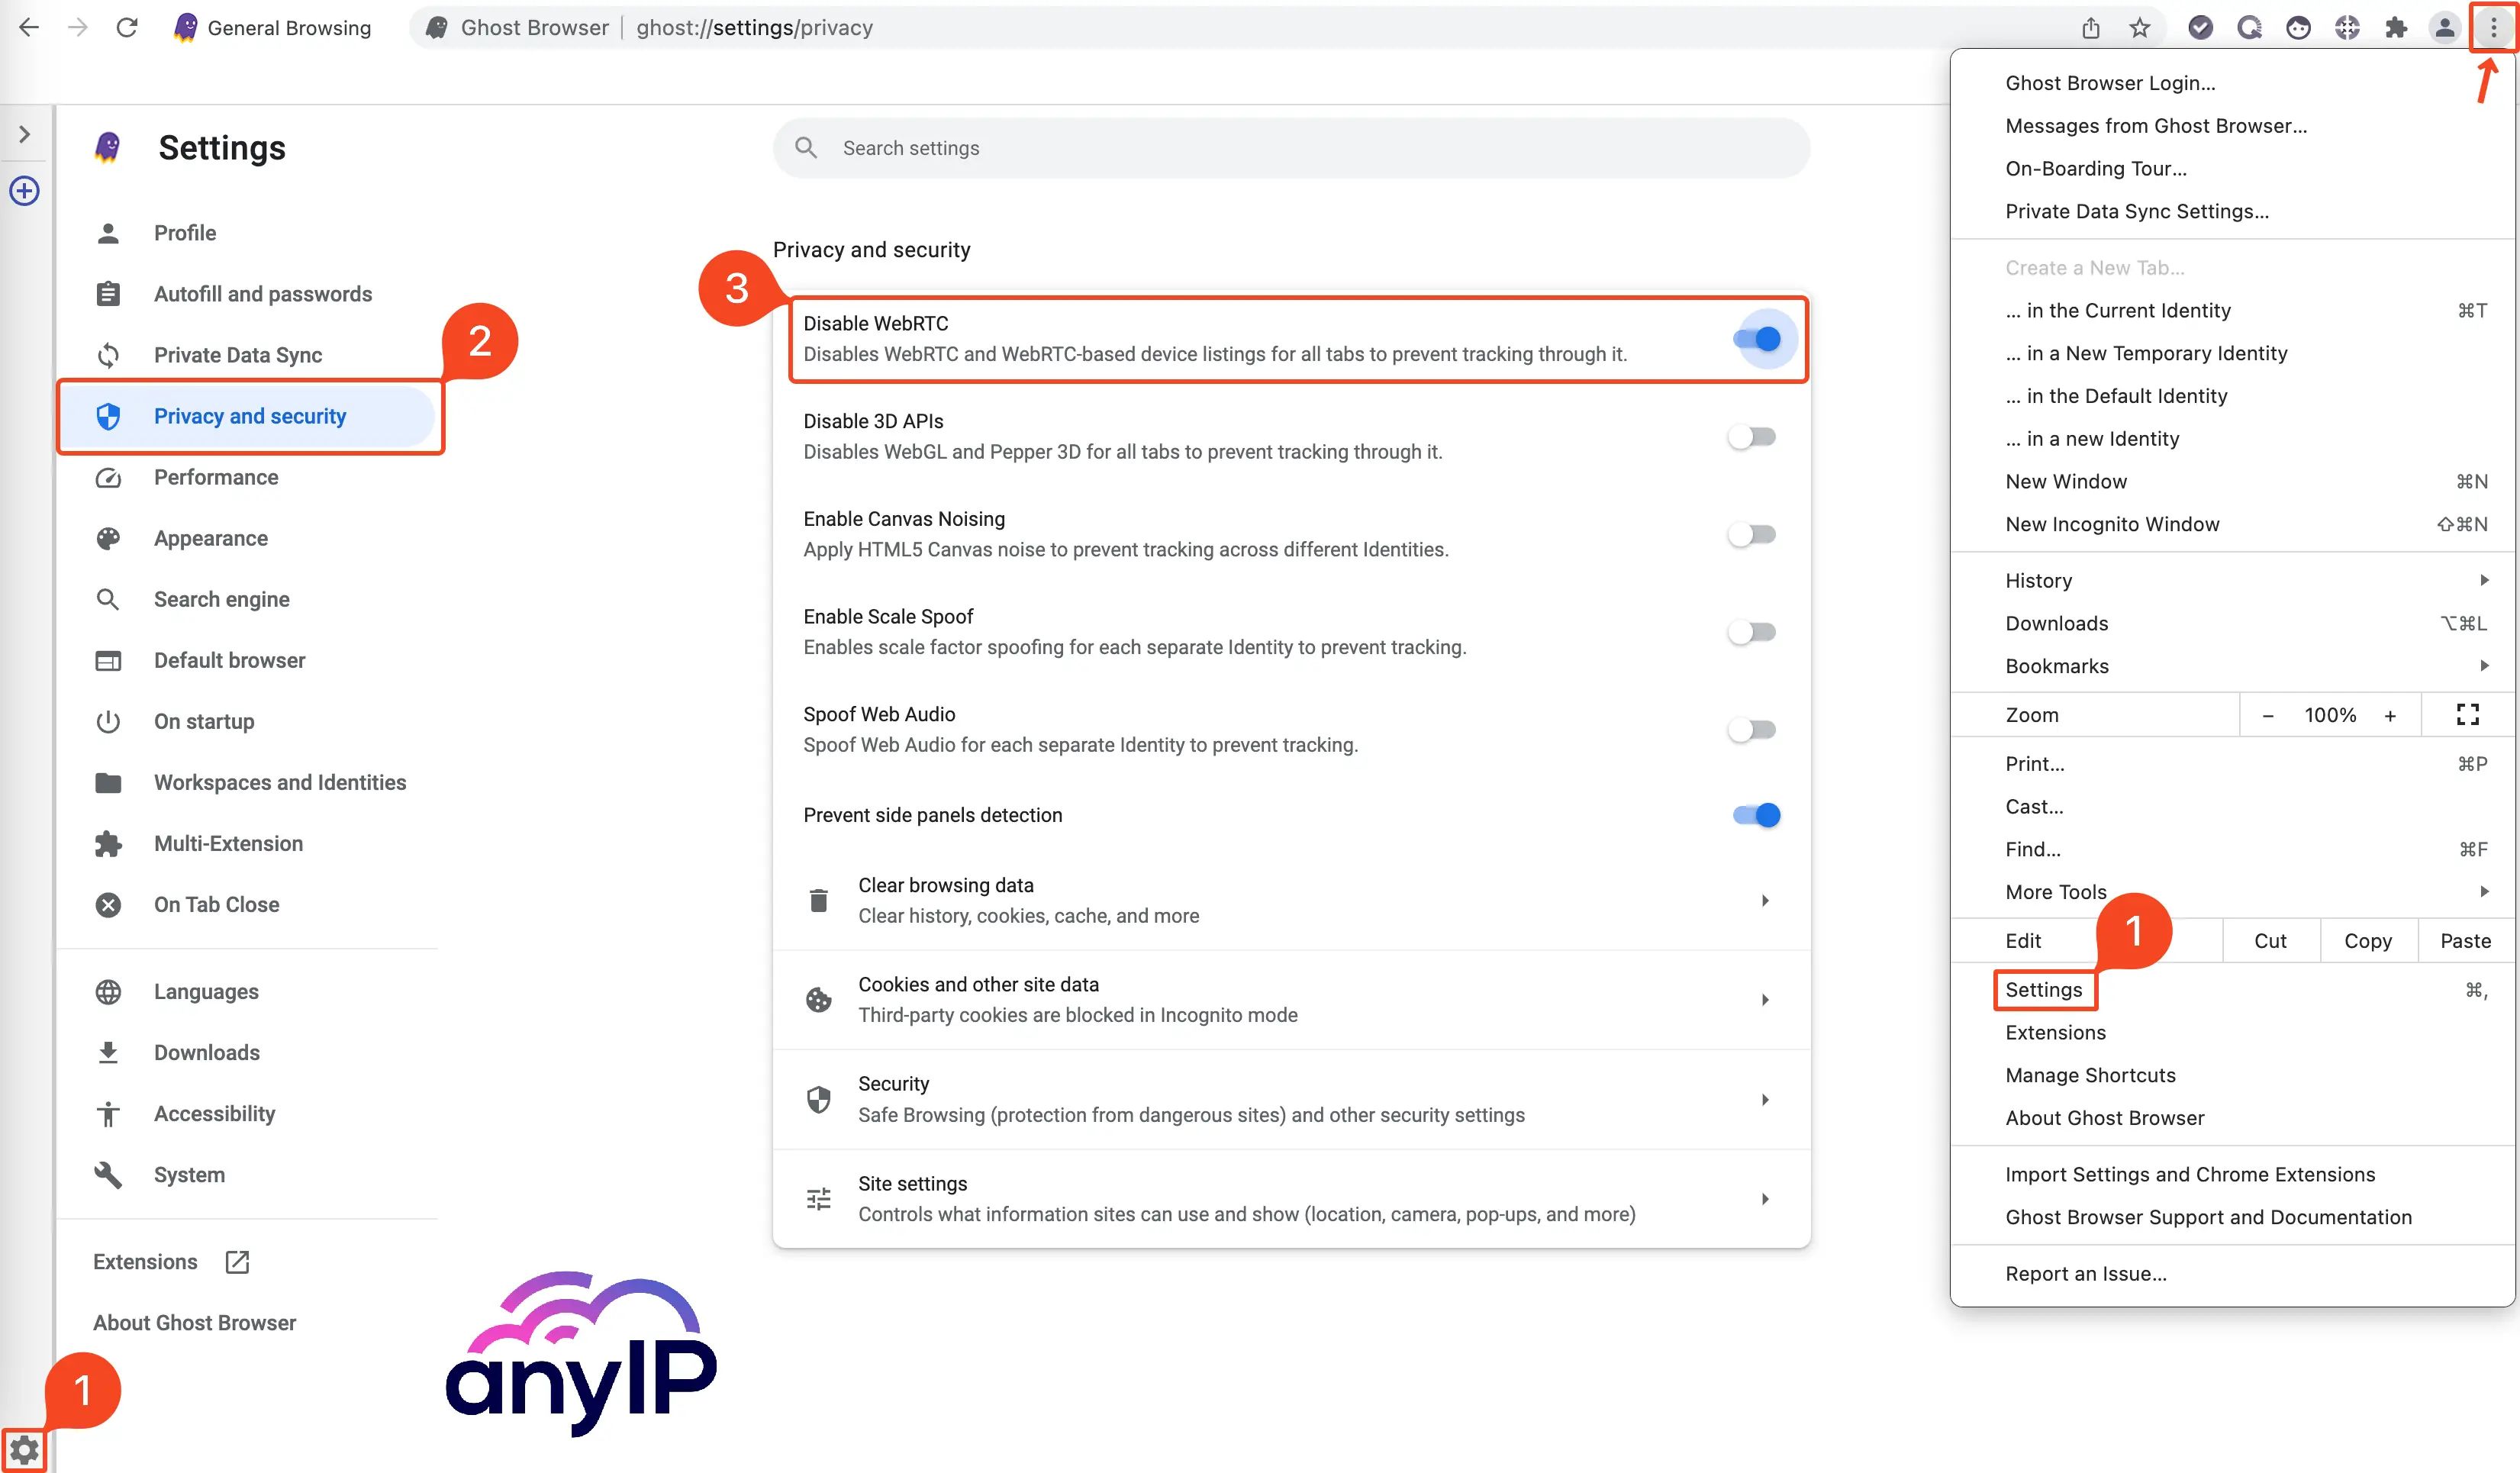
Open the settings (two possible way)
Go to “Privacy and security”
Then activate the option “Disable WebRTC”
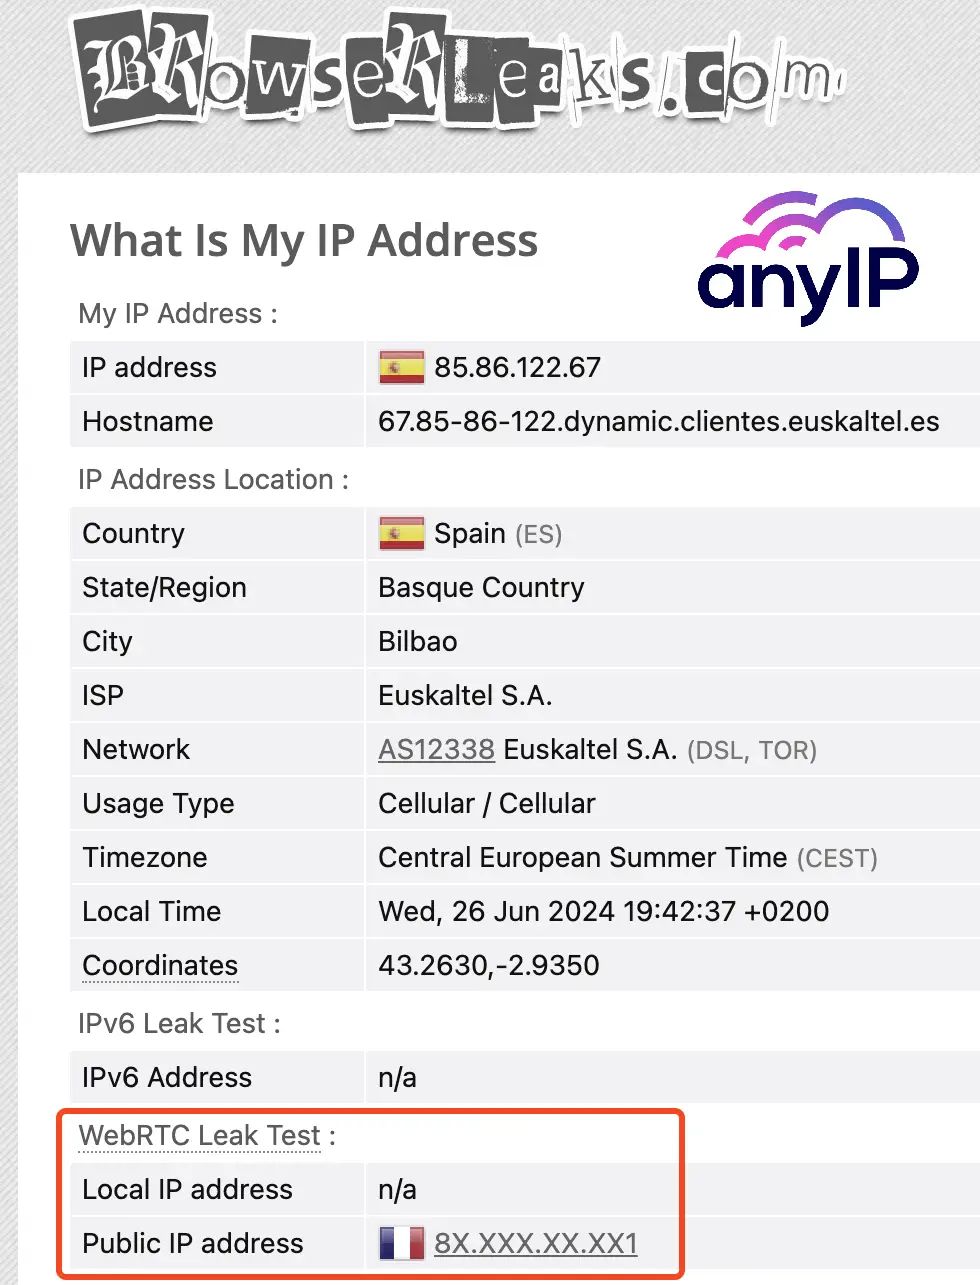
Here is a screenshot of browserleaks.com/ip with the WebRTC enabled:
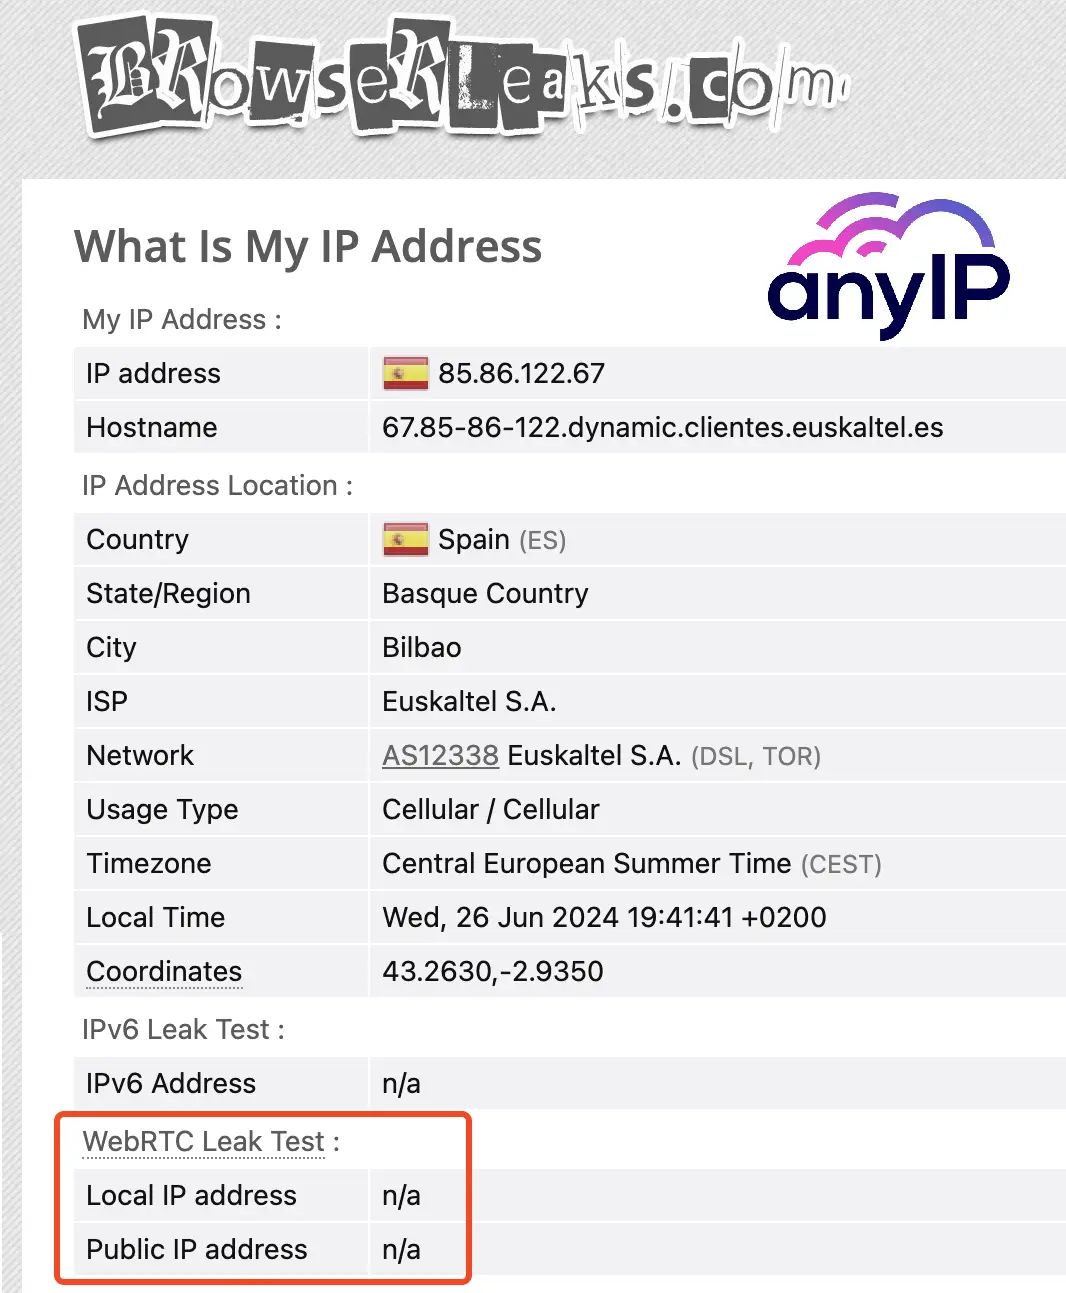
And now here is the update of browserleaks.com/ip with the WebRTC disabled. Everything is located in Spain as it should be and no leaks:
Conclusion
That’s it, now Ghost Browser and it’s Ghost Proxy Control extension have no secret for you!
If like me you need to manage multiple account and don’t want the pain of using tons of browser or useless back and forth. I believe this browser could be your future best friend.
Have a try and download it here.
You don’t have a proxy?
You got you, create your account in less than 2min and have access to quick and hassle-free proxies through anyIP.io's expansive network. If you have any question, the 24/7 support team will be here to help you out.
Article by
Khaled Bentoumi
Khaled is a software engineer. He's been involved in many startups of different sizes. Previously, he founded Data to Page, an AI Programmatic SEO startup. He now handles all the marketing at anyIP.


Article by
Khaled Bentoumi
Khaled is a software engineer. He's been involved in many startups of different sizes. Previously, he founded Data to Page, an AI Programmatic SEO startup. He now handles all the marketing at anyIP.
Read more
How to customize Your User-Agent with Python Requests
Learn how to update and rotate user-agents in Python Requests to avoid detection and improve scraping efficiency.

