
How to Set Up SOCKS5 Proxy in Chrome: Ultimate Guide
Table of Contents
Key takeaways
Use Proxy SwitchyOmega to set up HTTP, HTTPS, and SOCKS5 proxies in Chrome.
Chrome requires IP whitelisting for SOCKS5 proxies, as it lacks native support.
WebRTC leaks can expose IPs; fix with WebRTC Network Limiter extension.
IP whitelisting simplifies authentication without username/password.
Command line can launch Chrome with SOCKS5 proxy and fix DNS leaks.
In this tutorial, we’ll show you how to quickly set up a HTTP, HTTPS and SOCKS5 proxy in the popular web browser Google Chrome. We’ll use a third-party extension named “Proxy SwitchyOmega (ZeroOmega).”
💡 First thing first, to set up your proxy, you’ll need a few requirements:
An anyIP.io proxy account. You can enjoy our fully refundable plan if you don't have one.
All the proxies needed information such as :
username/password;
proxy server addresses (URL or IP + port) ;
How to set up Proxy on Chrome with “Proxy SwitchyOmega (ZeroOmega)”
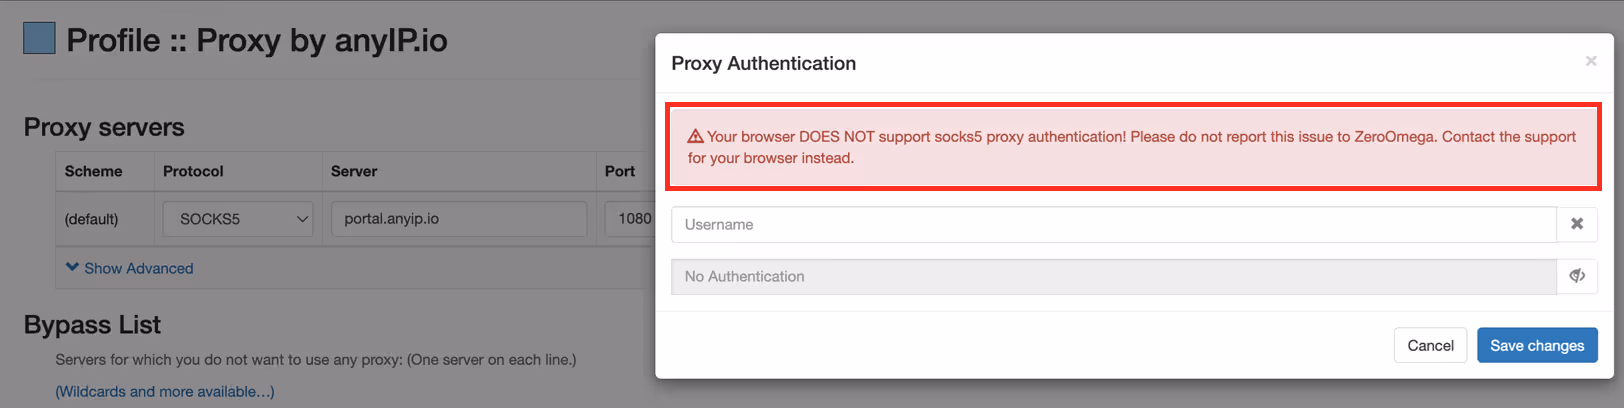
💡 To use a SOCKS5 Proxy on Chrome, you must use a proxy provider offering an IP Whitelisting authentication method (such as anyIP.io).
Indeed, Chrome is not natively compatible with a SOCKS5 Proxy because, it requires a username/password authentication. No worries, we will see how to set up a SOCKS5 proxy on the “Advanced only” section.
You’ll soon be able to hide your IP easily by configuring a proxy on Chrome. Head up to the Proxy SwitchyOmega (ZeroOmega) download page to download the extension.
Follow our guide to configure your HTTP proxy:
Step 1: Download and add Proxy SwitchyOmega 3 (ZeroOmega) extension to Chrome
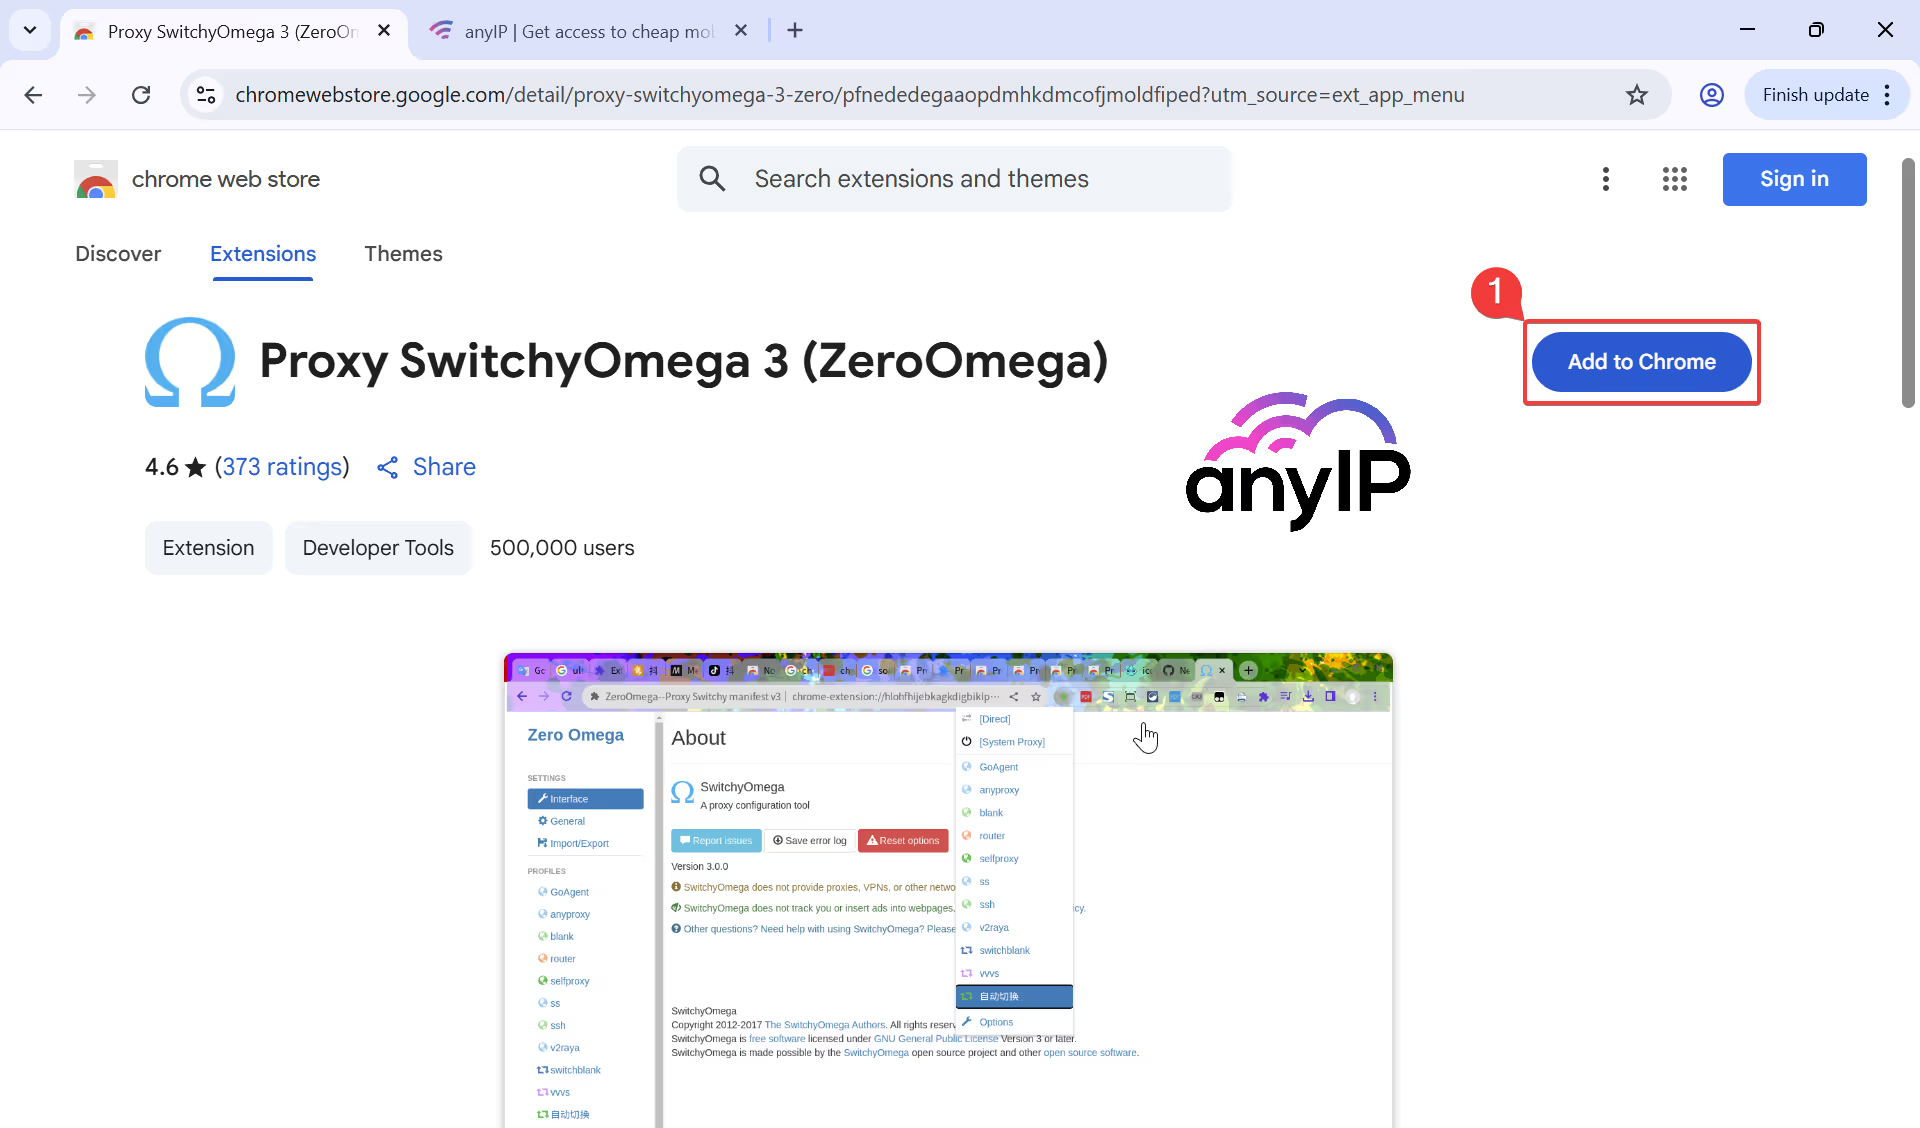
Click on “Add to Chrome”
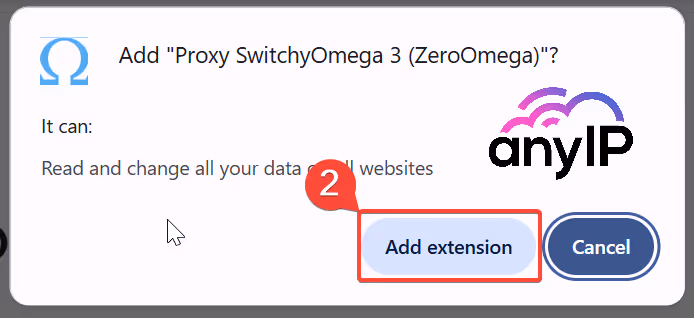
Review all the permissions granted to Proxy SwitchyOmega (ZeroOmega). Then, click on “Add extension” to confirm
Step 1b (optional): Pin the extension directly to your toolbar for quick access
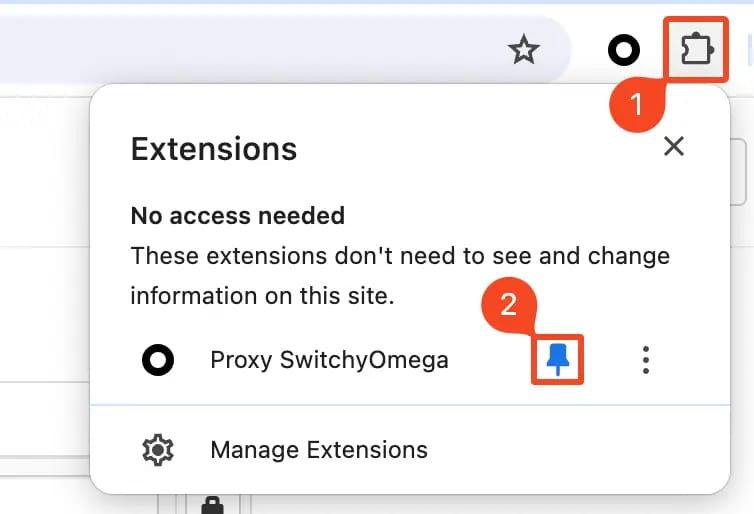
Click on the “Extension” icon
Next, click on the pin icon to pin the extension to the toolbar for quick access
Step 2: Open Proxy ZeroOmega dashboard
After a fresh install, the extension will automatically redirect you to the dashboard.
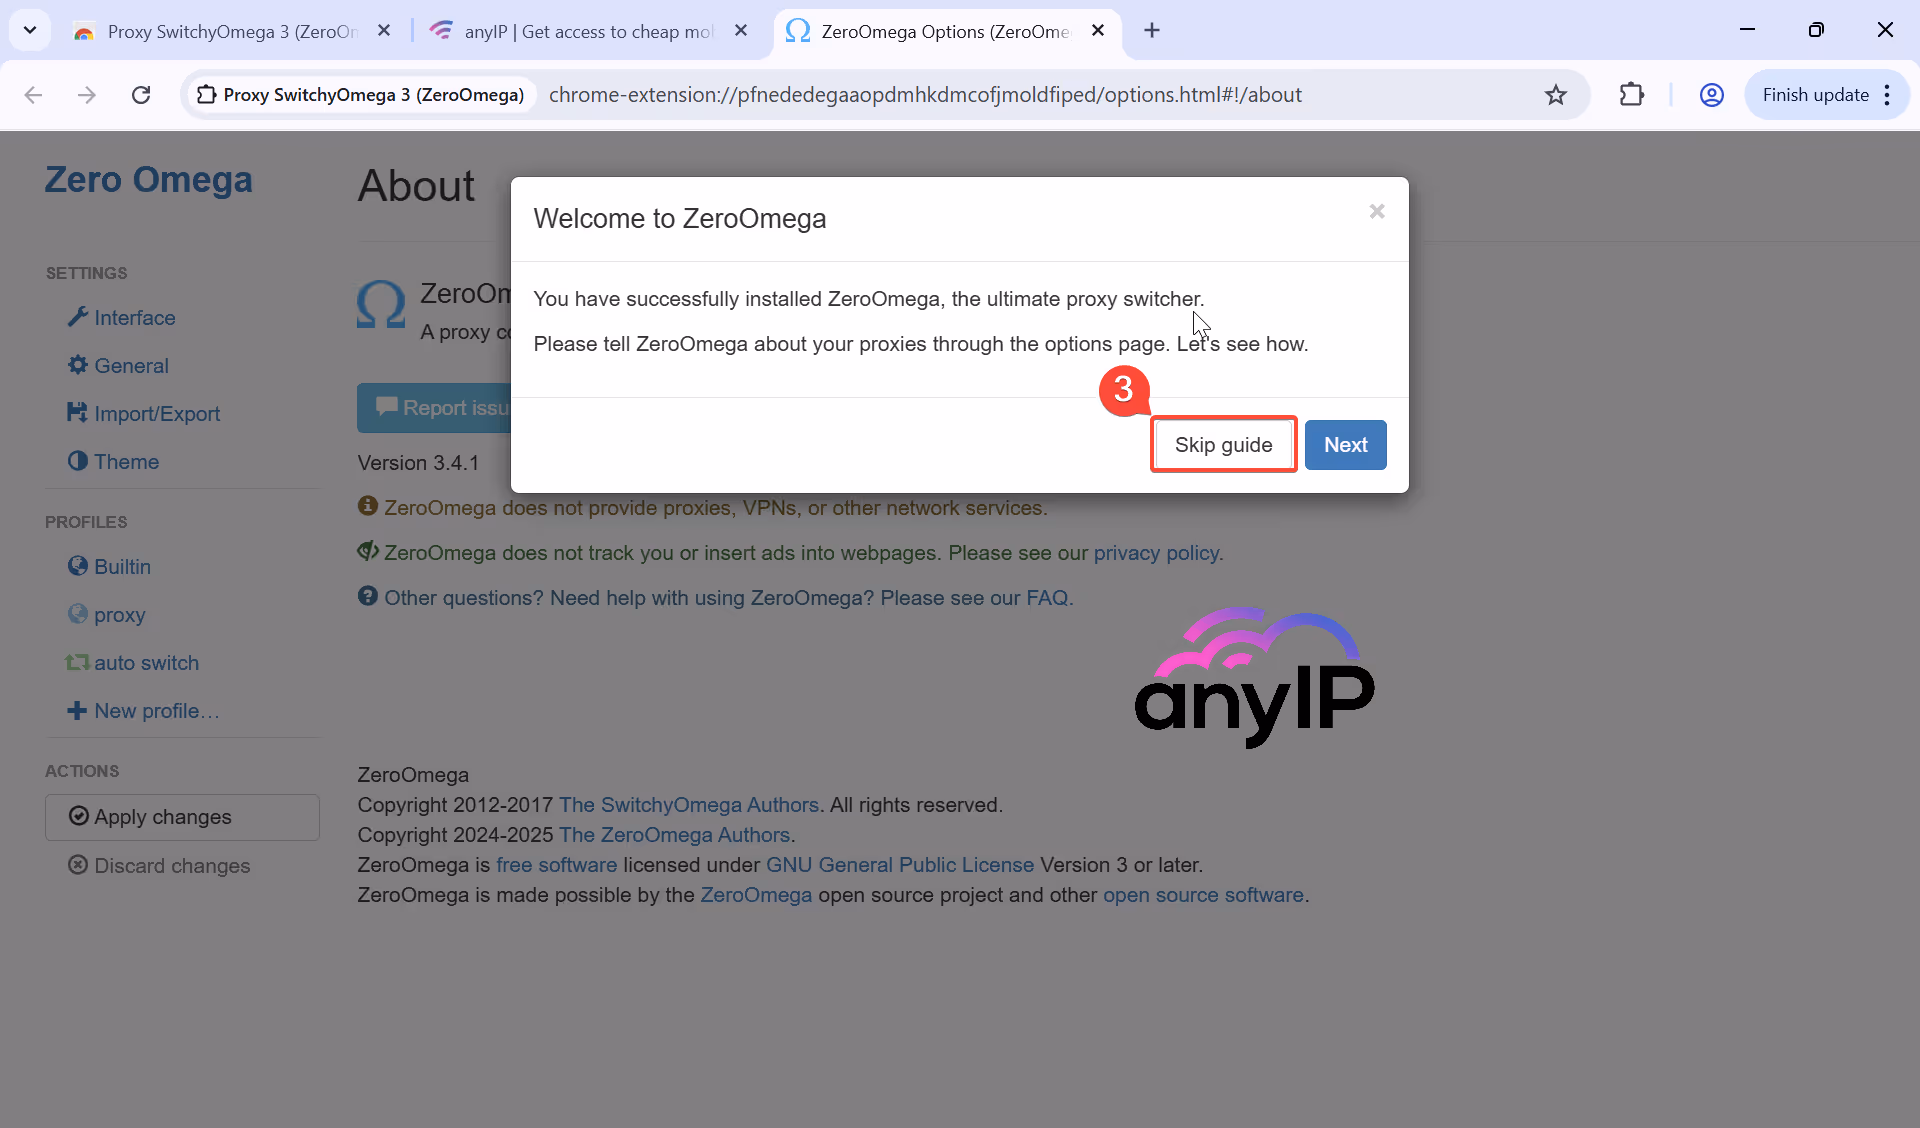
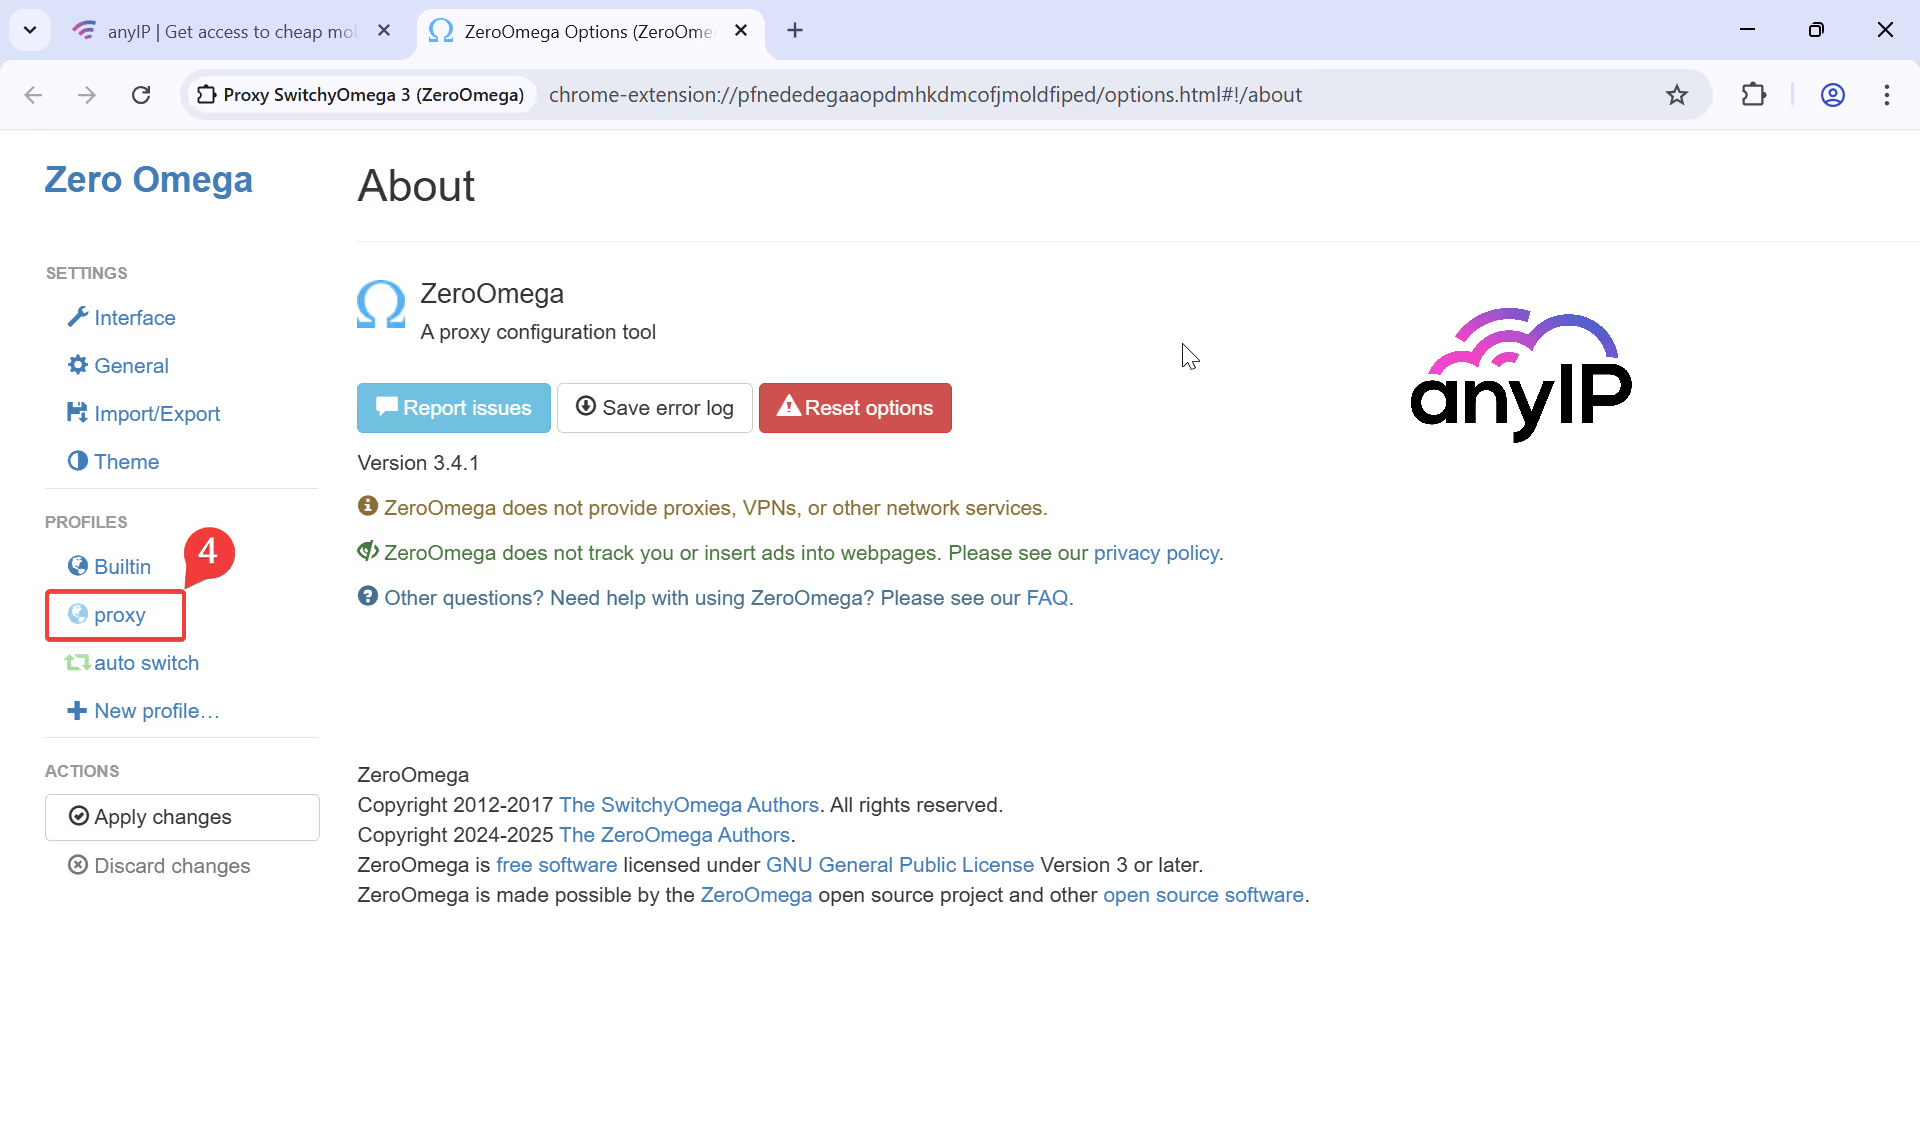
For this tutorial, we’ll skip the guide by clicking on the “Skip guide” (feel free to follow it if you want to)
Click on “proxy” to update the default proxy profile. You can also add a new profile, but the default profile won’t be helpful if you choose this option.
💡 If the extension is already installed on your browser, do as follows to access the dashboard:
Step 3: Head up to the “Proxies” menu to configure your proxy

Select the protocol “HTTP or HTTPS” from the dropdown menu
Enter your hostname in the Server field. In our example, we use anyIP.io as a provider: portal.anyip.io
Enter here your proxy port for anyIP.io we use: 1080
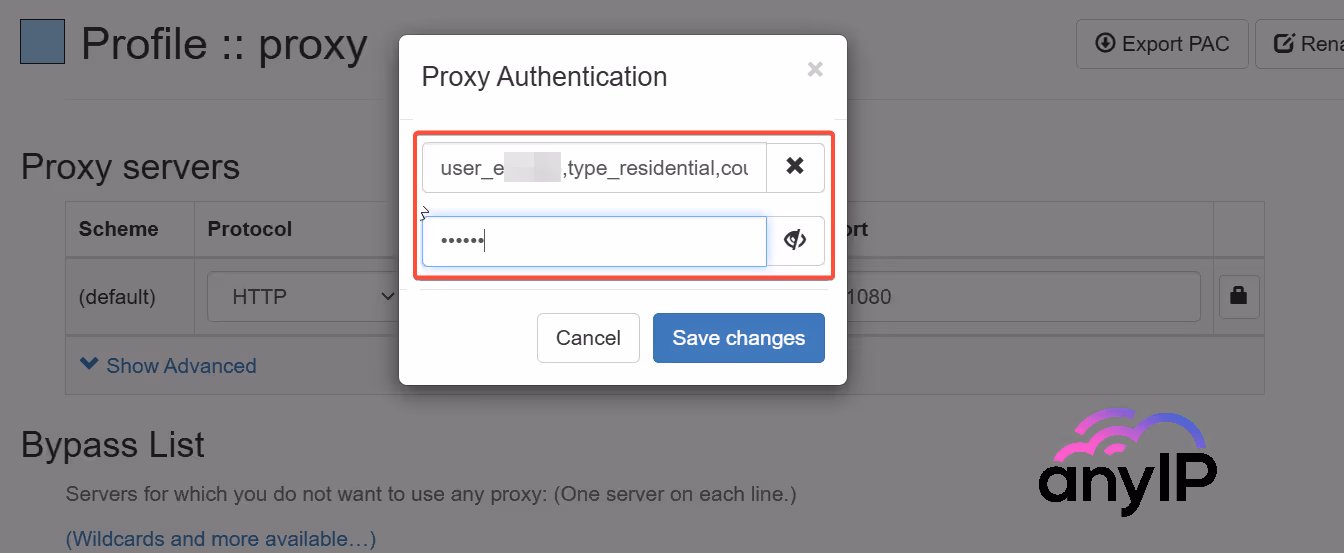
Click on the padlock to enter your proxy username and password
💡 To quickly identify your proxy, you can rename it as follows:
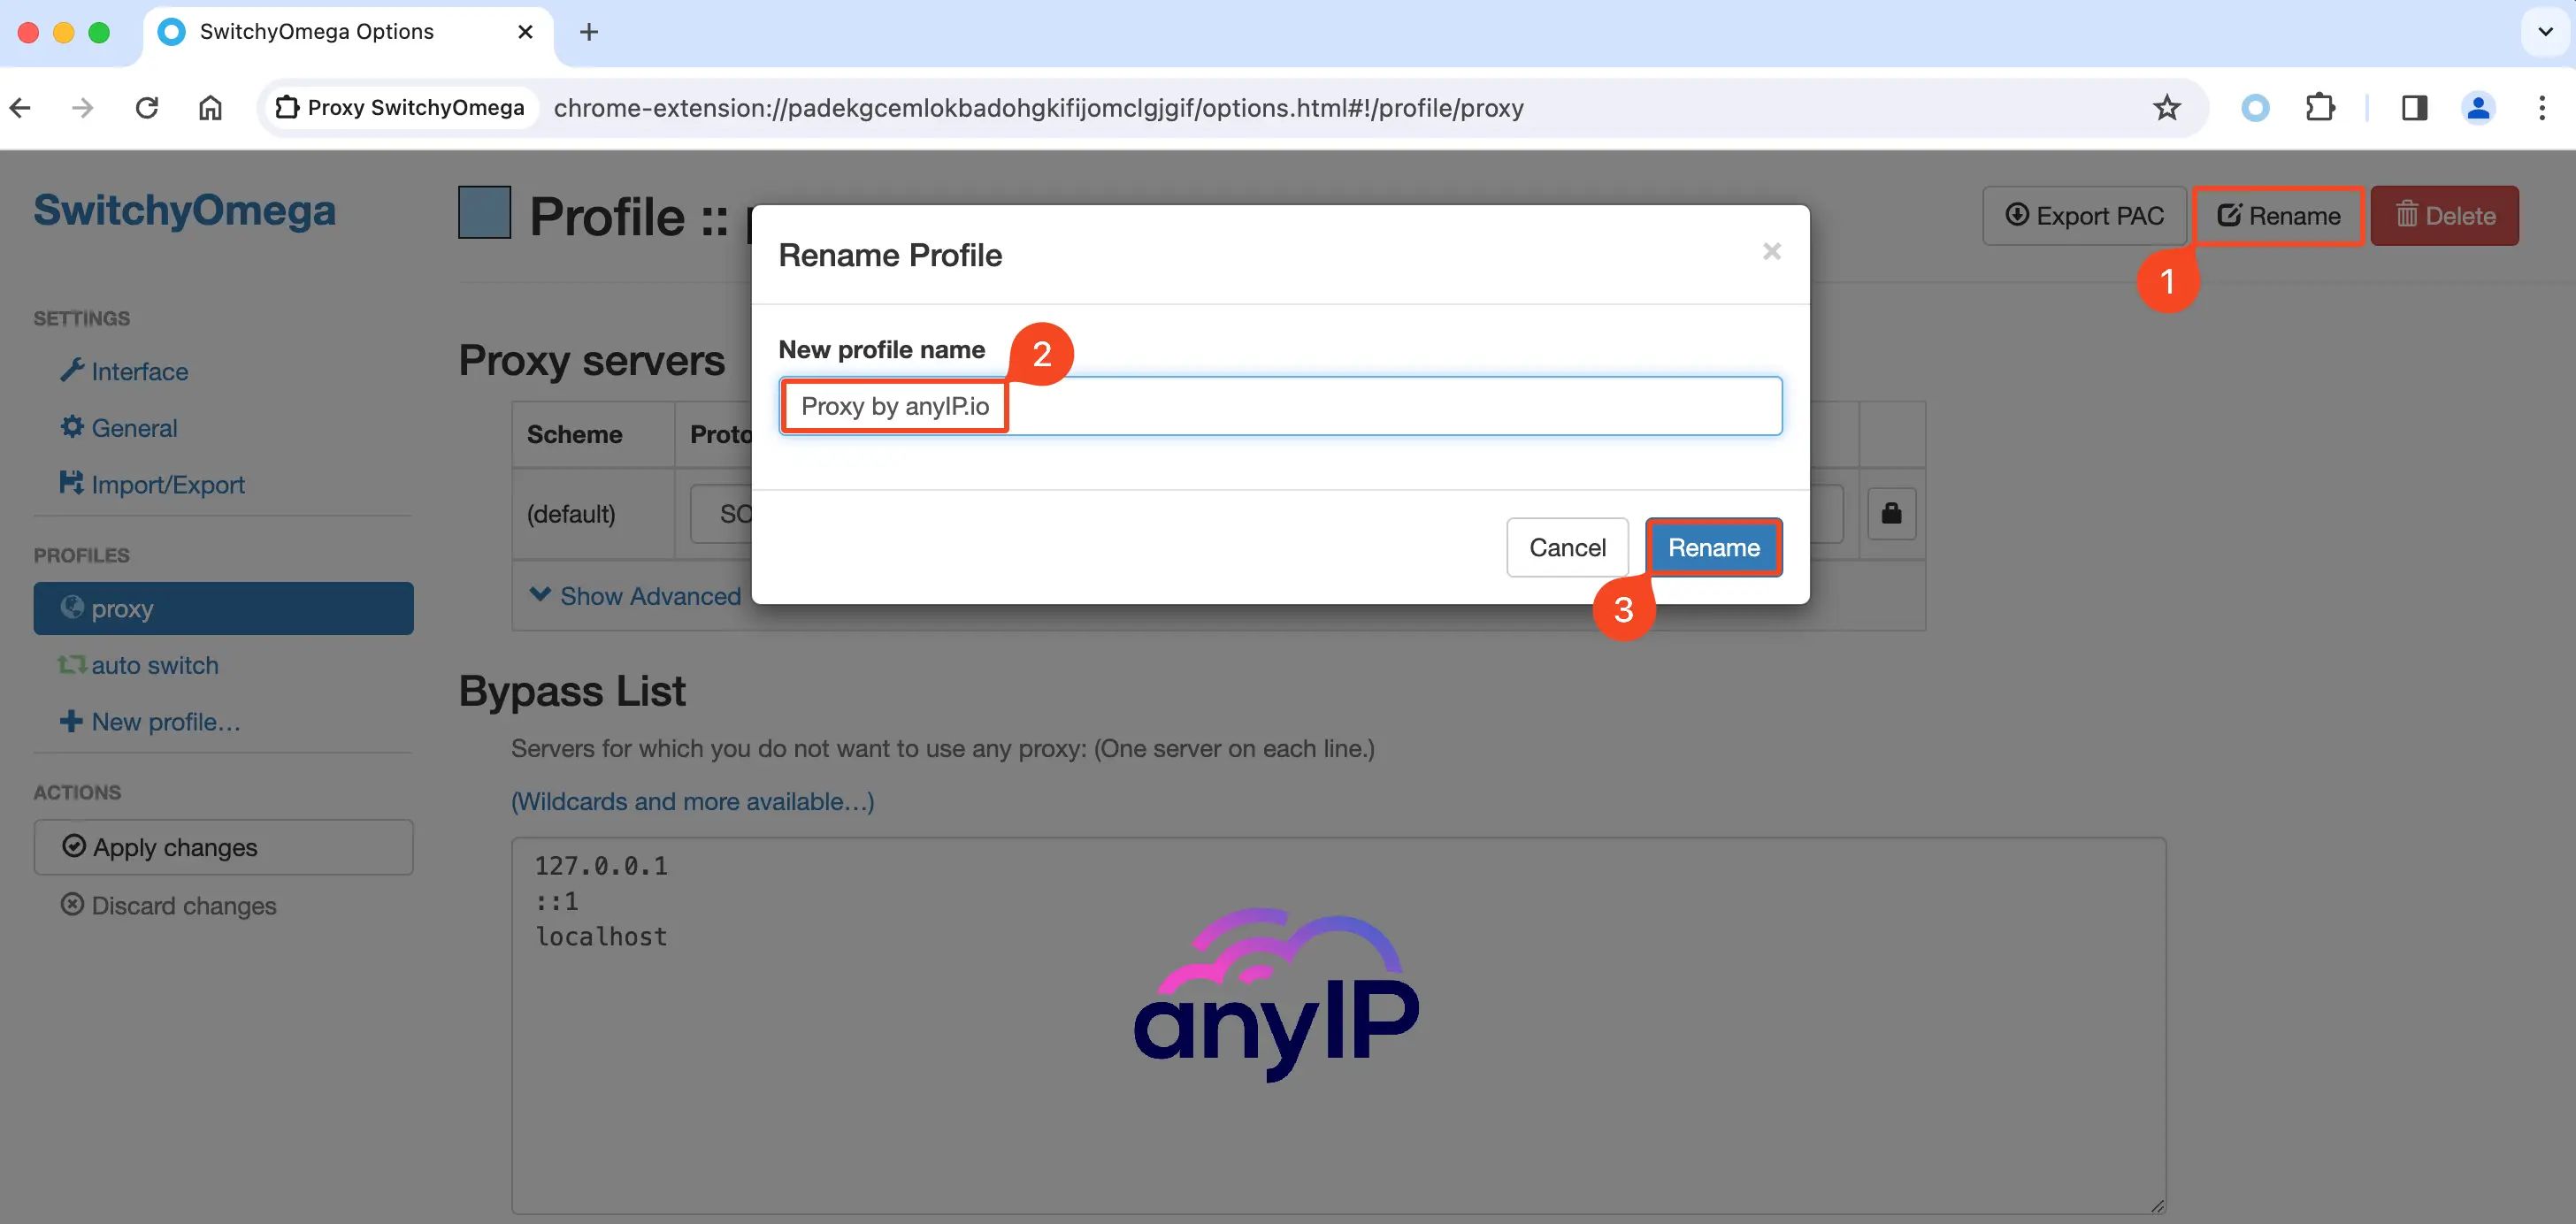
Click on “Rename” to open the Rename Profile form
Choose a name to identify your proxy easily
Save by clicking on the “Rename” button
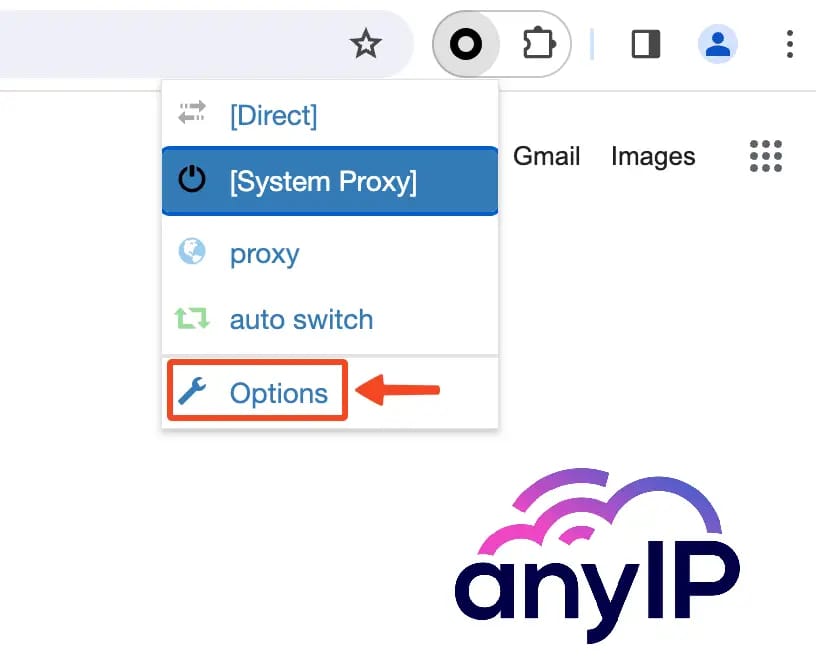
Step 4: Connect to your proxy
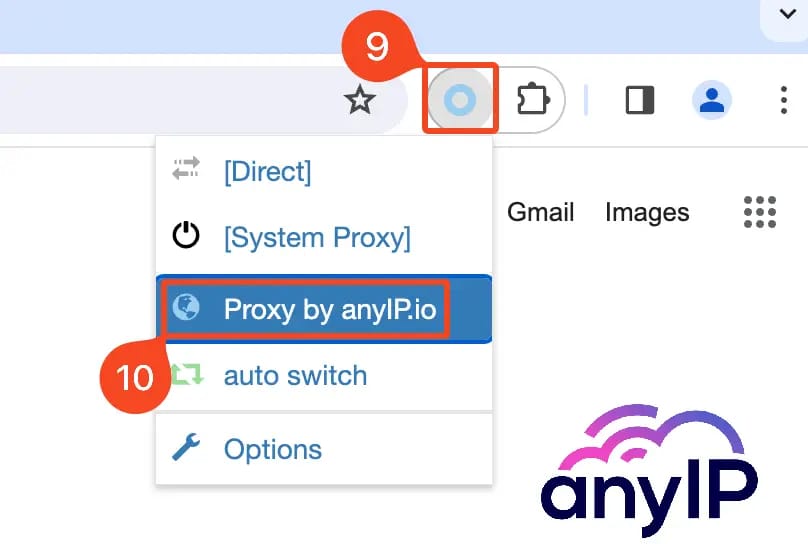
Open the extension menu by clicking on the Proxy SwitchyOmega 3 icon
For example, click on the proxy profile you just configured: Proxy by anyIP.io
💡 The extension icon should switch from grey to blue. This indicates your connection through the proxy.
How to test your proxy connection
We just covered how to use a SOCKS5 proxy in Chrome, but how do you ensure your residential proxy is enabled?
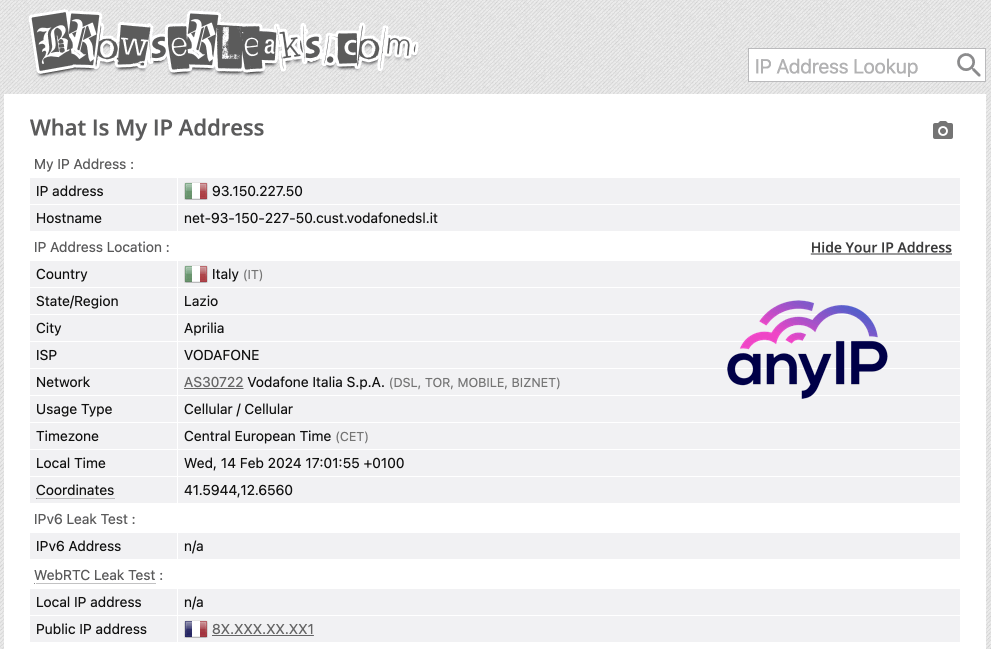
Luckily, It’s a simple verification. Head up to https://browserleaks.com/ip with and without the proxy activated. You will see that your IP is getting updated.
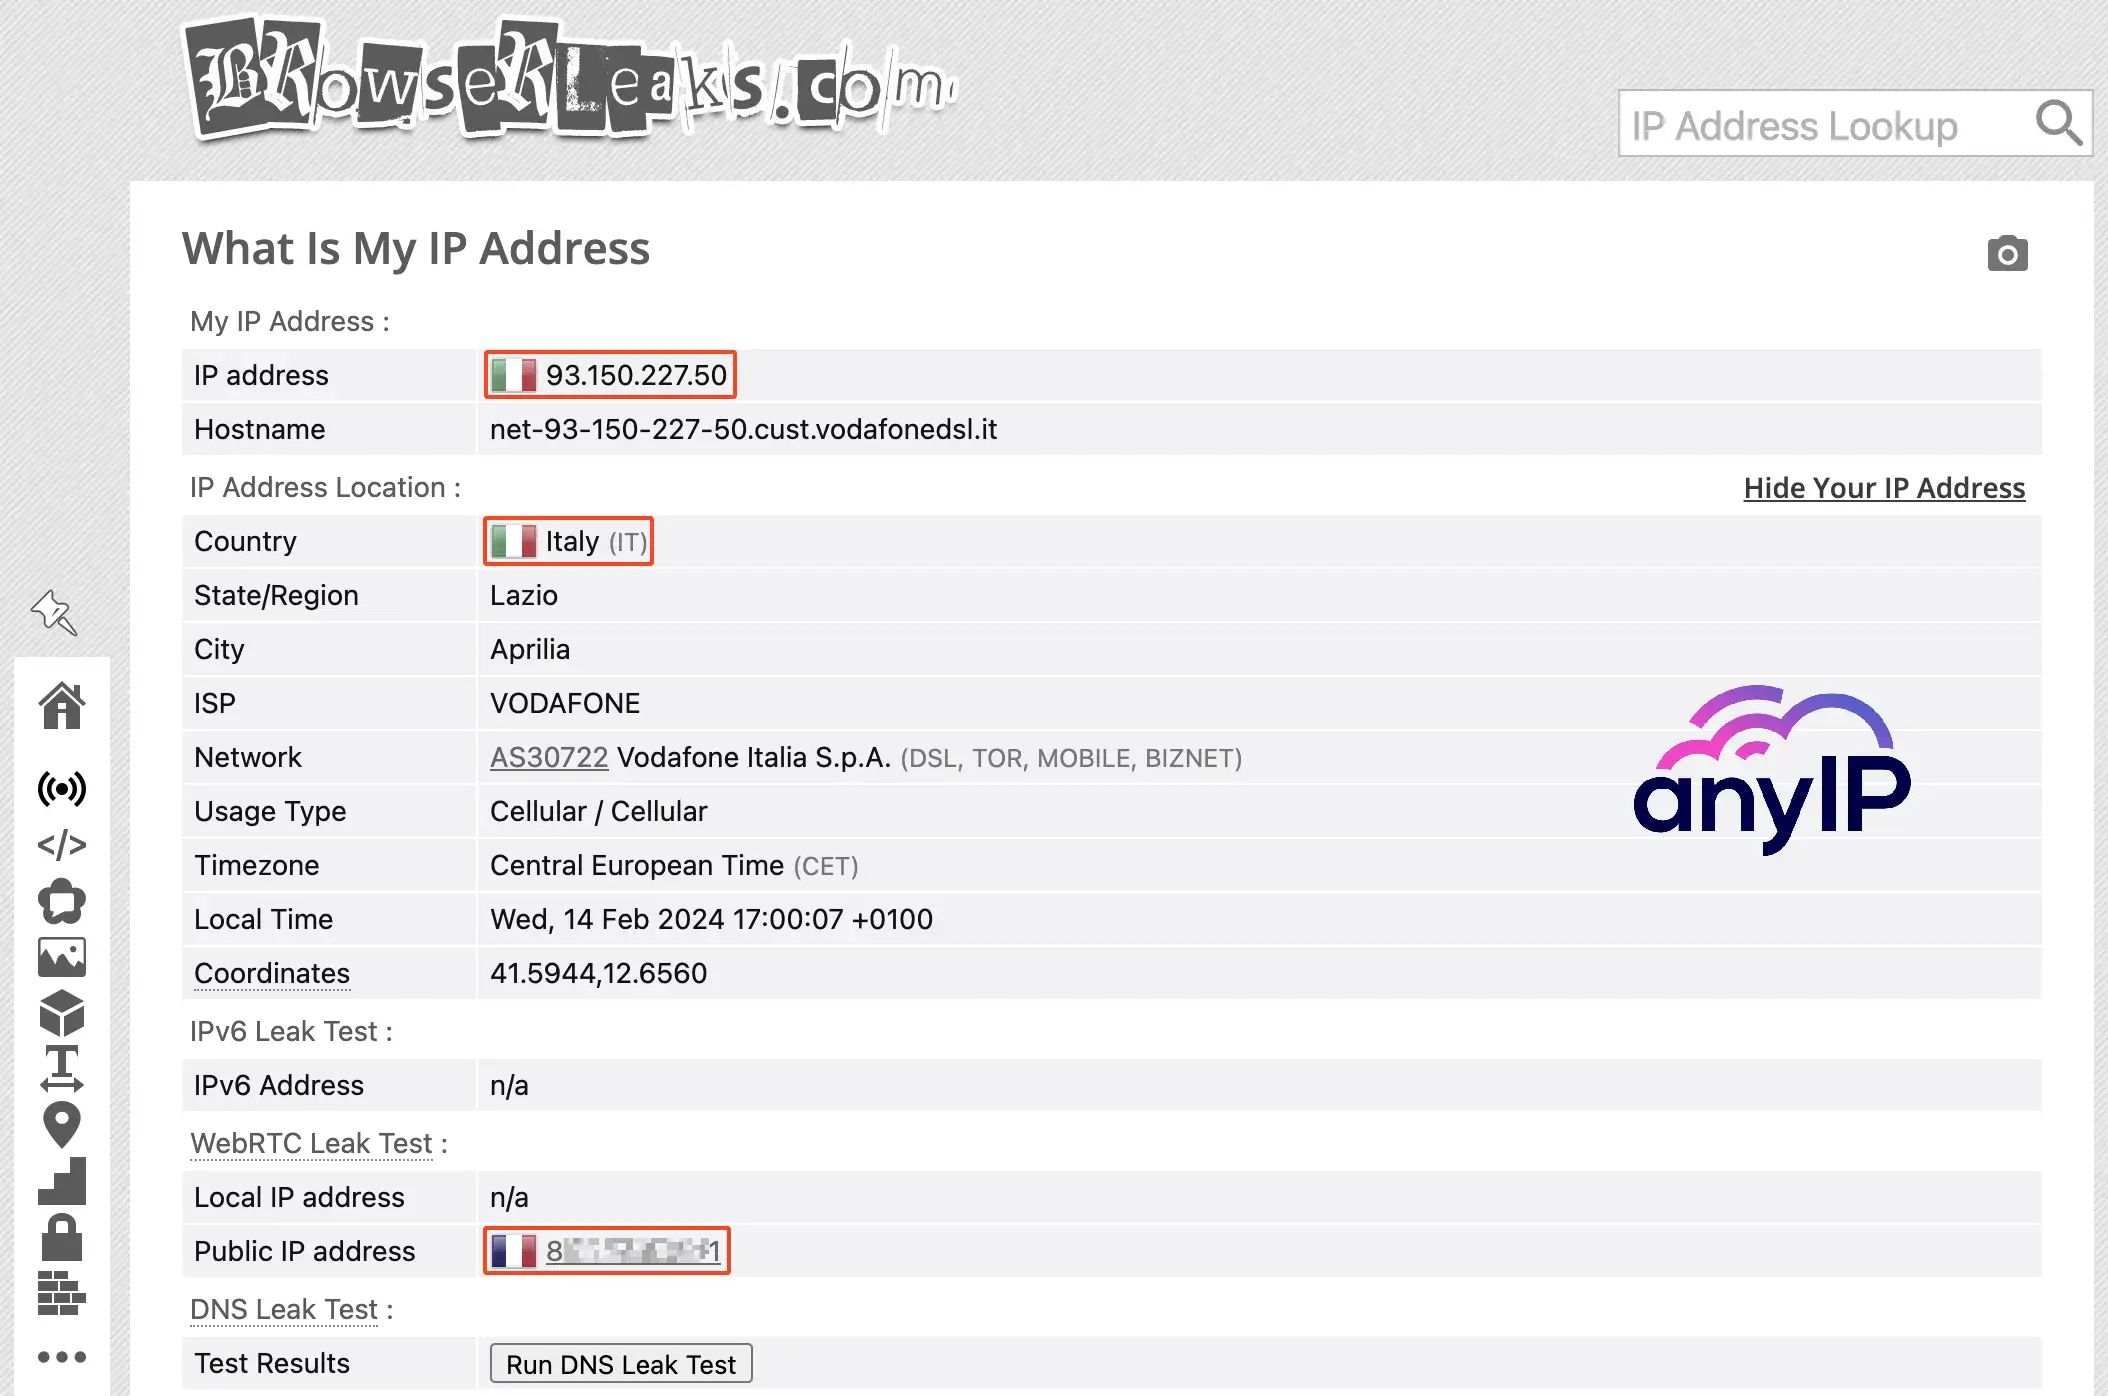
I can confirm that my new IP differs from when the proxy is disabled and that I’m well located in Italy as configured in my proxy.
You can also run a DNS leak check to verify that your DNS servers aren't exposing your real location.
If you look closely at those screenshots, you can see a WebRTC Leak revealing your public IP address
What is a WebRTC Leak, and how to fix it
WebRTC is a free, open-source technology. It enables real-time communication and data sharing. It's short for Web Real-Time Communication. It allows users to make audio and video calls. They can also share files and screens without additional software or plugins.
This technology has dramatically improved how we communicate and collaborate online. Yet, it has flaws. One of the significant concerns with WebRTC is the issue of WebRTC leaks.
It can expose a user's real IP address even when using a VPN or proxy. To fix this on Chrome, Google developed a simple extension. It gives you access to the WebRTC configuration.
Follow the instructions to install and configure the extension:
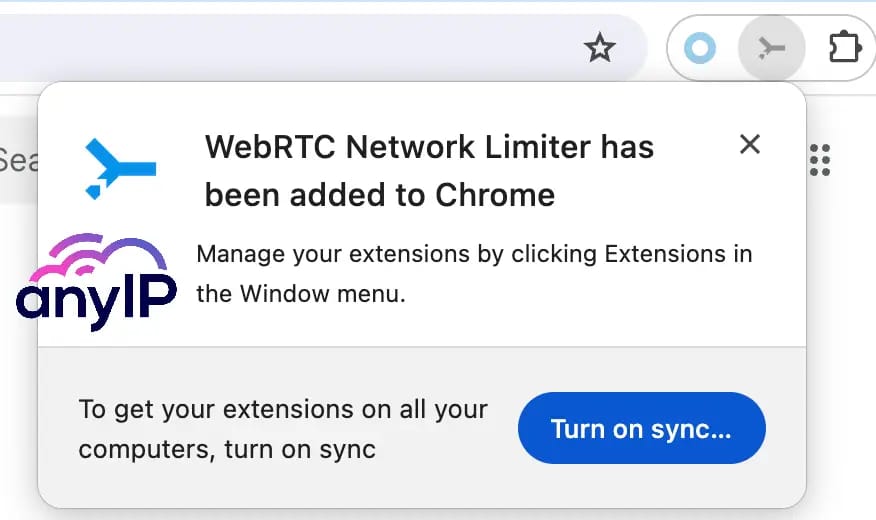
Step 1: Download and add WebRTC Network Limiter to Chrome

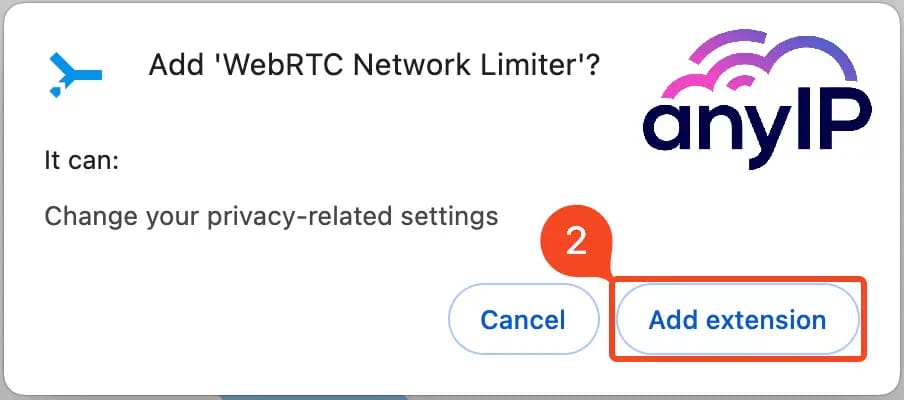
Click on “Add to Chrome.” in the extension page.
Review all the permissions granted to WebRTC Network Limiter. Then, click on “Add extension” to confirm.
💡 You should see a confirmation that the extension was added to Chrome.
Step 2: Heads up to the WebRTC Network Limiter option
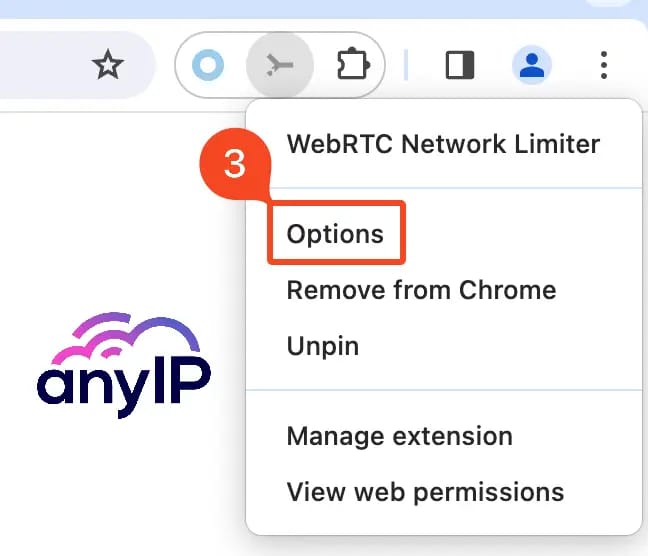
Open the extension menu and click on “Options” to access the extension configuration menu
Open the extension menu and click on “Options” to access the extension configuration menu
Step 3: Configure the extension to fix the WebRTC leak
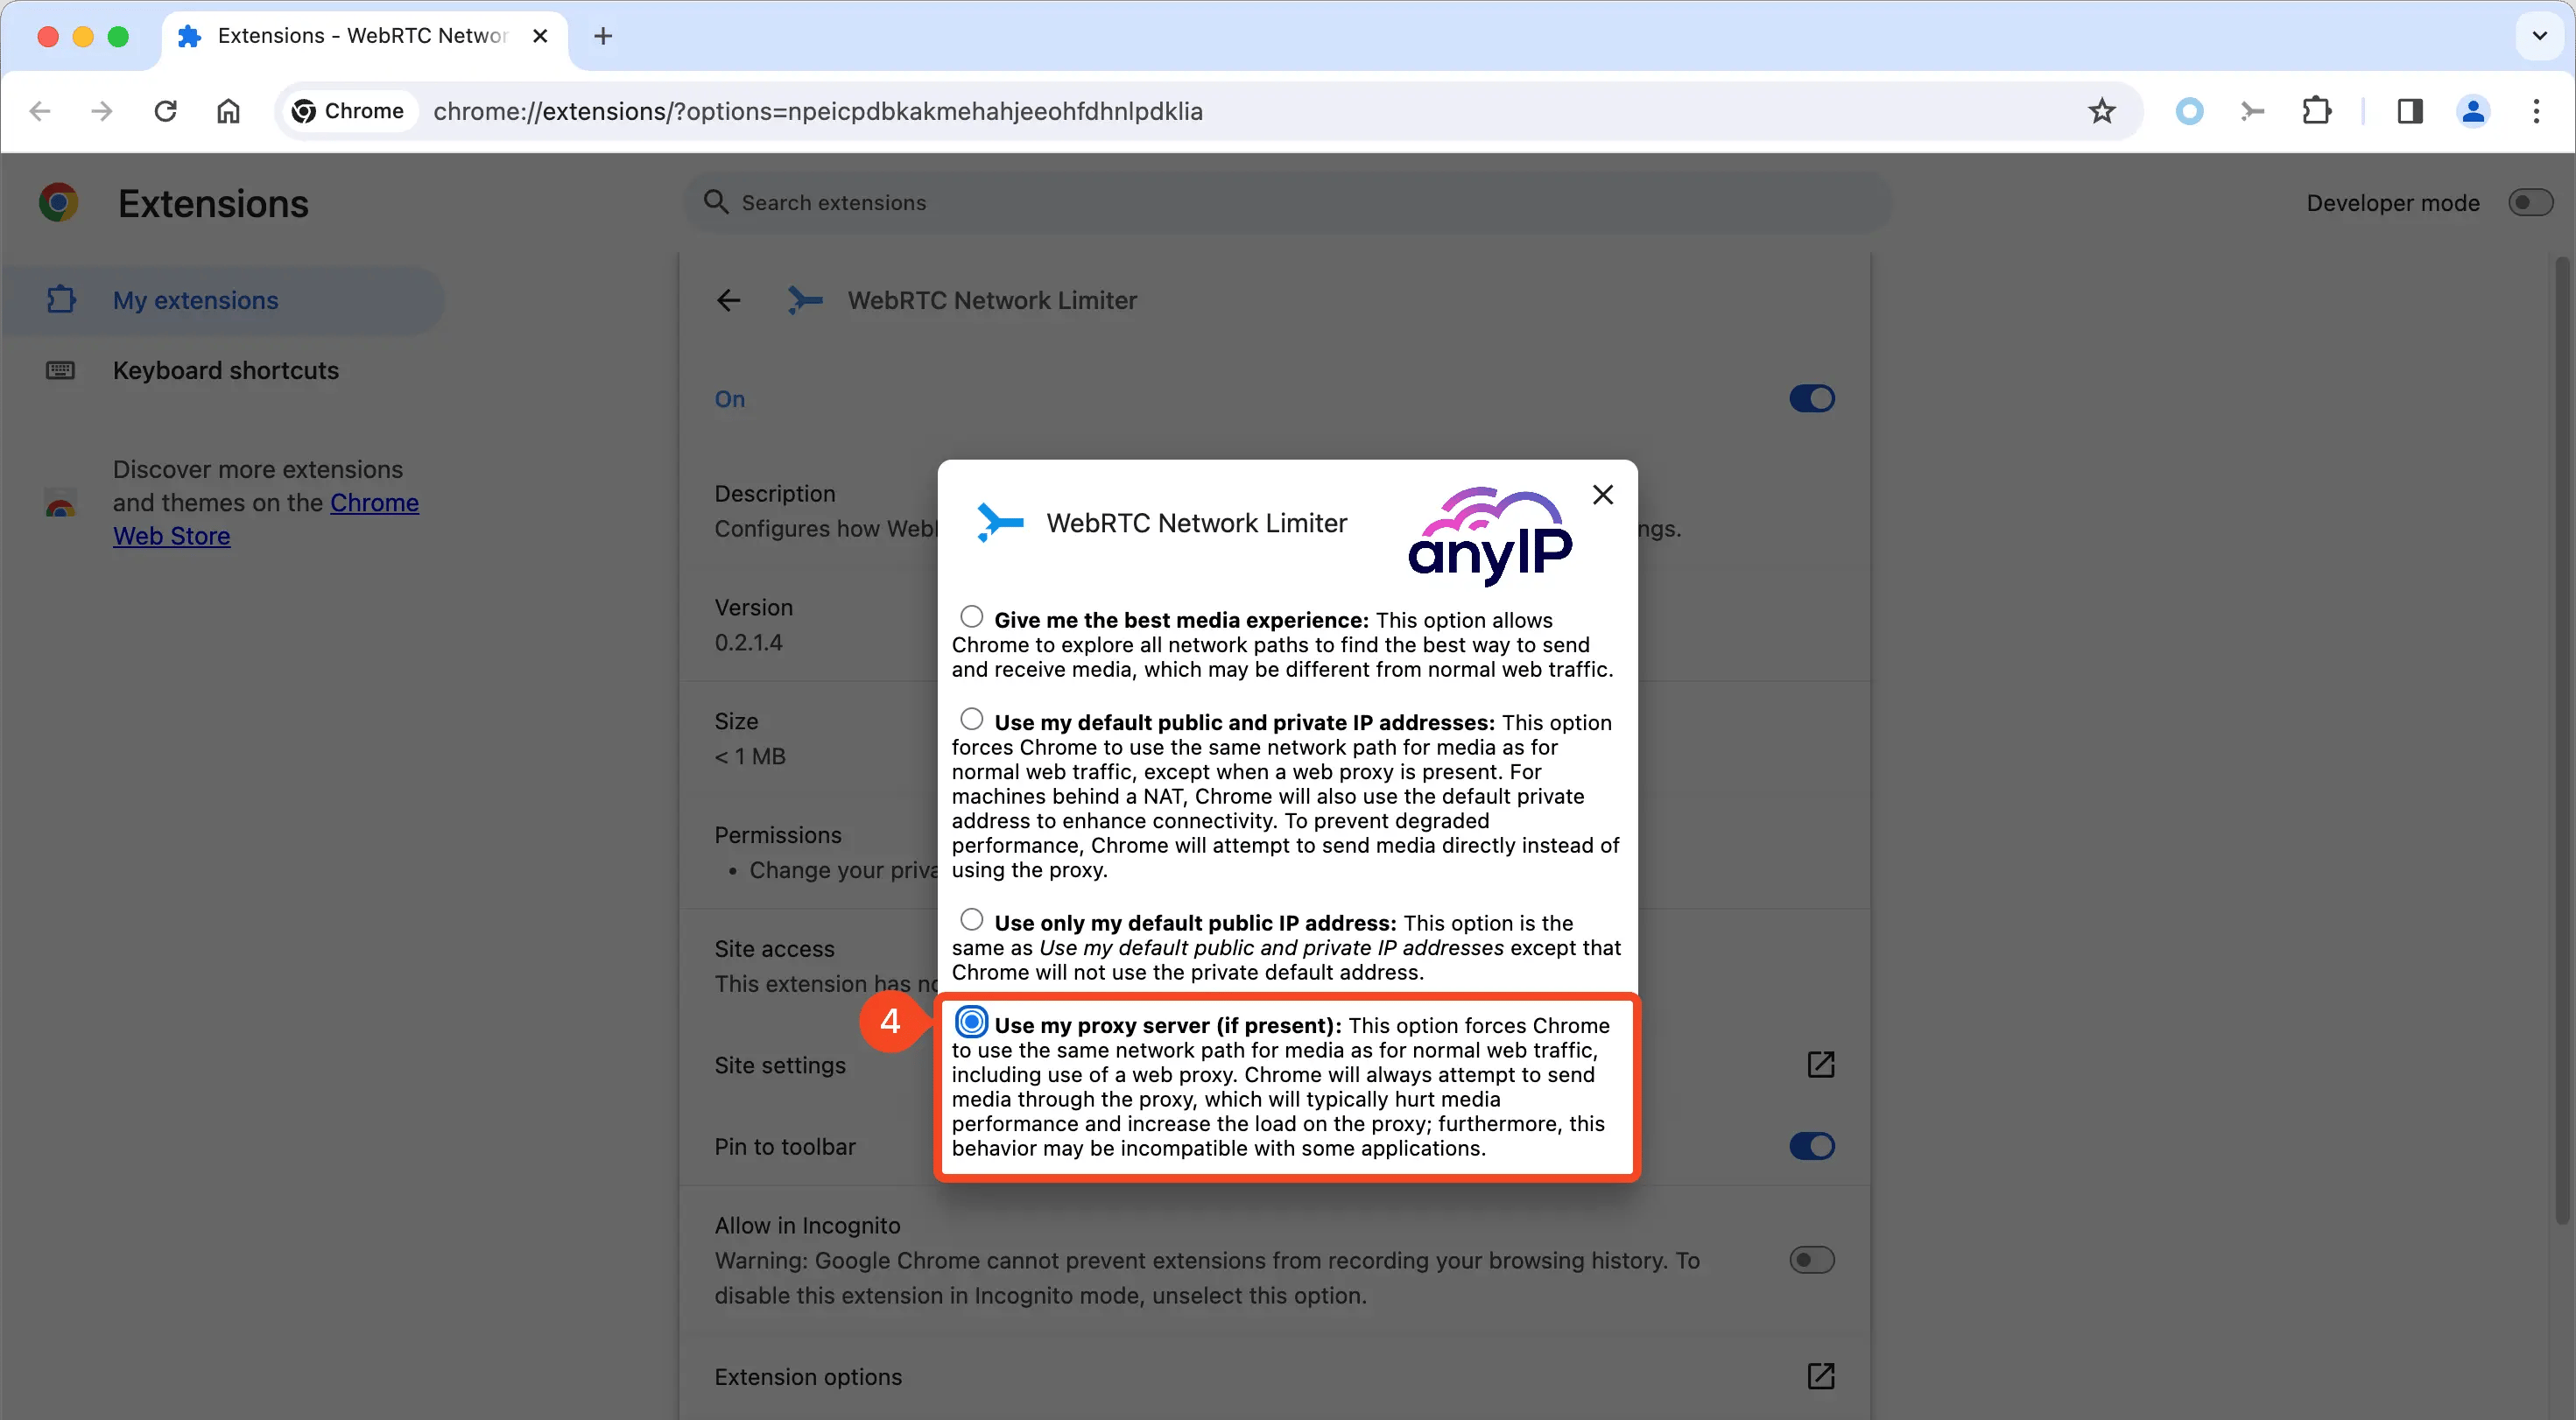
Select “Use my proxy server (if present)” to force Chrome to force the traffic through the proxy.
Step 4: Check your proxy connection one more time
Head back to https://browserleaks.com/ip to check the WebRTC Leak.
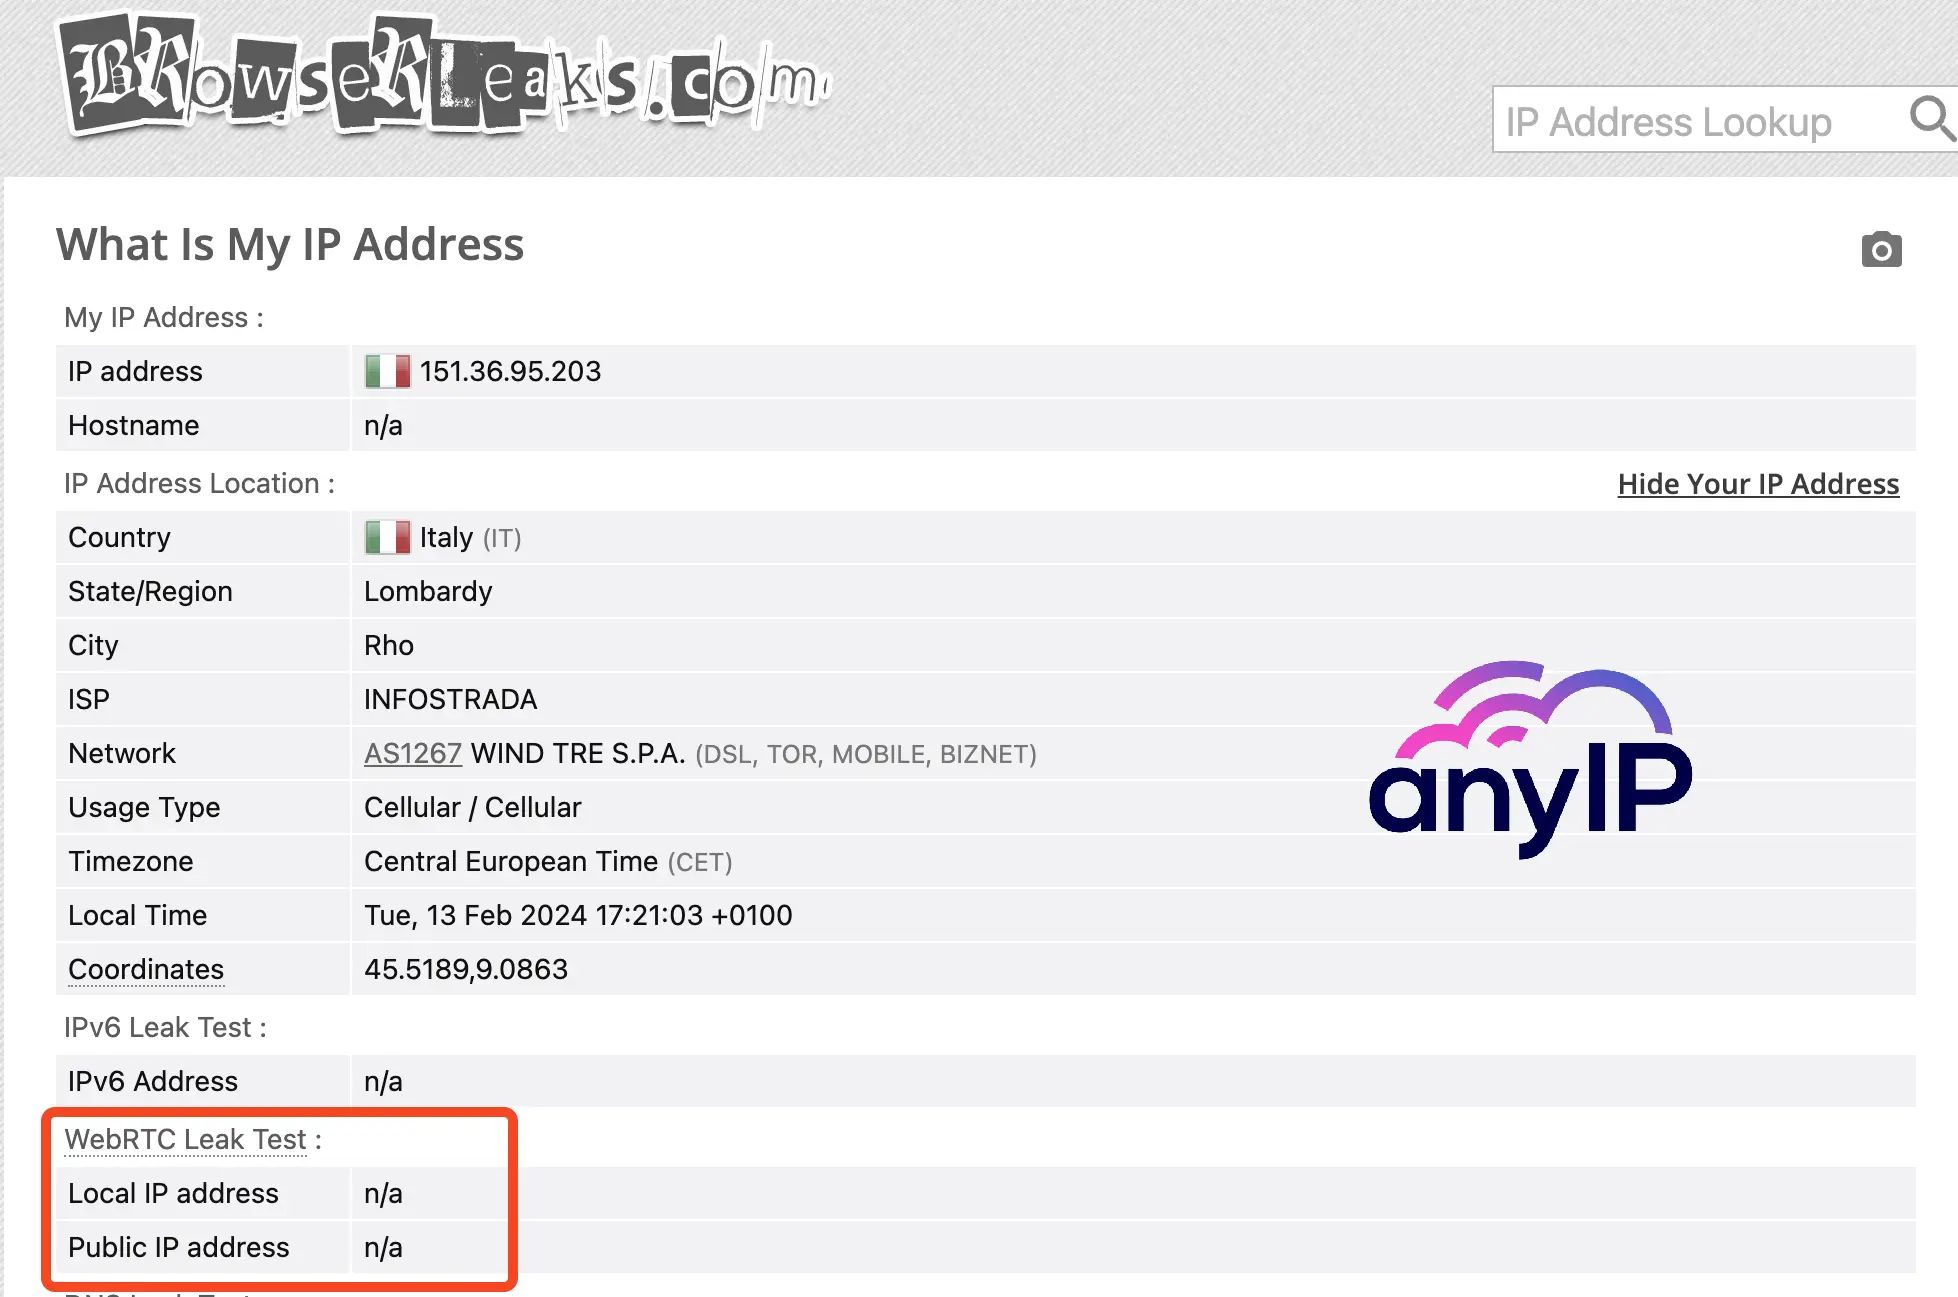
As you can see on the screenshot, you have now fixed the WebRTC Leak and can now browse the web anonymously.
Advanced Only
How to set up SOCKS5 Proxy on Chrome
A common reason to set up SOCKS5 in Chrome is to use Telegram proxies in restricted regions.
Chrome limitation with SOCKS5
If you want to use a SOCKS5 proxy in Chrome, you’ll need a provider that offers IP whitelisting (e.g., anyIP.io). Chrome does not natively support SOCKS5 proxies with username/password authentication, so IP whitelisting is the only reliable method.
With this setup, the proxy automatically recognizes your device’s IP address instead of asking for login credentials, which makes the connection smoother and avoids compatibility issues. This also ensures stable use with proxy management extensions, such as SwitchyOmega 3.
Why we recommend using HTTP/HTTPS
Keep in mind that while SOCKS5 proxies are flexible and can handle more types of traffic, Chrome offers better built-in support for HTTP/HTTPS proxies. That’s why many users prefer HTTP/HTTPS for simplicity, while choosing SOCKS5 with IP whitelisting when they need broader protocol support.
With HTTP/HTTPS, authentication and compatibility are straightforward, resulting in faster, more stable, and easier-to-manage connections within the extension.
What is IP whitelisting?
IP whitelisting, like we’re offering at anyIP.io involves registering your device’s IP address in your dashboard. Once whitelisted, the system will only accept connections coming from that IP, no username/password needed. This makes authentication simpler, especially for browsers like Chrome.
How to use IP whitelisting? Here’s a quick step-by-step guide for IP whitelisting on anyIP.io
Log in to your anyIP.io dashboard.
Go to the Authentication / IP Whitelisting section.
Add your device’s IP address
Save changes → from now on, the proxy will accept connections only from that IP, no username/password required.
💡 If your IP address changes frequently (due to mobile data or dynamic internet), IP whitelisting will block you until you update your IP address in anyIP.io.
Best for: static IPs (home/office).
If your IP changes frequently, we recommend using the username/password authentication instead
How to use a SOCKS5 proxy
Select “SOCKS5” from the dropdown menu
Enter your hostname in the Server field. In our example, we use anyIP.io as a provider: portal.anyip.io
Enter here your proxy port for anyIP.io we use: 2000
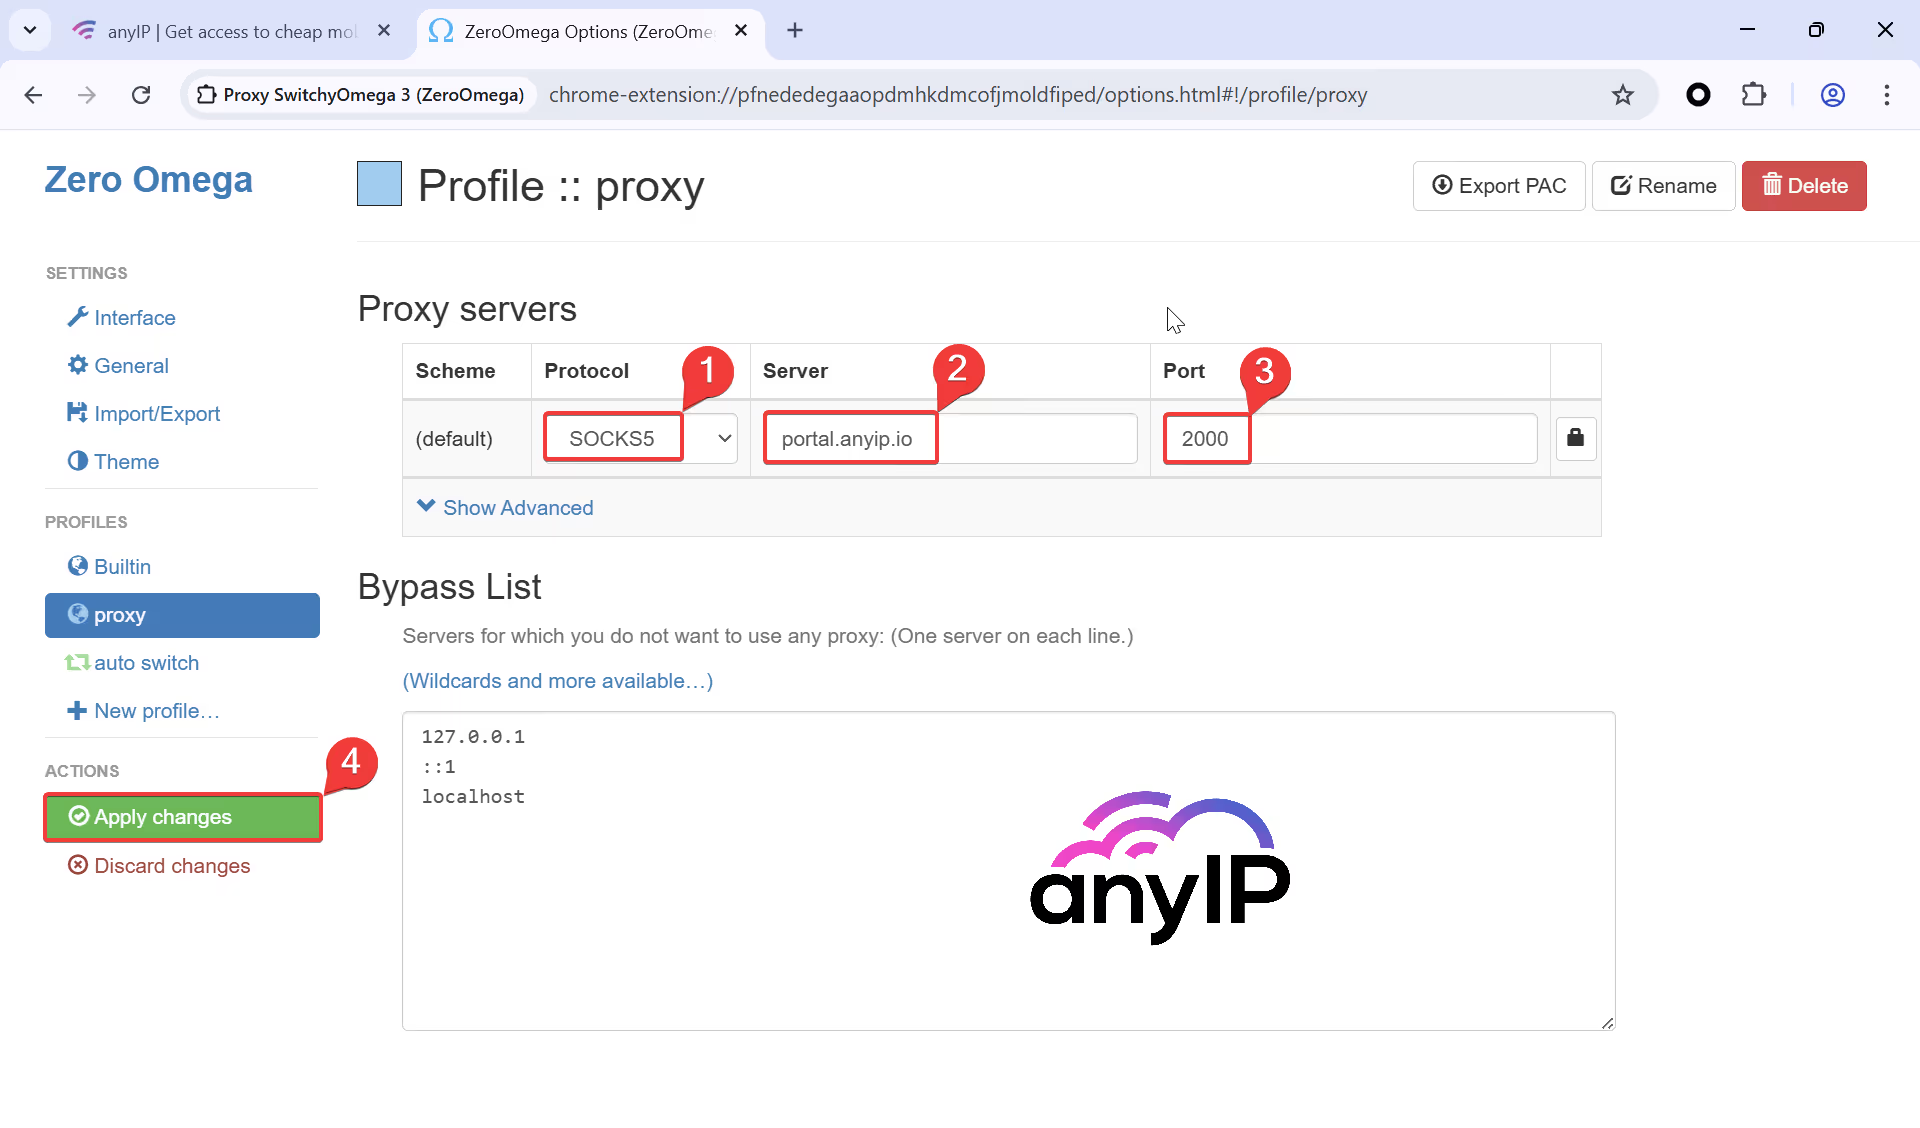
Done, you can now use the proxy directly on SwitchyOmega (ZeroOmega) without login prompts.
Connect to your SOCKS5 proxy using the command line.
If you're familiar with Terminal/PowerShell, you can launch Google Chrome with a SOCKS5 proxy using this command line:
For macOS:
"/Applications/Google Chrome.app/Contents/MacOS/Google Chrome" --proxy-server="socks5://portal.anyip.io:2000”For Windows 10/11:
Start-Process -FilePath "C:\Program Files\Google\Chrome\Application\Chrome" --proxy-server="socks5://portal.anyip.io:2000"Depending on your proxy provider, you have to update:
The hostname, in this example, we use : portal.anyip.io
The port. For our test, we used: 2000
The file path may differ depending on where you installed Google Chrome.
Once your command line is ready, ensure that Chrome is closed. Then press “Enter” to launch a new instance of Chrome with the proxy enabled.
To test your connection, you can use the same tools as the previous method.
Fix WebRTC and DNS Leak using the command line
One major issue when using “—proxy-server” is that this argument only applies to URL load. Google Chrome has many components that can bypass the proxy server. Hence, your connection will not be fully anonymous.
"DNS prefetcher” is one of those components. It will use your local DNS to improve browsing performance. It is causing a DNS Leak while using a SOCKS5 proxy.
To fix this behavior, you could turn off “DNS prefetcher,” which would drive Chrome to send raw DNS requests.
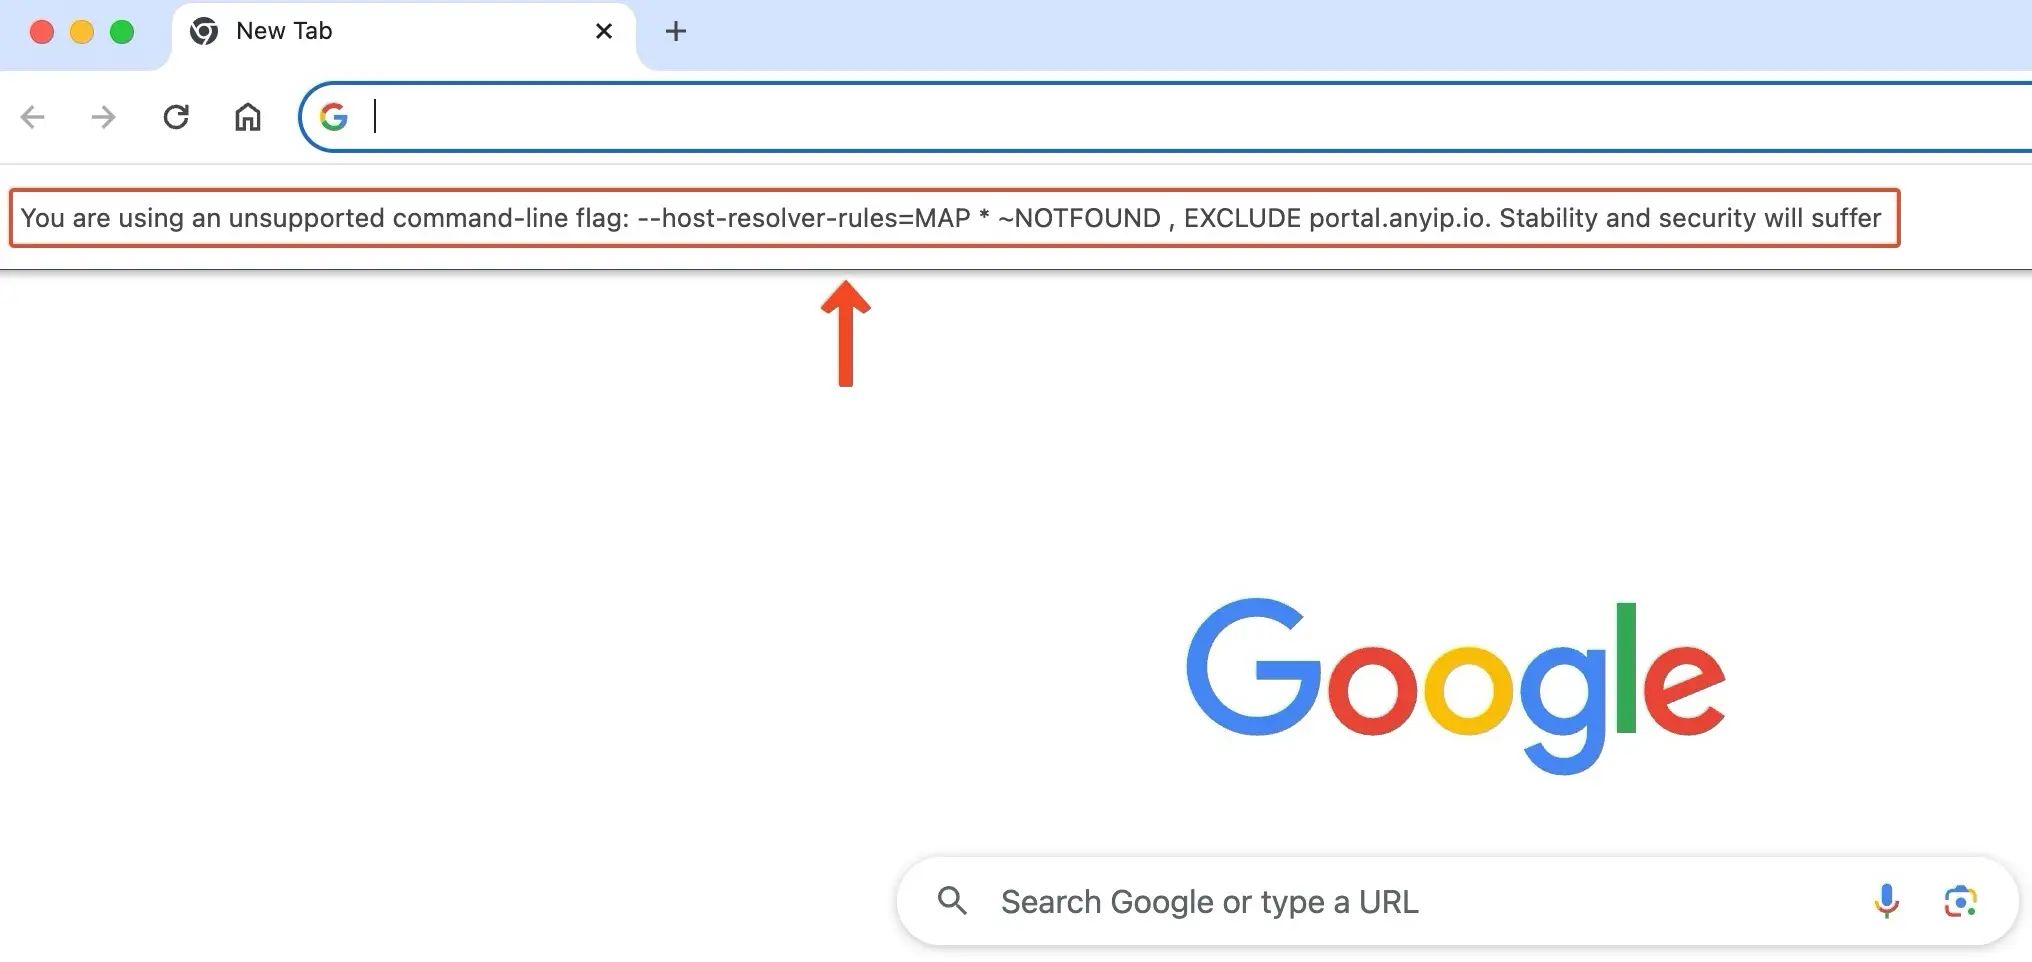
The best solution to solve this issue is to add the following argument in the command line :
--host-resolver-rules="MAP * ~NOTFOUND , EXCLUDE portal.anyip.io"What “—host-resolver-rules” is preventing Chrome to send DNS requests over the internet. Instead, all requests, except for your proxy, are mapped to an invalid address (0.0.0.0).
Again, depending on your proxy, you need to update the hostname. Here, we use “portal.anyip.io.”
This method is deprecated, and using it will print an error when using it. You may continue to use it as long as it works at your own risk
Troubleshooting Common Issues
You may encounter a few common issues, such as :
My proxy is not connecting?
Suppose you're having problems connecting to your proxy. Make sure you have the correct hostname/IP and port. And take some time to verify your login details (password and username).
I’m getting the “ERR_SOCKS _CONNECTION_FAILED” error.
As mentioned, Google Chrome is incompatible with SOCKS5 Proxy. SOCKS5 Proxy requires username/password authentication. Before using a proxy provider, ensure it can handle IP whitelisting authentication.
Connection refused or server not responding.
If your credentials and proxy information are correct, contact your proxy provider. Check if their services are still working correctly.
How to quickly get SOCKS5 proxy using anyIP.io.
Gain quick and hassle-free access to SOCKS5 proxies through anyIP.io's expansive network. You can count on their 24/7 support team for uninterrupted and seamless service.
What is a SOCKS5 proxy, and how are they working with Chrome?
A SOCKS5 proxy is a secure internet protocol. It routes network packets between a client and a server through a proxy server. It stands for Socket Secure v5. Using a SOCKS5 proxy on Google Chrome helps bypass network restrictions. It also lets you access geo-restricted content. It also hides your IP address and improves internet security.
What about Mozilla Firefox?
If you are more of a Firefox user, don't worry. You can follow this guide to help you configure the proxy in less than 10 minutes!
Article by
Khaled Bentoumi
Khaled is a software engineer. He's been involved in many startups of different sizes. Previously, he founded Data to Page, an AI Programmatic SEO startup. He now handles all the marketing at anyIP.
:format(webp))
:format(webp))
Read more
How to customize Your User-Agent with Python Requests
Learn how to update and rotate user-agents in Python Requests to avoid detection and improve scraping efficiency.

How to Set Up Proxies with Potatso in iOS: Guide
Discover the ultimate Potatso proxy guide! Learn how to set up and configure proxies on your iOS device effortlessly.

How to Set Up SOCKS5 Proxy in Firefox: Ultimate Guide
In this step-by-step tutorial, we’ll show you two methods to set up a SOCKS5 proxy quickly in Mozilla Firefox.