
How to use proxies with the Python Requests module?
Table of Contents
Key takeaways
Requests library is ideal for HTTP requests and proxy usage in Python.
Using proxies helps bypass rate limits and anti-bot protections for web scraping.
Define proxies in Python using a structured dictionary with protocol and URL.
Errors arise if both http and https proxies are not specified, risking account bans.
The requests library supports various proxy types, including HTTP, HTTPS, and SOCKS5.
Requests is my favorite library for performing HTTP requests in Python. It has a straightforward usage of HTTP methods and proxy connections.
It’s the perfect choice for simple tasks, small web scrapers, or dive into more complex data collection processes.
Using proxies is a game changer for web scraping. They let you bypass rate limits and some anti-bot protections. They also make your activity sneakier.
This tutorial is the guide I would have loved to read when I started my journey as a web scraper. I’ll share some tips that could have saved me from painful mistakes.
How to use a proxy with Python Requests
In this first section, we'll cover the basics of the requests Python library.
We'll use it to perform a simple request. How to authenticate to a private proxy. Also, how to structure the proxies dict.
Straightforward proxies’ dict syntax
Requests is a package you have to install, so if it’s not already done, it can be installed like this:
python3 -m pip install requestsBefore diving into the specs of using proxies with requests, here is the simplest syntax to use a proxy for a request:
import requests

http_proxy = "http://130.61.171.71:3128"
proxies = {
    "http": http_proxy,
    "https": http_proxy,
}

resp = requests.get("https://ifconfig.me/ip", proxies=proxies)

print(resp, resp.text)
And the output should be:
$ python3 main.py
<Response [200]>130.61.171.71
💡 Note that for this example, we’re using a free proxy, so it might not be available or functional when you try it.
It’s always a struggle to find a working free proxy.
When you look at the code snippet above, you might wonder:
Why does he use an HTTP proxy for both HTTP and HTTPS?
Why does he specify “HTTP” both in the key and the string value? Isn’t it redundant?
That is what I wondered when I saw that structure at first, but when you take a look at the documentation, everything makes sense.
What does the documentation say about the syntax
From the requests documentation, we understand that the proxies dict is a mapping protocol to the URL of the proxy.
In a more comprehensive language, here is the proxies’ dict structure:
proxies = {
  "target_protocol": "scheme://proxy_host:proxy_port"
}target_protocol: It can be different protocols like HTTP, HTTPS or FTP. It's the protocol where you want the associated proxy to be used. You could use a proxy for other protocols, but it is beyond the scope of the requests python lib.
scheme: In other terms, I could have named it, proxy_connection. This is the type of connection you want to use to connect to your proxy. In the next points we’ll see what are the different protocols you can use to connect to a proxy.
proxy_host and proxy_port: It’s basically the domain:port or ip:port to your proxy.
I hope it's clear, trust me, I would have loved to read these lines somewhere before.If you misunderstand this structure, you could face consequences.
The mistake that cost me thousands of bans
I once made a mistake in a project that led to over 3,000 social media accounts being suspended overnight.
Let me quickly recap the story for you.
I was scraping data from a popular social network, using a proxy provider and thousands of authenticated accounts. Initially, my proxy configuration looked like this:
proxies = {
  "http": "http://myproxyprovider.com:3128",
  "https": "https://myproxyprovider.com:443",
}
However, I kept encountering SSLError exceptions.
Thinking the issue was the SSL connection, I removed it:
proxies = {
  "http": "http://myproxyprovider.com:3128"
}
At first, it seemed to work. The process ran smoothly for a week, but then I realized the traffic wasn’t going through the proxy at all.
I quickly added back the HTTPS key, but it was too late. The social network flagged all accounts because they suddenly started using different IPs after weeks of using the same static one. In the next morning, every account was suspended.
I’ve learned always to set the HTTPS protocol in the proxies’ dict, as most sites use HTTPS. Also, if you use accounts for scraping, ensure each account consistently uses the same or a similar proxy.
Later in this article, we’ll cover how to reuse the same proxy with a provider and handle SSLError exceptions more effectively.
Different types of proxy connections
Here, we’ll discuss the different ways to connect to a proxy and their specificities.
HTTP
As its name says, this kind of connection is to handle HTTP requests. All the traffic between your program and the proxy won’t be encrypted. The advantage is that it’s fast and reliable for handling massive requests.
HTTPS
It’s the same as HTTP but handles SSL/TLS connection between your program and the proxy.
That obviously makes the traffic encrypted and secure. However, it also makes it a little bit slower, and you can encounter some connection errors.
SOCKS5
SOCKS5 stands for SOCKet Secure, is good for its flexibility, it can handle various protocols.
If you need to route your traffic to a non-HTTP service, you’ll have to use SOCKS5.
For example, if you want to use the Tor network with requests, you must use a socks5 connection.
Using a socks5 connection with your proxy will make the DNS resolution happen on the client rather than on your proxy. If you want to resolve the DNS on the proxy server, you can use this scheme: socks5h.
Requests also support socks5 proxy connection, but you’ll have to install a third party library.
You can install the requests extension like this:
python3 -m pip install requests[socks]Then, you can use a socks5 proxy like so:
import requests

username = "jeremylp"
password = "password"

socks5_proxy = f"socks5://{username}:{password}@portal.anyip.io:1080"
proxies = {
  "http": socks5_proxy,
  "https": socks5_proxy,
}

resp = requests.get("https://ifconfig.me", proxies=proxies)
print(resp, resp.text)
Proxy basic authentication
Until now, we have never talked about authentication to a proxy. This is crucial because we never use free proxies in the real world. They are so unstable and unreliable that we can’t count on that kind of proxies.
From now on, I’ll use the anyIP.io provider for my examples. You can use Basic Authentication to authenticate to a proxy.
Here is the most straightforward syntax to provide credentials to a proxy:
username = "jeremylp"
password = "password"

proxies = {
  "http": f"http://{username}:{password}@portal.anyip.io:1080",
  "https": f"https://{username}:{password}@portal.anyip.io:443"
}
Using requests proxies with environment variables
Python Requests also allows you to set environment variables to set your proxies.
There are 4 standard variables, HTTP_PROXY, HTTPS_PROXY, ALL_PROXY, and NO_PROXY.Their lowercase version also works.
HTTP_PROXYandHTTPS_PROXY: These variables define the proxy server to use for HTTP and HTTPS connections.ALL_PROXY: This variable defines a “catch-all” proxy for unhandled protocols. You could only export this variable to handle HTTP and HTTPS connections.NO_PROXY: This variable specifies the hosts or domains that should bypass the proxy.
Here is an example using environment variables to set proxies:
$ export HTTP_PROXY='http://jeremylp:password@portal.anyip.io:1080'
$ export HTTPS_PROXY='https://jeremylp:password@portal.anyip.io:443'
$ export ALL_PROXY='socks5://jeremylp:password@portal.anyip.io:1080'
$ export NO_PROXY='localhost,127.0.0.1,.example.com'
$ python3
>>> import requests
>>> resp = requests.get("https://ifconfig.me/ip")
>>> print(resp.text)
186.188.228.86
Proxies with Requests Session object
The requests library offers a Session object, which allows you to set up some default configurations, like headers, timeouts, or proxies. Thus, you don’t have to specify these parameters each time you make a request.
The Session object is also very useful for some websites you might want to scrape. Some websites will return you an error saying that you must accept cookies to perform successful requests to it.
Performing requests via a Session object is the solution to accept cookies.
⚠ Warning:
Note that if you use proxies with this syntax, it could get overwritten by proxies defined in the environment variables. To ensure the use of proxies in the presence of the environment variables, you can specify the proxies keyword argument in the requests.
Let’s see an example of how to use proxies with the requests Session object:
import requests

username = "jeremylp"
password = "password"

us_proxy = f"http://{username},country_US:{password}@portal.anyip.io:1080"
gb_proxy = f"http://{username},country_GB:{password}@portal.anyip.io:1080"
de_proxy = f"http://{username},country_DE:{password}@portal.anyip.io:1080"

proxies = {
    "http": us_proxy,
    "https": us_proxy,
}


# Session object syntax:
sess = requests.Session()
sess.proxies.update(proxies)

resp = sess.get("https://ifconfig.co/country")
print("Session syntax:", resp.text.strip())


# Here we will overwrite the proxy settings using the environment variable:
import os
os.environ["HTTPS_PROXY"] = gb_proxy

resp = sess.get("https://ifconfig.co/country")
print("Env var overwrites:", resp.text.strip())


# The 'proxies' keyword can't be overwritten:
resp = sess.get("https://ifconfig.co/country", proxies={"https": de_proxy})
print("'proxies' keyword is the first choice:", resp.text.strip())
The output will be:
Session syntax: United States
Env var overwrites: United Kingdom
'proxies' keyword is the first choice: Germany
Advanced usage of proxies with Requests
This second section will explore a more advanced use of proxies. We'll look at real-world use cases and share advice my younger self would have appreciate.
Proxy rotation in proxy request made simple with anyIP.io
In your web scraping journey, you might target websites that are used to deal with bots, and use different anti-bot protections (i.e Cloudflare, DataDome).
Or maybe you are just greedy and want to scrape a large amount of data from an API or a website quickly.
In these two use cases, rotating IP is a game changer to bypass limitations.
Here is the first example of rotating in a list of proxies:
import random
import requests

username = "jeremylp"
password = "password"

proxies_list = [
	"http://102.0.12.224:8080",
	"http://13.71.96.175:80",
	"http://101.255.166.141:3128",
	"http://13.87.97.69:8080",
	"http://102.214.166.1:1981",
	"http://1.4.225.116:8081",
]

for _ in range(10):
		proxies = {
		    "https": random.choice(proxies_list),
		}
    resp = requests.get("https://ifconfig.me/ip", proxies=proxies)
    print(resp.text)
As a professional proxies provider, anyip.io offers a very easy way to rotate proxies. Instead of rotating in a list of a few IPs, anyip.io allows you to seamlessly rotate among millions of proxies.
By default, it rotates proxy for each request performed. Short example:
import requests

username = "jeremylp"
password = "password"

proxies = {
    "http": f"http://{username}:{password}@portal.anyip.io:1080",
    "https": f"http://{username}:{password}@portal.anyip.io:1080",
}

for _ in range(10):
    resp = requests.get("https://ifconfig.me/ip", proxies=proxies)
    print(resp.text)
And the output:
4.147.231.106
86.82.142.53
118.90.241.215
85.167.160.122
222.187.186.31
15.54.154.206
201.230.89.106
94.184.9.14
216.110.218.152
115.115.172.213
Among different possible configurations, anyip.io gives us control on how often we want to rotate proxies:
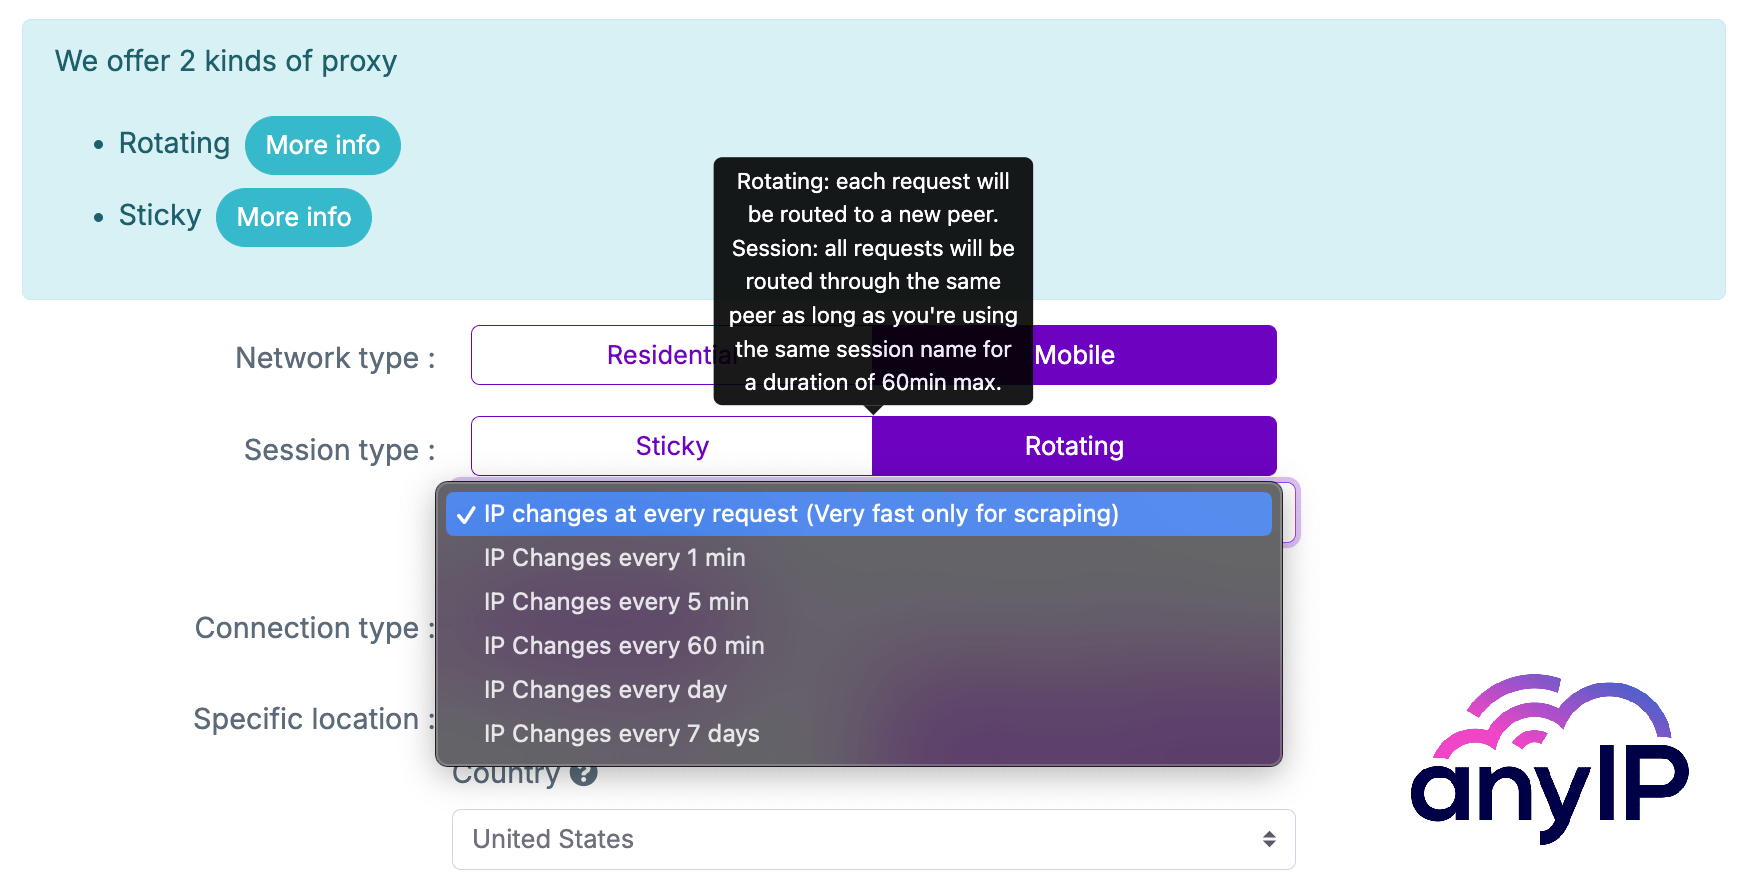
As you can see in the screenshot, there are different configurations you can use to meet your needs.
Here, we’ll focus on the Sticky and Rotating proxies.
Sticky proxy
As its name says, you can reuse the same session name to keep the same IP or at least a similar IP (an IP from the same ISP provider and geolocation) over and over.
Use case example:
When you aim to scrape data accessible as an authenticated user, you need multiple accounts. So, you should associate a session to each account, using a part of the email or a username as a session name.
Rotating proxy
With this proxy type, you can rotate your IP at every request or based on a specific time.
To rotate based on a specific time you’ll need a session name and another parameter, sesstime_x, where x is the counter (in minutes) for when you want the session to rotate the IP. You can set it from 1 minute to 10080 minutes (7 days).
If you're unfamiliar with using proxy providers, this kind of config is set in the username of the basic auth.
Let’s see a simple example using sticky proxies:
import requests
from uuid import uuid4

def sticky_proxies_demonstration():
    """Demonstrate the use of sticky proxies."""

    # Generate 2 session names using a shortened uuid4
    sessions = [uuid4().hex[:6] for _ in range(2)]

    for i in range(10):
        # Session is rotated each round
        session = sessions[i % len(sessions)]

        # Perform an HTTP request using the session name
        http_proxy = f"http://{username},session_{session}:{password}@portal.anyip.io:1080"
        proxies = {
            "http": http_proxy,
            "https": http_proxy,
        }
        resp = requests.get("https://ifconfig.me/ip", proxies=proxies)
        print(f"Session {session}: {resp.text}")


username = "jeremylp"
password = "password"

print("Let's try Sticky Proxies:")
sticky_proxies_demonstration()
And the output:
Session f2142f: 103.165.155.198
Session 3b0173: 64.224.249.46
Session f2142f: 103.165.155.198
Session 3b0173: 64.224.249.46
Session f2142f: 103.165.155.198
Session 3b0173: 64.224.249.46
Session f2142f: 103.165.155.198
Session 3b0173: 64.224.249.46
Session f2142f: 103.165.155.198
Session 3b0173: 64.224.249.46
We saw different ways to rotate IPs using a professional proxy provider with the requests Python library.
But we haven’t seen all the features of the requests library yet. In the next point, I’ll present another example of a less-known feature using proxies with the requests library.
Use specific proxies for different target websites
In the previous chapter, we talked about the proxies’ dict syntax, but there is something I didn’t specify. The dict’s keys are supposed to define the target protocol.
We can also use the key to target a website instead of the whole HTTP or HTTPS protocol.
Short example:
import requests

username = "jeremylp"
password = "password"

proxies = {
    "https://ifconfig.me": f"http://{username}:{password}@portal.anyip.io:1080",
}

resp = requests.get("https://ifconfig.me/ip", proxies=proxies)
print("ifconfig.me:", resp.text)
resp = requests.get("https://ifconfig.co/ip", proxies=proxies)
print("ifconfig.co:", resp.text) # This will reveal my real ip
And the output:
ifconfig.me: 101.255.120.98
ifconfig.co: **.***.**.*** # my ip censored
As we can see in the code snippet, instead of only providing http or https in the key, we can append the target domain name.
The request to ifconfig.me went through the proxy. The response from ifconfig.co revealed my home's IP address.
💡 Note that you can also specify the https key aside a domain key. The https key will act as a default proxy for the HTTPS protocol if the target website is not found in the dict.
Moreover, only domain aiming is available. You won’t be able to target a specific path.
This feature is interesting if you want to centralize and simplify the usage of proxies in your project.
You can create a global variable, PROXIES, to set a proxy for each website you want to scrape.
Here's a proxy's dict syntax using this feature and geo-targeting of anyip.io to scrape product prices from different Amazon countries:
proxies = {
    "https": f"http://{username}:{password}@portal.anyip.io:1080",
    "https://amazon.de": f"http://{username},country_DE:{password}@portal.anyip.io:1080",
    "https://amazon.co.uk": f"http://{username},country_GB:{password}@portal.anyip.io:1080",
    "https://amazon.fr": f"http://{username},country_FR:{password}@portal.anyip.io:1080",
}
Common errors while playing with proxies
In this last point, I'll share some tips on handling common exceptions in web scraping.
Basically, common errors, are network related errors. Especially if you’re using residential proxies, you might meet those errors more often than data center proxies.
You can mitigate network-related errors (like ProxyError, TimeoutError, ConnectionError, and sometimes SSLError) just by doing a retry or even rotating the proxy.
You can code your retry system or use the requests’ retry feature in the Session object.
For SSLErrors, you can avoid them by setting the keyword argument verify to False.
If you do so, you’ll see many warnings, such as “InsecureRequestWarning: Unverified HTTPS request is being made to host…”
Here is an example to mute these messages:
import requests

# Disable SSL warnings
import urllib3
urllib3.disable_warnings()

username = "jeremylp"
password = "password"

proxies = {
    "https": f"http://{username}:{password}@portal.anyip.io:1080",
}

resp = requests.get("https://ifconfig.me/ip", proxies=proxies, verify=False)
print(resp.text)
⚠ Disclaimer:
Setting verify=False could lead to an MITM (Man-in-the-Middle) attack. For example, a peer running the same software could intercept and forward your queries, compromising security.
It’s not recommended to set verify to False. When you encounter an SSLError, it’s often due to the peer disconnecting during data transfer, which causes decryption to fail. It's essential to understand the risks. Always consider this approach as dangerous.
BONUS: Import this code in your project (ready to use)
I have written this code for my personal use. I share it with you.
First, you’ll have to set the environment variables ANYIP_USERNAME and ANYIP_PASSWORD.
Then, you’ll find the ProxyType enumeration, which defines the type of proxies anyip.io offers.
Then, a list of all the available country codes is made in the constant COUNTRY_CODES.
Finally, the definition of the function get_anyip_proxy returns a ready-to-use proxy dict for the requests library.
It has four keyword arguments:
proxy_type, of typeProxyType, by defaultProxyType.RESIDENTIALsession, an optionalstr, it’s the session name to usesession_time, an optionalint, the time (in minutes) you want the session to lastcountry_code, an optionalstr, the country to locate
You can customize this code according to your needs:
"""Module to define anyip.io proxy utilities."""
import os
from enum import Enum
from typing import Optional

import requests

# Get the AnyIP username and password from environment variables, with defaults.
ANYIP_USERNAME: str = os.getenv("ANYIP_USERNAME", "<username>")
ANYIP_PASSWORD: str = os.getenv("ANYIP_PASSWORD", "<password>")

class ProxyType(str, Enum):
    """Enum to define proxy types (residential or mobile)."""
    RESIDENTIAL = "type_residential"
    MOBILE = "type_mobile"

# List of valid country codes for AnyIP proxy service.
COUNTRY_CODES: list[str] = [
    "DZ","AR","BD","BE","BO","BR","CM","CA","CO","CD","CI","EG","FR","DE","IN","ID",
    "IT","KW","MY","MA","NL","OM","PK","PH","PL","QA","RU","SA","SN","ES","TH","TN",
    "TR","UA","AE","GB","US","VN",
]

def get_anyip_proxy(
    proxy_type: ProxyType = ProxyType.RESIDENTIAL,  # Default proxy type is residential
    session: Optional[str] = None,  # Optional session name
    session_time: Optional[int] = None,  # Optional session duration in minutes
    country_code: Optional[str] = None,  # Optional country code for targeting
) -> dict:
    """Get anyip.io proxy configuration as a dictionary.

    Args:
        proxy_type: The type of proxy to use (residential or mobile).
        session: Optional session ID for session persistence.
        session_time: Optional session time in minutes (valid range: 1 to 10080).
        country_code: Optional ISO country code to specify a proxy from a specific region.

    Returns:
        A dictionary containing the HTTP and HTTPS proxy URLs.
    """

    # If country_code is provided, ensure it's valid and format it for AnyIP.
    if country_code:
        assert country_code in COUNTRY_CODES, f"Invalid country code: {country_code}"
        country_code = f"country_{country_code}"

    # If a session is provided, format it for AnyIP.
    if session:
        session = f"session_{session}"

    # If both session and session_time are provided, validate session_time and format it.
    if session and session_time:
        assert 1 <= session_time <= 10080, "Session time must be between 1 and 10080"
        session_time = f"sesstime_{session_time}"

    # Build the proxy configuration string, filtering out None values.
    proxy_config = [ANYIP_USERNAME, proxy_type, session, country_code, session_time]
    username = ",".join(filter(None, proxy_config))

    # Construct the proxy URL with the formatted username and AnyIP password.
    http_proxy = f"http://{username}:{ANYIP_PASSWORD}@portal.anyip.io:1080"

    # Return the proxy dictionary for both HTTP and HTTPS requests.
    return {
        "http": http_proxy,
        "https": http_proxy,
    }


if __name__ == "__main__":
    # Example usage of the get_anyip_proxy function with a US-based proxy, session, and session time.
    proxy = get_anyip_proxy(country_code="US", session="1234", session_time=15)

    # Make a request to check your public IP through the proxy.
    resp = requests.get("https://ifconfig.me", proxies=proxy)

    # Print the response (which should show the IP address used for the request).
    print(resp.text)
Article by
Jérémy
Jérémy is a Fullstack Developer and Web Scraping Expert. He has contributed to various projects by designing and scaling their data collection processes. Since his early years, his passion for computer science has driven him to explore and push the limits of digital systems.
:format(webp))
:format(webp))
Read more

How to customize Your User-Agent with Python Requests
Learn how to update and rotate user-agents in Python Requests to avoid detection and improve scraping efficiency.

How to Set Up SOCKS5 Proxy in Chrome: Ultimate Guide
In this tutorial, we’ll show you how to quickly set up a SOCKS5 proxy in the popular web browser Google Chrome

How to Set Up Proxies with Potatso in iOS: Guide
Discover the ultimate Potatso proxy guide! Learn how to set up and configure proxies on your iOS device effortlessly.